
How to Upload Employee Data via Workday
-
- Basic Authentication
- OAuth2.0 Authentication (code grant)
- Workday OAuth2.0 Authentication Set Up
- Crosschq OAuth2.0 Authentication Set Up
- OAuth 2.0 Authentication (JWT)
- Workday OAuth2.0 Authentication Set Up
- Crosschq OAuth2.0 Authentication Set Up
- Setting Up Workday Report
Syncing Your Employee Data Automatically with Workday
Employee .csv files can be synced via an API with your Workday HRIS.
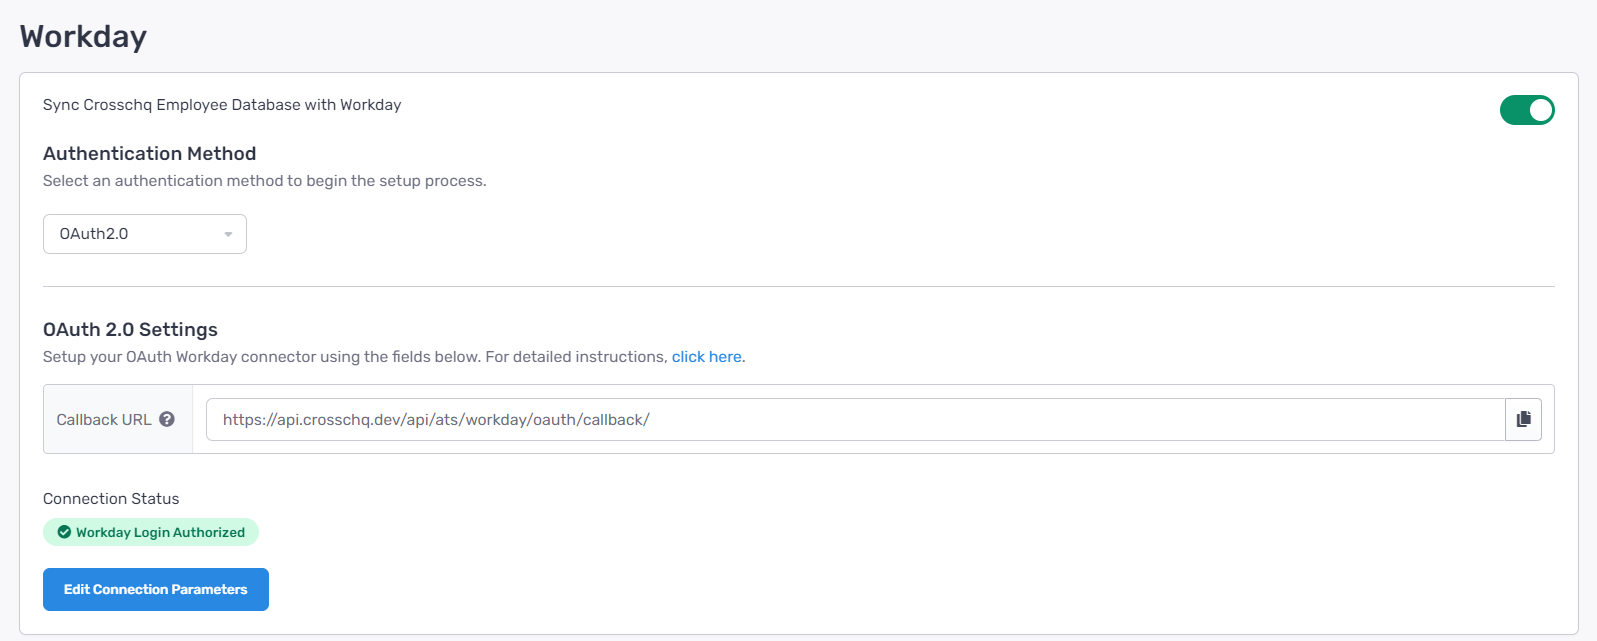
Login to your Crosschq administrator account, then click Organization Settings > Connectors item on the menu. Locate the Workday listing in the main panel, then click the Manage button.
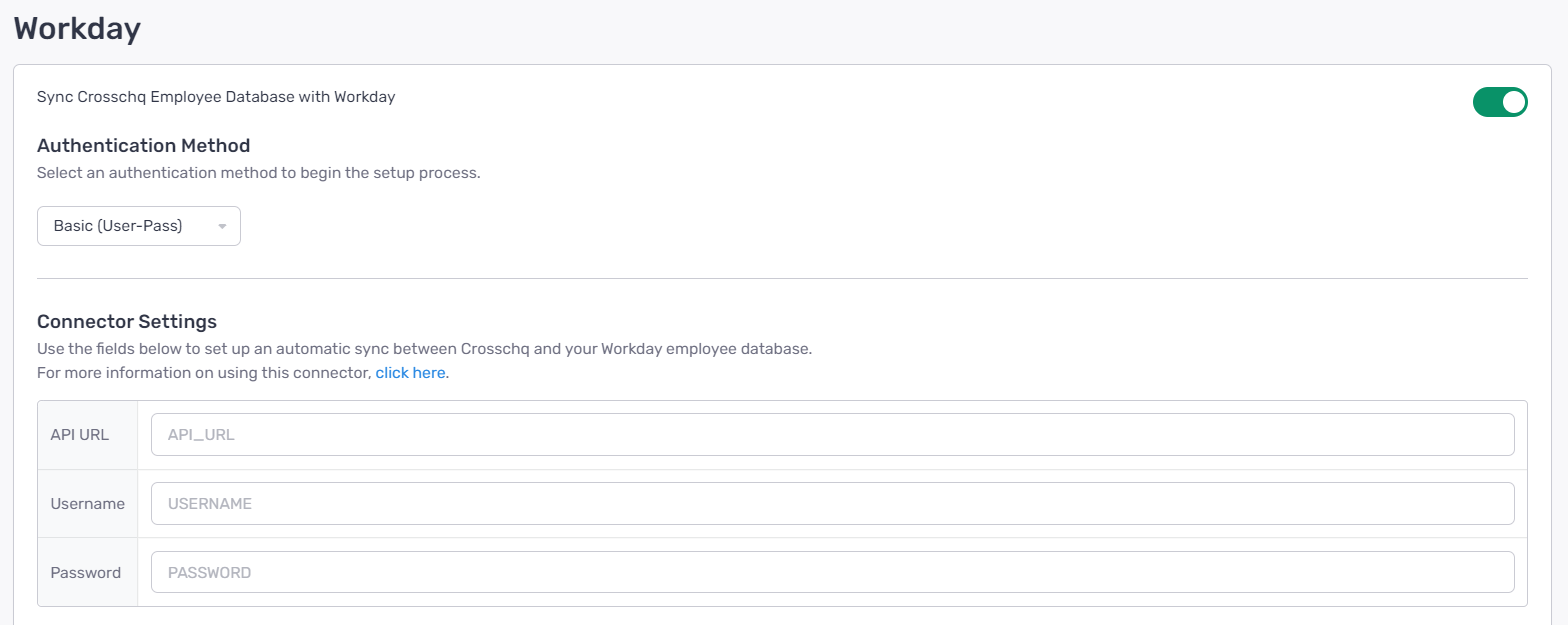
Click the toggle switch so that it turns green to enable the Workday connector.

The Crosschq-Workday connector supports three different authentication Methods.
- Basic (User-Pass)
- OAuth2.0 (Code Grant)
- OAuth2.0 (JWT Bearer Grant)
Basic Authentication
Select the Basic (User-Pass) option within the drop-down menu and enter the appropriate information such as API URL, Username, and Password, then select save changes.
OAuth2.0 Authentication
Workday OAuth2.0 (code grant) Authentication Set Up
Select the OAuth2.0 (Code Grant) option within the drop-down menu and follow the steps below:

OAuth2.0 activation
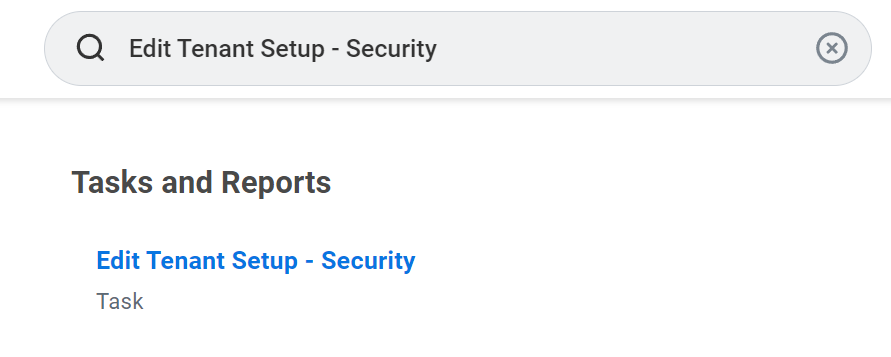
- Within Workday, use the search bar to search for Edit Tenant Setup - Security and access this section.
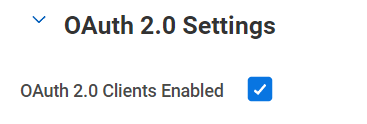
- Scroll down to locate the OAuth 2.0 Settings section and enable the OAuth 2.0 Clients Enabled checkbox. Then click OK to save the changes.
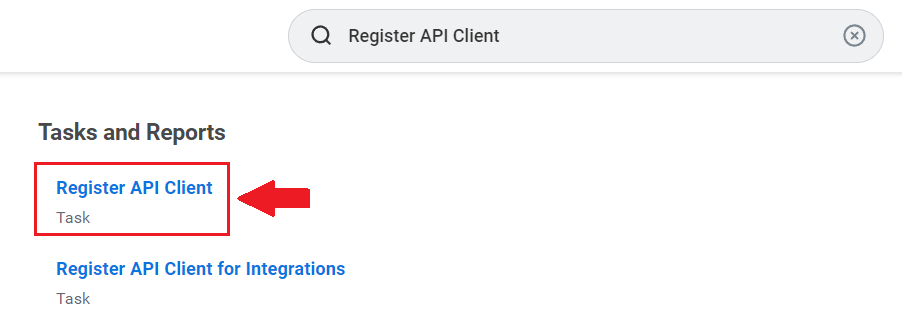
Register API Client
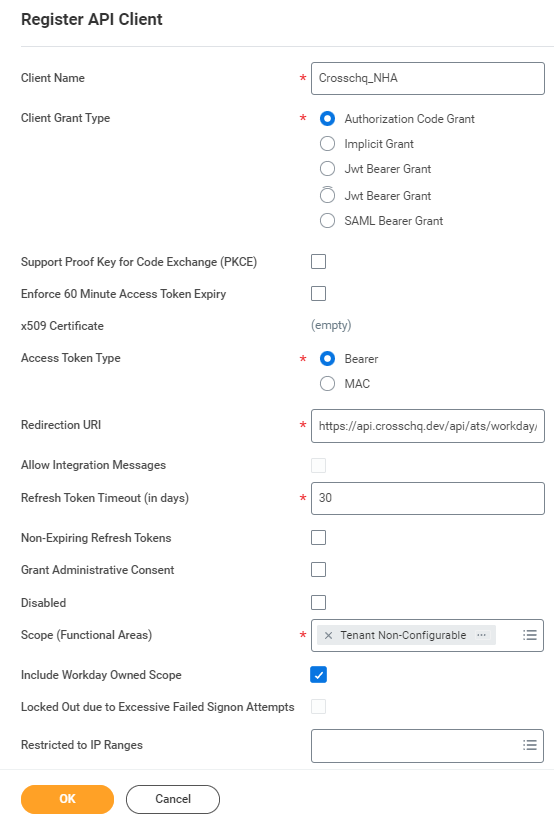
- Search for Register API Client and access this section.
- Modify the following fields:
- Client name: Type the desired name for your API;
- Client Grant Type: Select "Authorization Code Grant";
- Access Token Type: Select Bearer;
- Redirection URL: Paste the Callback URL you will find within the Workday Connector section in Crosschq;
- Scope (Functional Areas): Select Workday REST API > Tenant - Non configurable;
- Include Workday Owned Scope: Enable Checkbox.
After Clicking OK, the following information will show up on the API client page:
- Client ID
- Workday REST API Endpoint
- Token Endpoint
- Authorization Endpoint
Client Secret
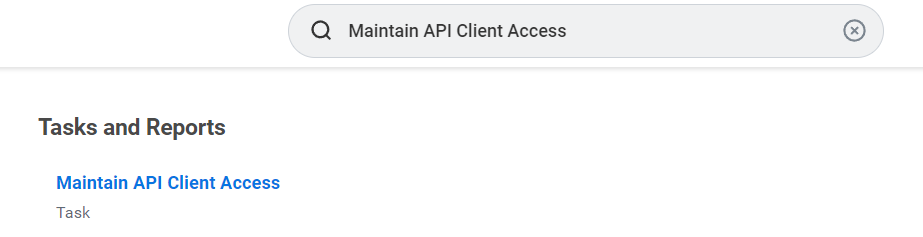
- To generate the client secret key, search for the Maintain API Client Access task and access it.
- Find the API Client you created in the last steps and access it.
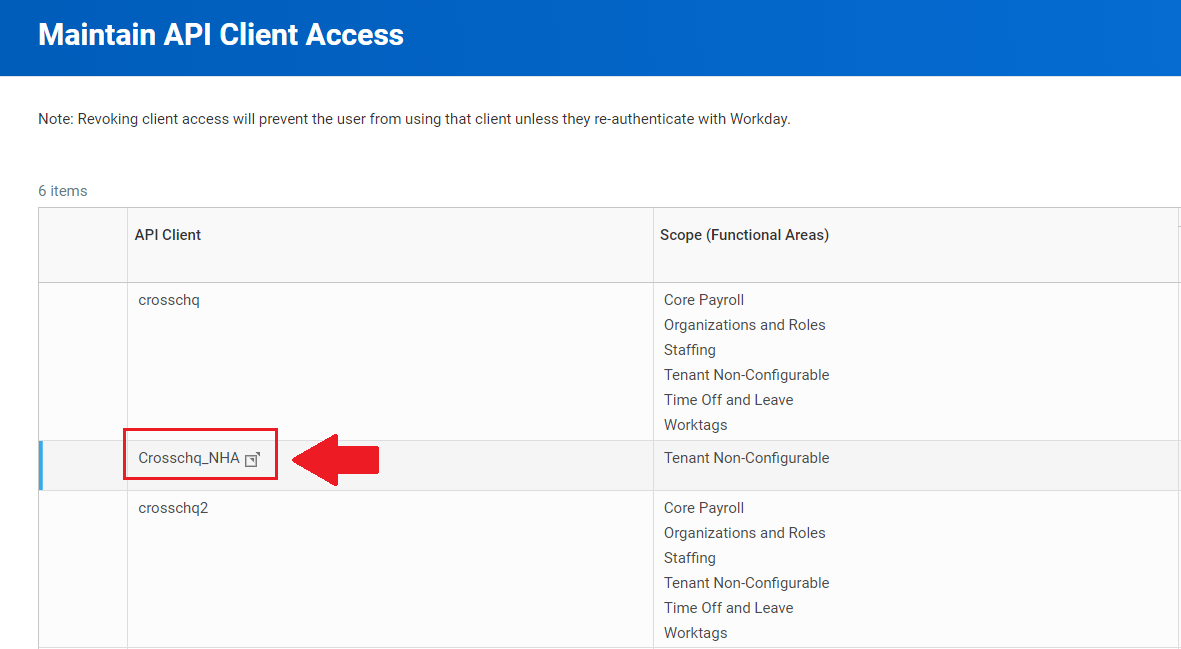
- Click the three dots right to the client's name and follow this route: API Client > Generate New Client Secret.
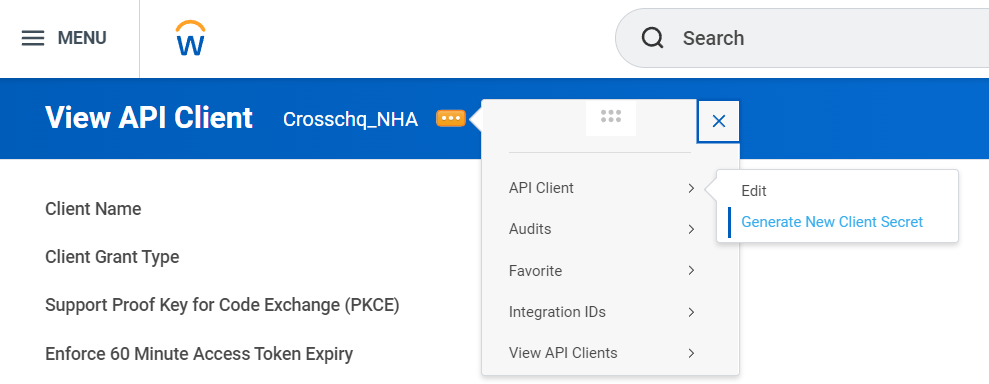
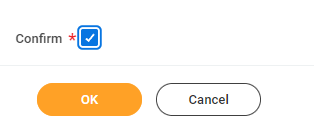
- Scroll down to the bottom of the page and activate the Confirm checkbox. This will create the Secret Key. Then press OK to save the changes.
After Clicking OK, the Secret Key will show up on the API client page, along with the Client ID, Workday REST API Endpoint, Token Endpoint, and Authorization Endpoint.
Important: Copy the secret key and keep it in a safe place as it will only appear once.

Crosschq OAuth2.0 (code grant) Authentication Set Up
Once the last steps are completed, you will have all the information you need to finish the configuration.
- Within the Workday connector section of Crosschq, click the Edit Parameters button.
Then, complete all fields according to the following:
- API URL: Paste the Workday API URL. (if you do not know how to get this URL, please contact Workday support);
- Client ID: Paste the Client ID;
- Client Secret: Paste the Client Secret;
- REST Endpoint: Paste the Workday REST API Endpoint;
- Token Endpoint: Paste the Token Endpoint;
- OAuth Endpoint: Paste the Authorization Endpoint;
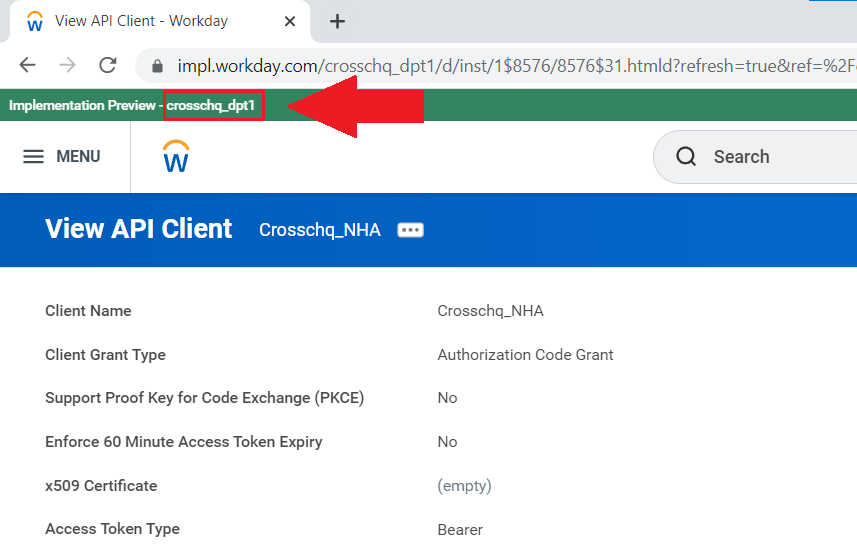
- ATS Tenant: Paste the ATS Tenant tag - this value will show up within the API Client section of Workday, at the top of the page, with a green background. See the image below:
2. Click Save Connection Settings.
3. Sign out of Workday.
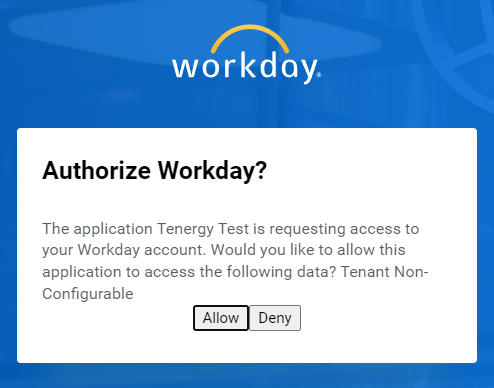
4. Click Authorize Workday Access. You will be redirected to Workday, sign in again and then select Allow.
5. You will see the Workday Login Authorized status in green within Crosschq. If you do not see this status, please contact support@crosschq.com
Workday OAuth2.0 (JWT) Authentication Set Up
Select the OAuth2.0 (JWT) option within the drop-down menu and follow the steps below:

OAuth2.0 activation
- Within Workday, use the search bar to search for Edit Tenant Setup - Security and access this section.
- Scroll down to locate the OAuth 2.0 Settings section and enable the OAuth 2.0 Clients Enabled checkbox. Then click OK to save the changes.
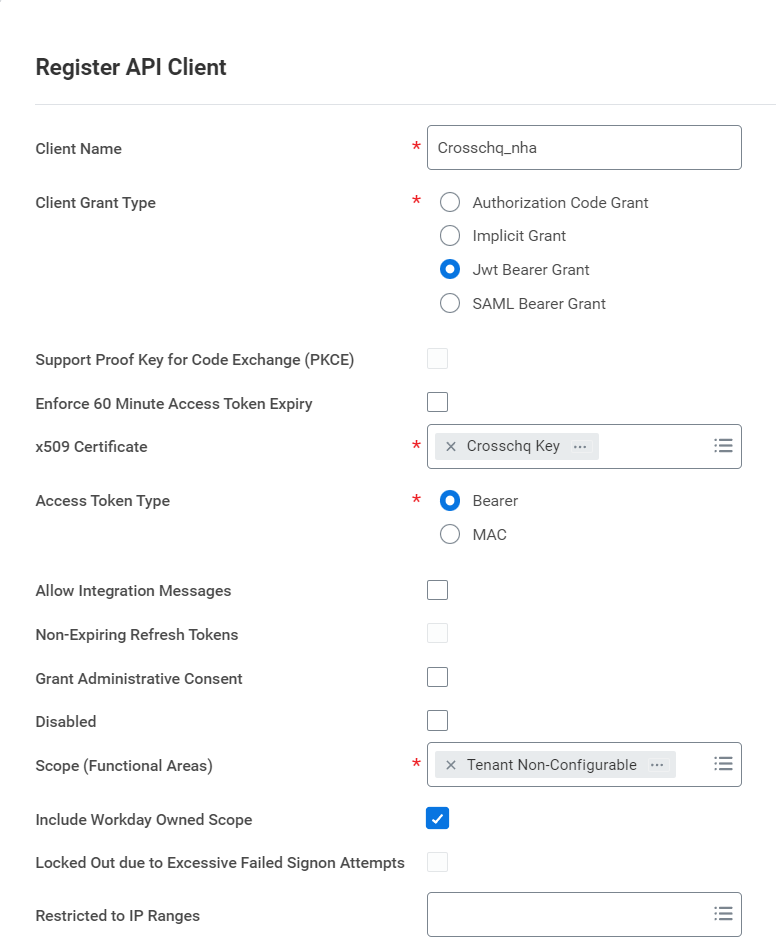
Register API Client
- Search for Register API Client and access this section.
- Modify the following fields:
- Client name: Type the desired name for your API;
- Client Grant Type: Select "Jwt Bearer Grant";
- x509 Certificate: select "Create x509 Public Key", you will be redirected to a different section. There you will see the following fields:
Name: type the desired name for your x509 public key;
Certificate: Paste the Public Key you will find within the Workday Connector section in Crosschq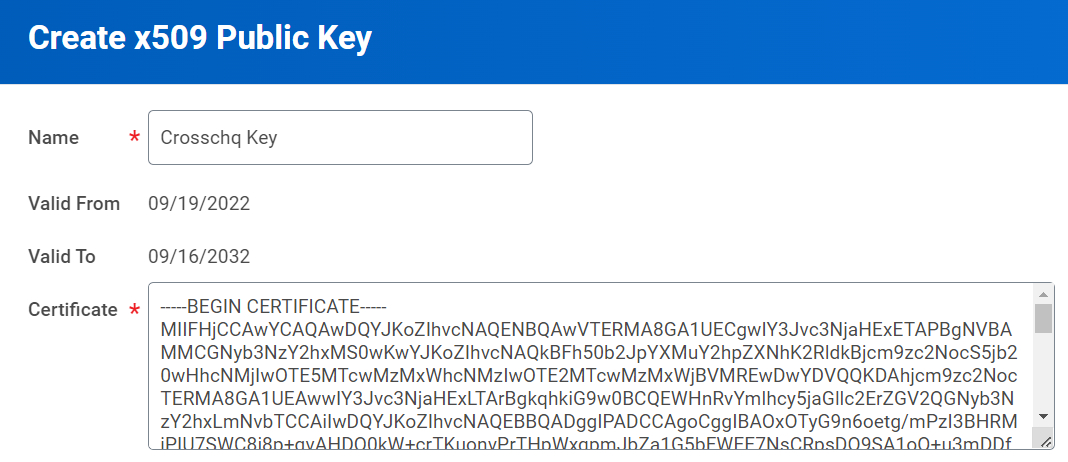
Then, press OK; - Access Token Type: Select Bearer;
- Scope (Functional Areas): Select Workday REST API > Tenant - Non configurable;
- Include Workday Owned Scope: Enable Checkbox.
After Clicking OK, the following information will show up on the API client page:
- Client ID
- Workday REST API Endpoint
- Token Endpoint
- Authorization Endpoint
Crosschq OAuth2.0 (JWT) Authentication Set Up
Once the last steps are completed, you will have all the information you need to finish the configuration.
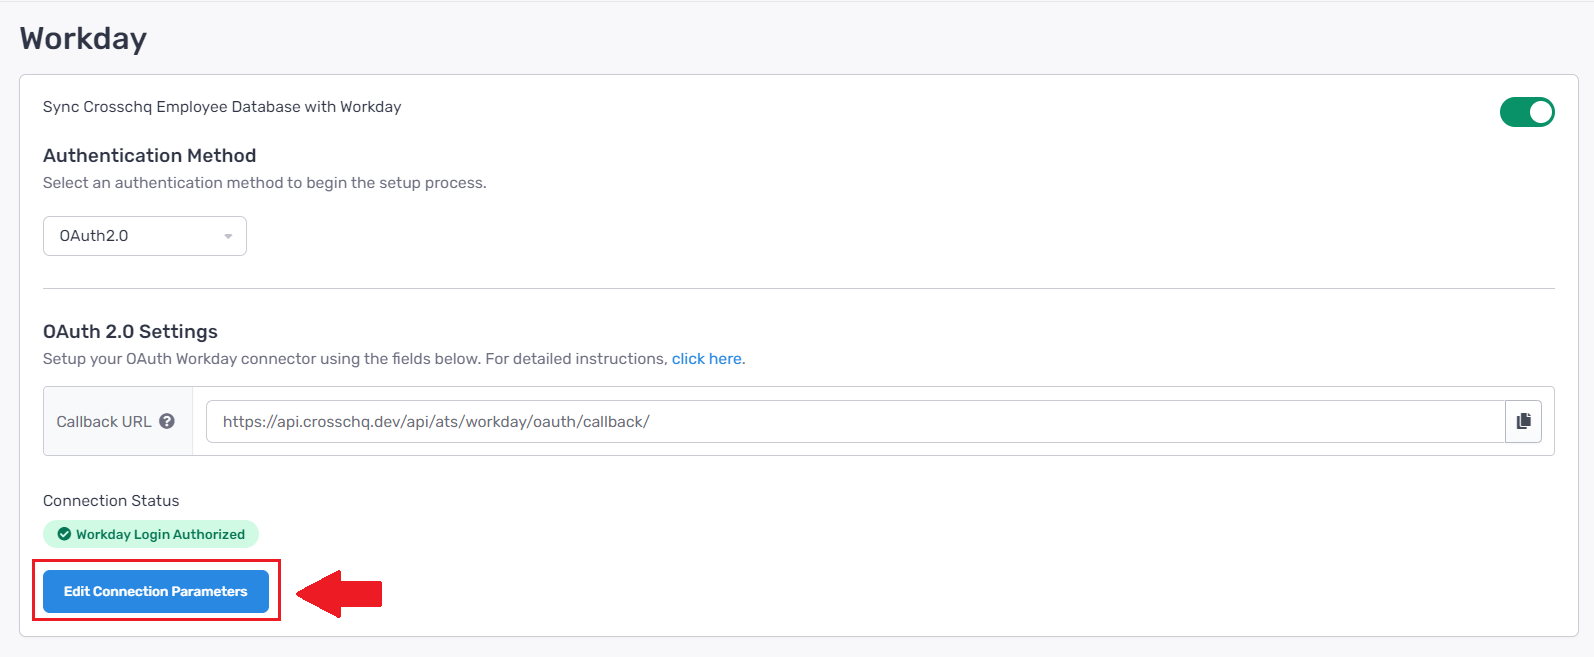
- Within the Workday connector section of Crosschq, click the Edit Connection Parameters button.
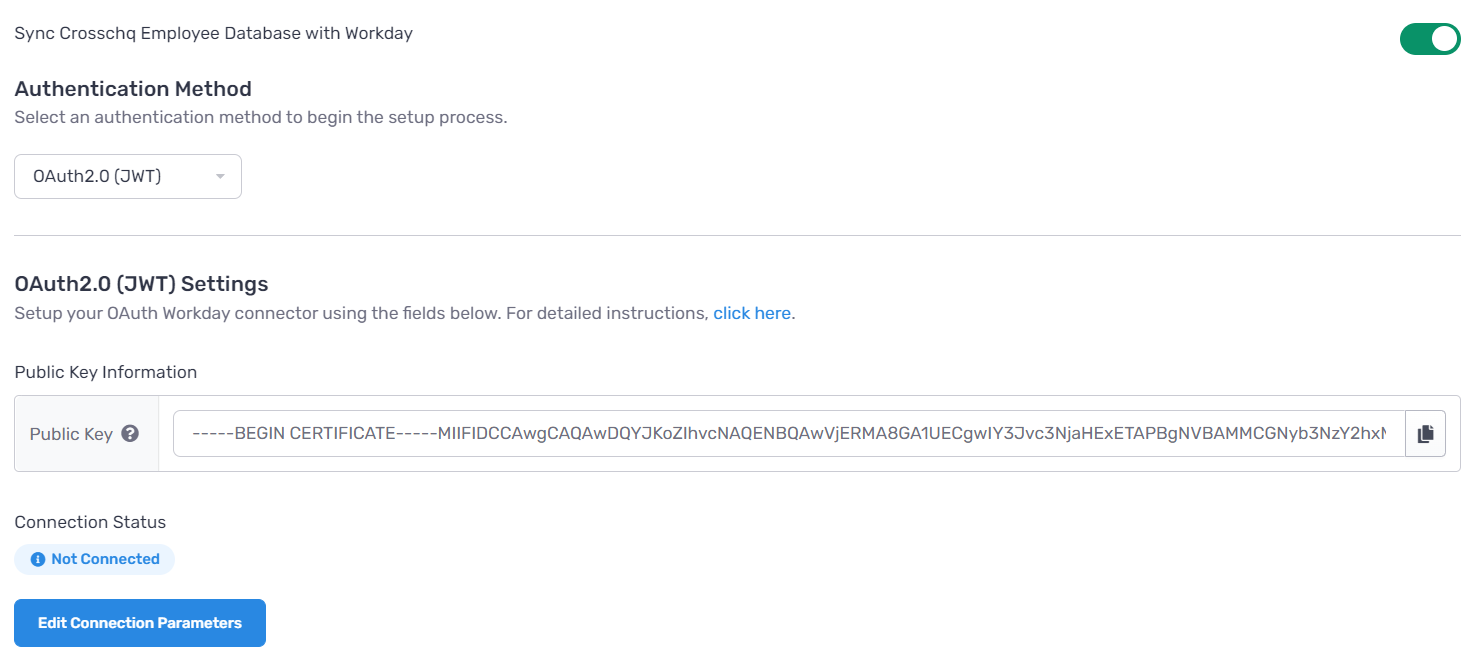
Then, complete all fields according to the following:
- API URL: Paste the Workday API URL. (if you do not know how to get this URL, please contact Workday support);
- Username: review this section to learn how to obtain the username.
- Client ID: Paste the Client ID;
- REST Endpoint: Paste the Workday REST API Endpoint;
- Token Endpoint: Paste the Token Endpoint;
- OAuth Endpoint: Paste the Authorization Endpoint;
- ATS Tenant: Paste the ATS Tenant tag - this value will show up within the API Client section of Workday, at the top of the page, with a green background. See the image below:
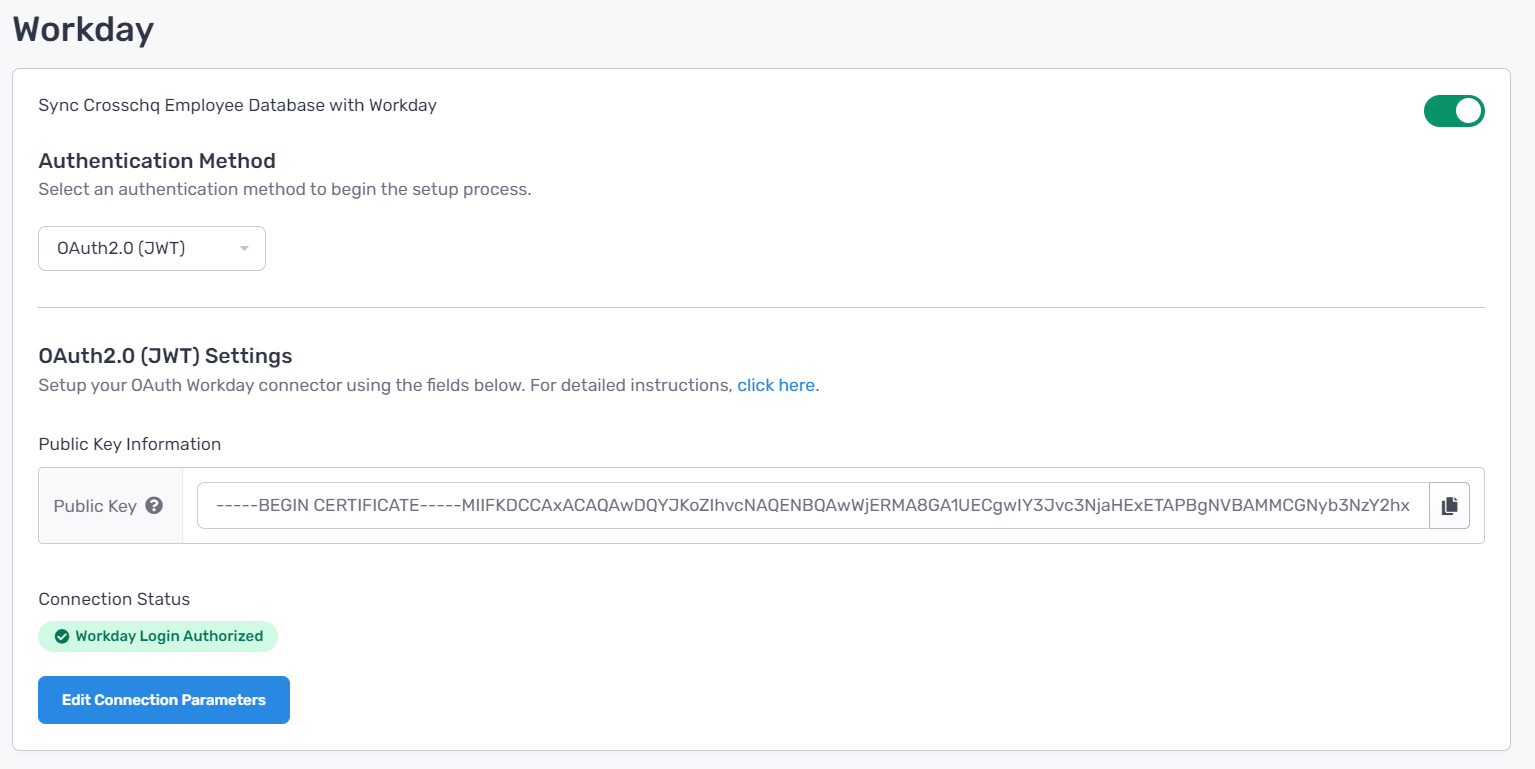
2. Click Save Connection Settings.
3. You will see the Workday Login Authorized status in green within Crosschq. If you do not see this status, please contact support@crosschq.com
Create an Integration System User (ISU)
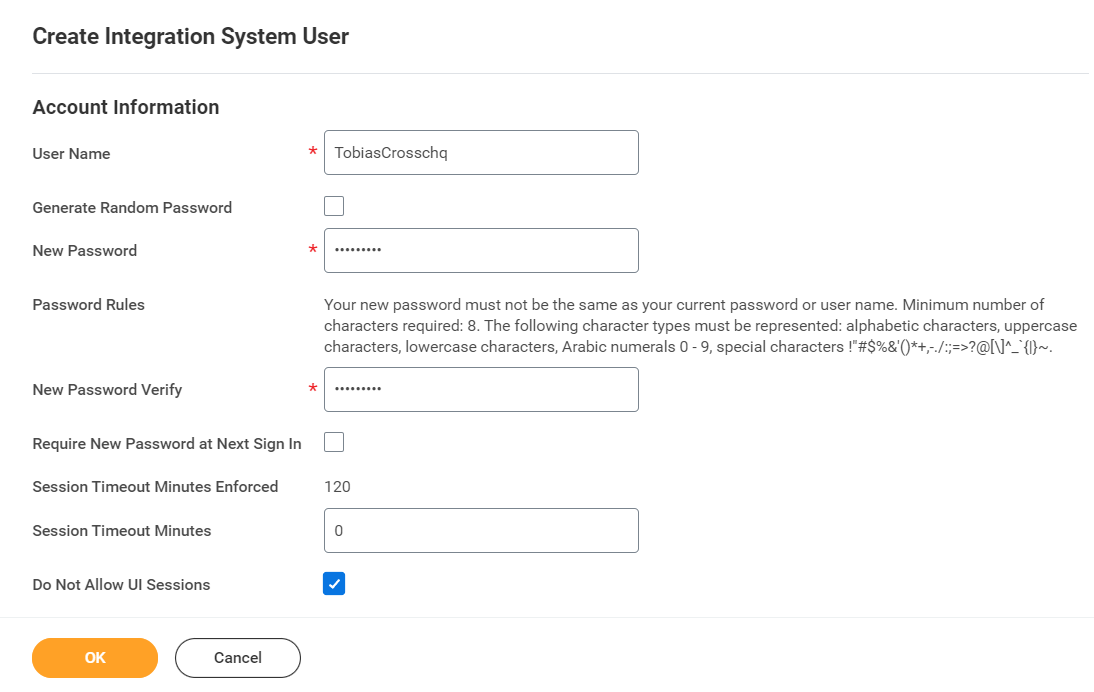
Navigate to the Workday search bar and type: "Create Integration System User" and click the task.
- Add a name to your user;
- Create a password;
- Activate the Do Not Allow UI Sessions checkbox. This box prevents others to log in to the Workday user interface using ISU credentials, the ISU will still be able to use web services/integrations.
Then click Ok.
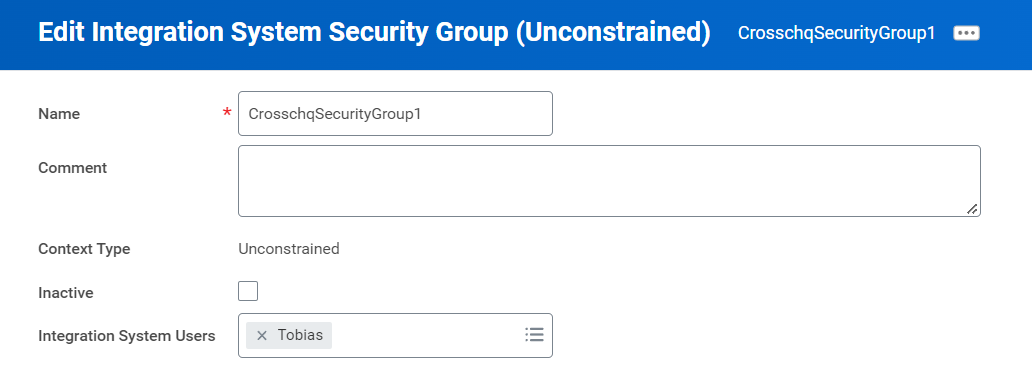
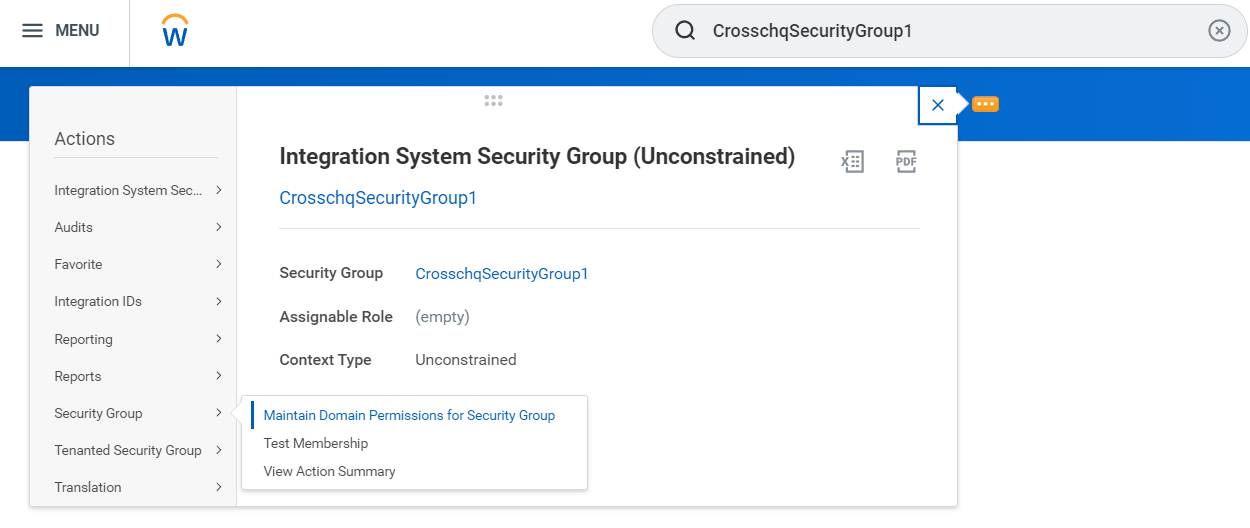
Next, we need to create a security group to assign the ISU to. Go to the search bar, type "Create Security Group" and click the task.
- Name the security group and select Integration System Security Group (Unconstrained) within the Type of Tenanted Security Group field. Click OK.
- On the next screen under Integration System Users select the ISU you previously created and click OK.
Now we need to assign domains to the Security Group.
Navigate to the security group you just created (if you’re unable to locate it, you can search for the name in the search bar, and make sure your search option is “All of Workday” on the left column). Go to the security group’s related actions icon, hover over Security Group and click Maintain Domain Permissions for Security Group.
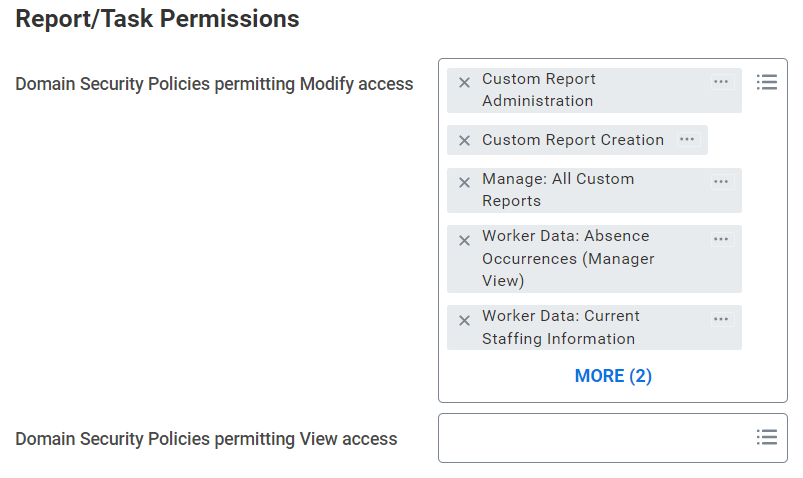
Add the following domains under Domain Security Policies permitting Modify access:
 Custom Report Administration
 Custom Report Creation
 Manage: All Custom Reports
 Worker Data: Absence Occurrences (Manager View)
 Worker Data: Current Staffing Information
 Worker Data: Employment Data
 Worker Data: Organization Information
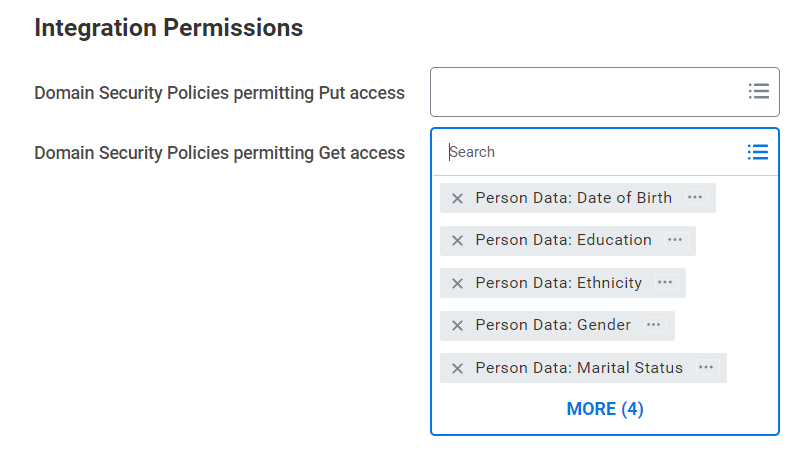
and the following domains under Domain Security Policies permitting Get access:
 Person Data: Date of Birth
 Person Data: Education
 Person Data: Ethnicity
 Person Data: Gender
 Person Data: Marital Status
 Person Data: Work Contact Information
 Person Data: Work Phone
 Worker Data: Worker ID
 Worker Position: View
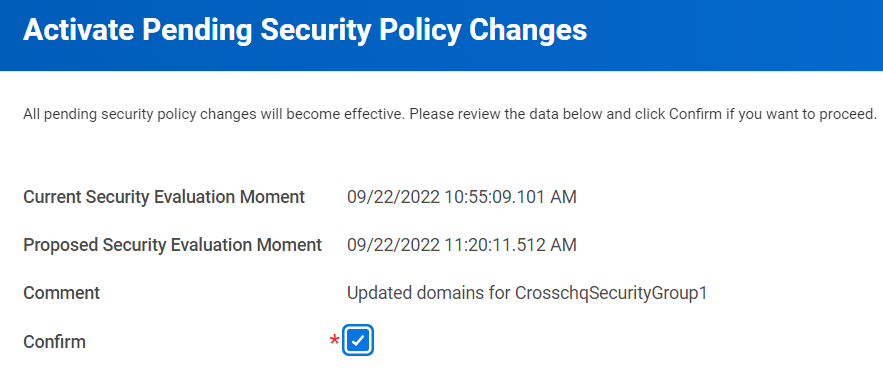
Click OK and then click Done.
Once the domains are added, we need to confirm the changes. Go to the search bar and type "Activate Pending Security Policy Changes" and click the task.
Add any comments you have, click OK, check the confirm box, and click OK again.
Next, navigate back to Crosschq and type the name of the ISU in the username field, and continue with the Crosschq OAuth2.0 (JWT) Authentication Set Up.
Setting Up Workday
Follow these steps to enable the integration within Workday:
Step 1: Create a custom Workday report
Create a custom JSON report in Workday that has your required fields and includes active and terminated workers.
The custom report must:- Include all required fields and include active and terminated workers.
- Have "web services enabled" so that Crosschq can successfully communicate with the Workday Reports-as-a-Service API.
- Be in JSON format.
- Have a report owner with appropriate permissions to access all demographics that appear in the report.
- At a minimum, include the following fields:
- First Name (firstName)
- Last Name (lastName)
- Email (Email_-_Primary_Work_or_Primary_Home)
- Hire Date (Hire_Date)
- Termination Date (termination_date)
- Termination Reason (Termination_Reason)
- Regrettable termination (termination_regrettable)
- Employee_ID
- Manager_ID
- Job Title (Job_Title)
- Termination Primary (termination_primary)
- You can also include:
- Date of Birth (dateOfBirth)
- Marital_Status = Married (Marital_Status___Married)
- Mobile Phone (Mobile_Phone_Number_with_Country_Code)
- Recruiter (Recruiter)
- Division (Division)
- Employee Type (Employee_Type)
- Time Type (Time_Type)
- Pay Rate Type (Pay_Rate_Type)
- Gender (Gender)
- Ethnicity Code (Ethnicity_Code)
-
Comment start Source (Source)
-
Education (Education)
Step 2: Generate Report Credentials
- Workday report information is pulled into Crosschq in JSON format. The following credentials need to be pulled from your Workday report to successfully initiate the Connector with Crosschq:
URL in JSON format. Note the end of the URL specifies the report format. Example:
https://wd5-impl-services1.workday.com/ccx/service/customreport/exam/12345/Example_Crosschq?format=json
- Username (Connector user name, not email) to access report
- Password to access report
- This process will likely require working with your IT team and/or a Workday technical representative.