Crosschq will retrieve your employee data through a Workday report. This article is organized into three key sections:
- Workday Report Setup: In this section, you will discover the essential and recommended fields to include in your report.
- Workday Report Credentials: Here, you will learn about the three different methods available for granting Crosschq access to your report:
- Basic Authentication
- OAuth 2.0 authentication (Vía Code Grant)
- OAuth 2.0 authentication (Vía JWT)
- Data Mapping and Sync Settings: This is the last step of the integration, in here you will map the fields in your Workday report with the fields in the Crosschq database.
Note: If you want to activate the Voice integration and have already integrated your Workday report with Crosschq, please scroll directly to the bottom of the article.
Let's get started...
Workday Report Setup
To begin, the first task is to generate a custom JSON report within the Workday platform.
The report must:
- Have "web services enabled" so that Crosschq can successfully communicate with the Workday Reports-as-a-Service API.
- Be in JSON format.
- At a minimum, include the following field:
- Employee Email Address
- Start Date
- Termination Date
- You can also include:
- First Name
- Last Name
-
- Termination Reason
- Termination Disposition
- Employee ID
- Manager ID
- Manager Email Address
- Manager Name
- Job Title
- Termination Type
- Date of Birth
- Marital Status
- Personal Email
- Personal Phone Number
- Recruiter
- Division
- Employee Type
- Time Type
- Pay Rate Type
- Gender
- Ethnicity Code
- Comment start Source
- Education
You can also add any other fields you think will be needed to slice and dice your data within Insights.
After configuring your report, the next step involves establishing the necessary credentials for Crosschq to access the report. This process may require collaboration with your IT team and/or a representative from Workday for technical assistance.Workday Report Credentials
This section provides a detailed guide on how to configure the three available methods for granting Crosschq access to your Workday report.
Before jumping into the authentication method, open Crosschq in a new tab and go to Organization Settings > Connectors > Workday HCM.

Now, click on the redirection links for the authentication methods listed above to smoothly navigate to your preferred authentication option.
Option 1: Basic Authentication
Under Authentication Method, select the Basic (User-Pass) option and enter the Report URL, Username, and Password from Workday.
Keep in mind that the specified user must hold the role of report owner and possess the necessary permissions to access all data included in the report, such as demographic information, termination details, etc.

Next, click Test Credentials. If the credentials are working fine, the next section called "Data Mapping" will be available and you will see the Connected status in green within Crosschq. If you do not see this status, please contact support@crosschq.com.

Now you can jump to the following step: Data Mapping and Sync Settings.
Option 2: OAuth 2.0 authentication (Vía Code Grant)
This method provides a more secure way for Crosschq to access your information compared to Basic Authentication.
To begin the configuration, go to the Workday settings in Crosschq and select the Oauth 2.0 (Code Grant) option.

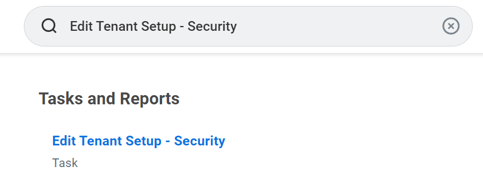
Now navigate to your Workday instance on a separate tab to set up the authentication on the Workday side.
Use the search bar to search for Edit Tenant Setup - Security.
Access the task, scroll down to locate the OAuth 2.0 Settings section, and check the OAuth 2.0 Clients Enabled box.
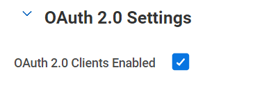
Click OK to save the changes. This will enable the OAuth 2.0 authentication method.
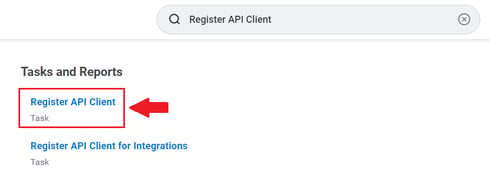
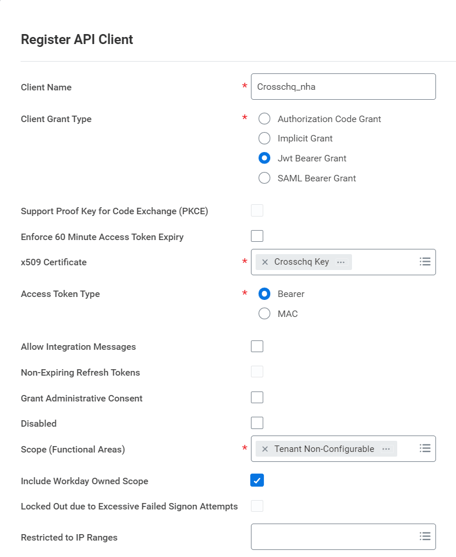
Next, search for Register API Client and access this section. Here you will generate the specific API that Crosschq will use to access your Workday Report.
Configure the following fields:
- Client name: Type the desired name for your API;
- Client Grant Type: Select "Authorization Code Grant";
- Access Token Type: Select Bearer;
- Redirection URL: Paste the Callback URL you will find within the Workday Connector section in Crosschq;
- Scope (Functional Areas): Select Workday REST API > Tenant - Non configurable;
- Include Workday Owned Scope: Enable Checkbox.

Click OK to save the changes. After Clicking OK, the following information will show up on the API client page:
- Client ID
- Workday REST API Endpoint
- Token Endpoint
- Authorization Endpoint
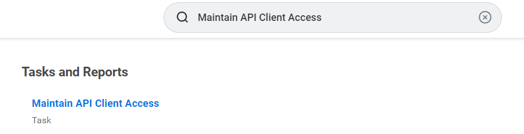
The last step of this authentication method is to generate a Client Secret. Search for the Maintain API Client Access task.
Within the task, locate the API Client you created in the last step and access it.
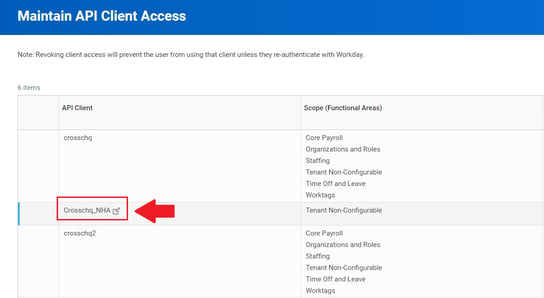
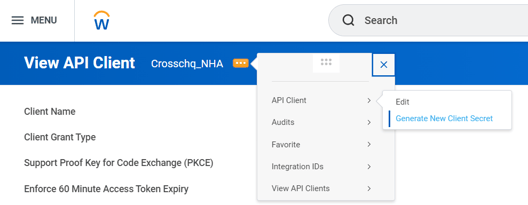
Click the three dots right to the client's name and follow this route: API Client > Generate New Client Secret.
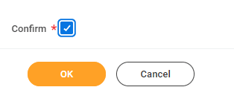
Scroll down to the bottom of the page and activate the Confirm checkbox. This will create the Secret Key. Then press OK to save the changes.
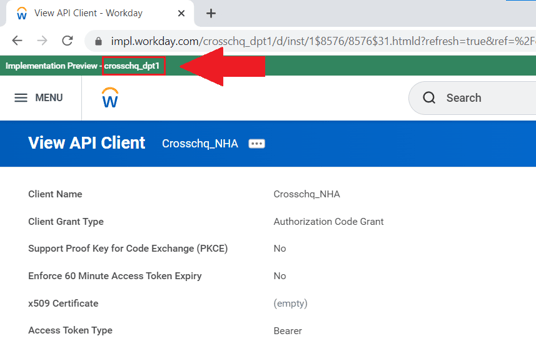
After Clicking OK, the Secret Key will show up on the API client page, along with the Client ID, Workday REST API Endpoint, Token Endpoint, and Authorization Endpoint.
Make sure to save the Secret Key, as it will only appear once.

With the completion of the steps in Workday, you will now have all the necessary information to enter into Crosschq to finalize the integration process.
Navigate back to Crosschq and enter all the data requested:

- Report URL: Paste the Workday Report URL. (if you do not know how to get this URL, please contact Workday support);
- Client ID: Paste the Client ID;
- Client Secret: Paste the Client Secret;
- REST Endpoint: Paste the Workday REST API Endpoint;
- Token Endpoint: Paste the Token Endpoint;
- OAuth Endpoint: Paste the Authorization Endpoint;
- Tenant: Paste the Tenant tag - this value will show up within the API Client section of Workday, at the top of the page, with a green background. See the image below:
Before you click "Test Credentials," we recommend logging out of your Workday account. This step helps ensure a smooth experience, as you'll be redirected to Workday from Crosschq and will need to sign in again to continue.
Now click Test Credentials and allow Crosschq to access Workday:
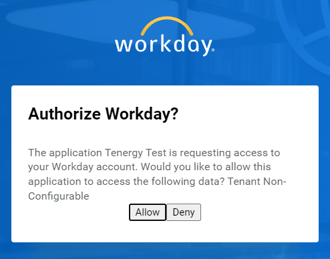
You will see the Connected status in green within Crosschq. If you do not see this status, please contact support@crosschq.com.
Now you can jump to the following step: Data Mapping and Sync Settings.
Option 2: OAuth 2.0 authentication (Vía JWT)
This method provides a more secure way for Crosschq to access your information compared to Basic Authentication. Unlike the Code Grant method, the JWT method uses a specific user to access the report. One of the final steps in this section will guide you through creating an Integration System User.
To begin the configuration, go to the Workday settings in Crosschq and select the Oauth 2.0 (JWT) option.

Now navigate to your Workday instance on a separate tab to set up the authentication on the Workday side.
Use the search bar to search for Edit Tenant Setup - Security.
Access the task, scroll down to locate the OAuth 2.0 Settings section, and check the OAuth 2.0 Clients Enabled box.
Click OK to save the changes. This will enable the OAuth 2.0 authentication method.
Next, search for Register API Client and access this section. Here you will generate the specific API that Crosschq will use to access your Workday Report.
Configure the following fields:
- Client name: Type the desired name for your API;
- Client Grant Type: Select "Jwt Bearer Grant";
- x509 Certificate: select "Create x509 Public Key". You will be redirected to a different section. There you will see the following fields:
- Name: type the desired name for your x509 public key;
- Certificate: Paste the Public Key you will find within the Workday Connector section in Crosschq.

Then, press OK;
- Access Token Type: Select Bearer;
- Scope (Functional Areas): Select Workday REST API > Tenant - Non configurable;
- Include Workday Owned Scope: Enable Checkbox.
Click OK to save the changes. After Clicking OK, the following information will show up on the API client page:
- Client ID
- Workday REST API Endpoint
- Token Endpoint
- Authorization Endpoint
The next and last step is to create an Integration System User (ISU) that Crosschq will use to access your information in Workday.
Search for Create Integration System User and access the task.

- Add a name to your user;
- Create a password;
- Activate the Do Not Allow UI Sessions checkbox. This box prevents others to log in to the Workday user interface using ISU credentials, the ISU will still be able to use web services/integrations.
Then click Ok.

Next, you need create a security group for the Integration System User (ISU). Simply enter Create Security Group in the search bar and select the corresponding task to continue.

- Name the security group and select Integration System Security Group (Unconstrained) within the Type of Tenanted Security Group field. Click OK.
- On the next screen under Integration System Users select the ISU you previously created and click OK.

Now you need to assign domains to the Security Group. Navigate to the security group you just created (if you’re unable to locate it, you can search for the name in the search bar, and make sure your search option is “All of Workday” on the left column).
Go to the security group’s related actions icon, hover over Security Group, and click Maintain Domain Permissions for Security Group.

In here you will provide the specific permissions for Crosschq to access the information in the report.
The following permissions are mandatory for Crosschq to access the report data and must be added within Domain Security Policies permitting Modify access:
Worker Data: Current Staffing Information

The following permissions are recommended. You can add them within Domain Security Policies permitting Modify access:
If you do not provide these permissions, the report will work, but Crosschq will only be able to access the columns available for Worker Data: Current Staffing Information permissions.
Worker Data: Employment Data
Worker Data: Organization Information

The following permissions are suggested and will be needed depending on the information you have added to your report. Granting these suggested permissions allows us to include more comprehensive data in the report. You should add these permissions within Domain Security Policies permitting Get access:
Person Data: Date of Birth
Person Data: Education
Person Data: Ethnicity
Person Data: Gender
Person Data: Marital Status
Person Data: Work Contact Information
Person Data: Work Phone
Worker Data: Worker ID
Worker Position: View

Once the domains are added, we need to confirm the changes. Go to the search bar and type "Activate Pending Security Policy Changes" and click the task.
Add any comments you have, click OK, check the confirm box, and click OK again.

With the completion of the steps in Workday, you will now have all the necessary information to enter into Crosschq to finalize the integration process.
Navigate back to Crosschq and enter all the data requested:

- Report URL: Paste the Workday Report URL. (if you do not know how to get this URL, please contact Workday support);
- Username: the username of the Integration System User (ISU);
- Client ID: Paste the Client ID;
- REST Endpoint: Paste the Workday REST API Endpoint;
- Token Endpoint: Paste the Token Endpoint;
- OAuth Endpoint: Paste the Authorization Endpoint;
- Tenant: Paste the Tenant tag - this value will show up within the API Client section of Workday, at the top of the page, with a green background. See the image below:
Next, click Test Credentials. If the credentials are working fine, the next section called "Data Mapping" will be available and you will see the Connected status in green within Crosschq. If you do not see this status, please contact support@crosschq.com.
Now you can jump to the following step: Data Mapping and Sync Settings.
Data Mapping and Sync Settings
After setting up the authentication method, the Data Mapping section will be available. In here you can map your fields in the Workday report with the fields in Crosschq.

Select edit mapping. Each column from your Workday Report will be displayed on the left side, while the corresponding fields within the Crosschq Intelligence Cloud will appear on the right side.
Crosschq will attempt to automatically match the fields from your report to the corresponding fields in the Crosschq Intelligence Cloud. If any fields cannot be matched automatically, a yellow warning will appear, prompting you to perform a manual match.

Utilize the dropdown menus to either select an existing field from the Crosschq database or to create a custom field directly within the same menu.

If you have any extra fields in your report that you prefer not to include in the upload, you can easily exclude them by unchecking the corresponding checkbox:

After you have mapped all your fields, click on Confirm and Sync Data. This action will initiate the synchronization process, allowing your data from Workday to seamlessly transfer into Crosschq.
The Sync Settings section will become available.

Clear existing database values when encountering a blank Workday field
This setting determines how the importer should treat any blank fields present in your report. If this option is turned off, Crosschq will disregard records that contain empty fields. Conversely, if enabled, Crosschq will remove the data from the corresponding field in the current database.
Remove existing records and replace with data from Workday
When this option is enabled, the current employee database in Crosschq will be completely replaced each time a synchronization is performed.
Crosschq Voice set up
To initiate Voice campaigns based on the Hire or Start date of your employees in Workday, you must first complete the prerequisite steps outlined above, which include creating a report and enabling Crosschq's access to that report.
If you have already completed these steps, you can activate the Voice integration by navigating to Organization Settings > Connectors > Workday HCM. Once there, scroll down to the App Settings section, where you will find the option to toggle Voice on.
