![Crosschq Logo 534x115.png]](https://support.crosschq.com/hs-fs/hubfs/Crosschq%20Logo%20534x115.png?height=40&name=Crosschq%20Logo%20534x115.png)
Connecting your Microsoft 365 tenant brings Crosschq into your Microsoft Teams interviews. You can use it in two ways:
- Crosschq Interview Assistant in any meeting: Interviewers add the Crosschq Interview Assistant app to any Teams meeting, including meetings your team already schedules, and see the interview guide and scorecard inside the meeting.
- Automatic meeting creation (optional): Crosschq also creates a Teams meeting for each interview your team schedules with a human interviewer, and sends the link to the candidate and the interviewers in their scheduling emails. Candidates do not need a Microsoft account to join.
In This Article
- Which Setup Do You Need?
- Prerequisites
- What You Are Approving
- Setting Up the Connection
- Verifying the Setup
- Using Crosschq Interview in Microsoft Teams
- Changing or Removing the Connection
- Troubleshooting
Which Setup Do You Need?
You do not need to create an app registration or a client secret. Crosschq provides the app, and you approve it.
Prerequisites
You need:
- A Crosschq Organization admin to run the setup in Crosschq.
- A Microsoft 365 Global Administrator or Privileged Role Administrator to approve the Crosschq app for your tenant. Application Administrator and Cloud Application Administrator roles cannot approve it.
- A Microsoft Teams administrator to approve Crosschq Interview Assistant and, for automatic meeting creation, run one PowerShell script. This can be the same person.
For automatic meeting creation only:
- An organizer mailbox: A user in your tenant that owns every meeting Crosschq creates, for example
interviews@yourcompany.com. We recommend a dedicated service or shared mailbox with a Microsoft 365 license that includes Teams. - The Microsoft Teams PowerShell module on the computer that runs the script.
What You Are Approving
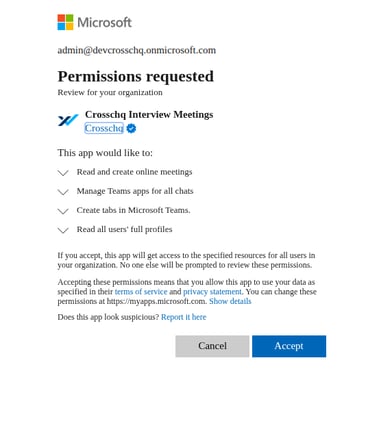
The Microsoft consent screen lists the app as Crosschq Interview Meetings, published by Crosschq with a verified badge. It requests these Microsoft Graph application permissions:
Microsoft only allows an app to create meetings for a user who has been granted an application access policy for that app. The PowerShell script in Step 4 grants this policy to your organizer mailbox only, so Crosschq can create meetings as that one user and no one else.
Setting Up the Connection
Step 1: Open the Microsoft Teams Meetings Card
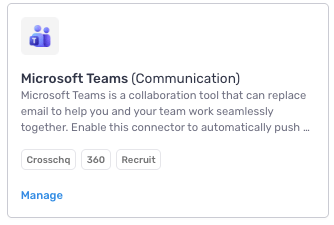
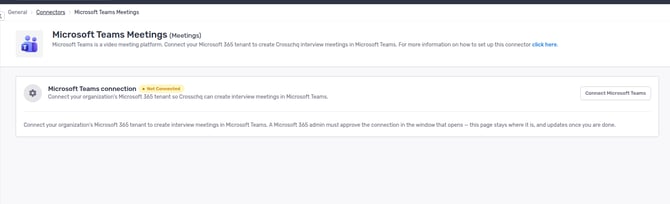
In Crosschq, go to Settings > General > Connectors. Find Microsoft Teams Meetings and click Manage.
Step 2: Approve the Crosschq App
- Click Connect Microsoft Teams. A Microsoft window opens. If your browser blocks pop-ups, the current tab goes to Microsoft instead.
- Sign in as a Global Administrator or Privileged Role Administrator.
- Review the permissions and click Accept.
The window shows Microsoft Teams connected, and the card in Crosschq updates on its own.
The connection link expires after 15 minutes. If it expires, click Connect Microsoft Teams again.
Steps 3 to 5 set up automatic meeting creation. If you only want to use Crosschq Interview Assistant in your own meetings, skip to Step 6.
Step 3 (Optional): Choose the Organizer Mailbox
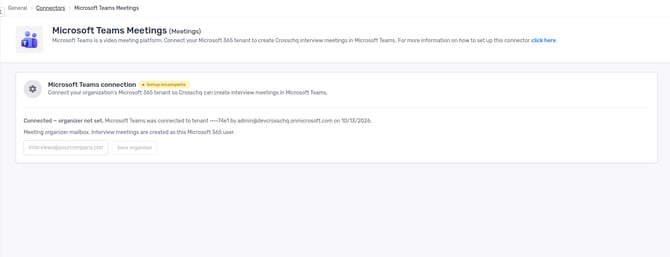
In Meeting organizer mailbox, enter the organizer's email address and click Save organizer. Crosschq checks that the mailbox exists in your tenant.
Step 4 (Optional): Run the Access Policy Script
- The card shows a PowerShell script for your organizer. Read the notice Have someone review this script before running it.
- Select I have reviewed this script and understand what it changes. The Copy command button unlocks.
- If you do not have the Microsoft Teams PowerShell module yet, run
Install-Module MicrosoftTeams -Scope CurrentUseronce. - Click Copy command, paste the script into PowerShell, and sign in as a Teams administrator when asked.
- Back in Crosschq, click Verify.
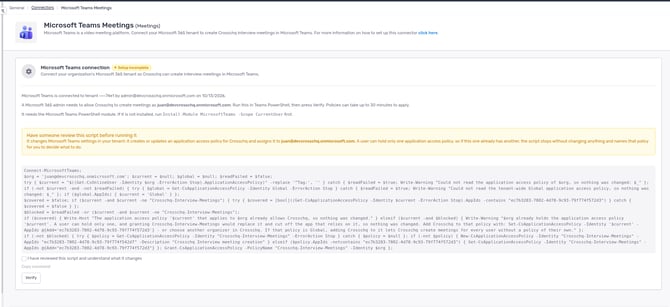
Microsoft can take up to 30 minutes to apply the policy. If Verify says the policy is not applied yet, wait and try again.
What the script changes: It creates an application access policy named Crosschq-Interview-Meetings, or adds Crosschq to that policy if it already exists, and grants the policy to the organizer mailbox. It changes nothing else, and it is safe to run again.
When the script stops without changing anything:
- The organizer already has another app's policy: A user can hold only one application access policy, so granting Crosschq's policy would cut off the other app. The script names the existing policy and prints the command that adds Crosschq to it. You can run that command or choose a different organizer mailbox in Crosschq.
- Your tenant-wide Global policy applies to the organizer: Adding Crosschq to the Global policy would let Crosschq create meetings for every user without a policy of their own. We recommend using a dedicated organizer mailbox instead.
- The script cannot read the current policy: Sign in again as a Teams administrator and run the script again.
- Crosschq is already allowed: The script says so. Click Verify.
Step 5 (Optional): Turn On Automatic Meeting Creation
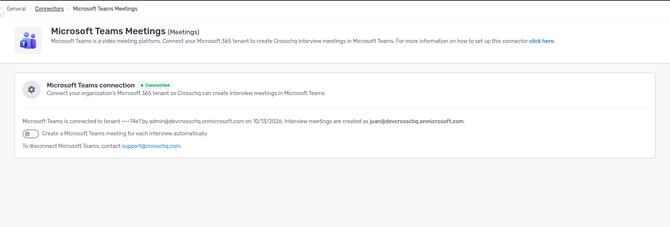
Turn on Create a Microsoft Teams meeting for each interview automatically. The card shows Connected.
Step 6: Make Crosschq Interview Assistant Available in Teams
- In the Microsoft Teams admin center, go to Teams apps > Manage apps. Find Crosschq Interview Assistant and confirm its status is Allowed.
- Go to Teams apps > Permission policies and confirm the policy assigned to your interviewers allows Crosschq Interview Assistant.
- Optional: Go to Teams apps > Setup policies to pin the app for your interviewers.
Policy changes can take up to 24 hours to reach every user.
Two Crosschq apps are involved. Crosschq Interview Meetings is the app approved on the Microsoft consent screen in Step 2. Crosschq Interview Assistant is the app interviewers add inside Teams meetings, approved in the Teams admin center in this step.
Verifying the Setup
- Crosschq Interview Assistant: As an interviewer, add Crosschq Interview Assistant to a test meeting. Confirm the panel shows your upcoming interviews and opens the one that matches the meeting.
- Automatic meeting creation: Schedule an interview with a human interviewer. Open the interview in Crosschq and confirm it has a Microsoft Teams link, and that the candidate and interviewer emails include it. The Teams meeting is titled Interview: [candidate name] and is owned by your organizer mailbox.
Meeting Options Crosschq Applies
- Only people in your Microsoft organization can present, so only they can admit others from the lobby. The candidate cannot admit anyone.
- Transcription is allowed, and recording does not start automatically.
- Crosschq does not change who waits in the lobby. Your Teams meeting policy decides that. By default, people outside your organization wait until an interviewer admits them.
To change who can present, transcription, automatic recording, the spoken language or meeting chat for your organization, reach out to our Support team.
Using Crosschq Interview in Microsoft Teams
Schedule an Interview
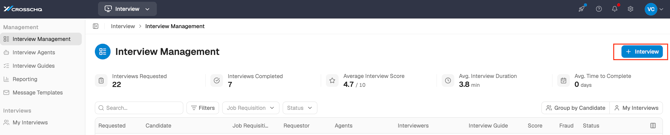
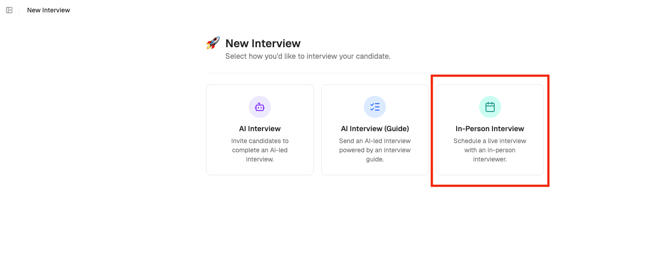
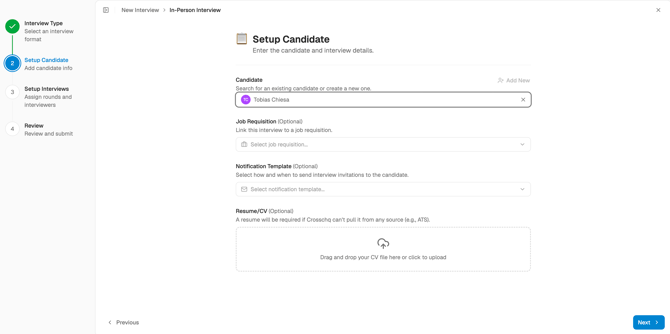
- Go to Interview Management and click + Interview. Select In-Person Interview.
- On the Setup Candidate screen, search for an existing candidate or create a new one. Job Requisition, Notification Template and Resume/CV are optional. Click Next.
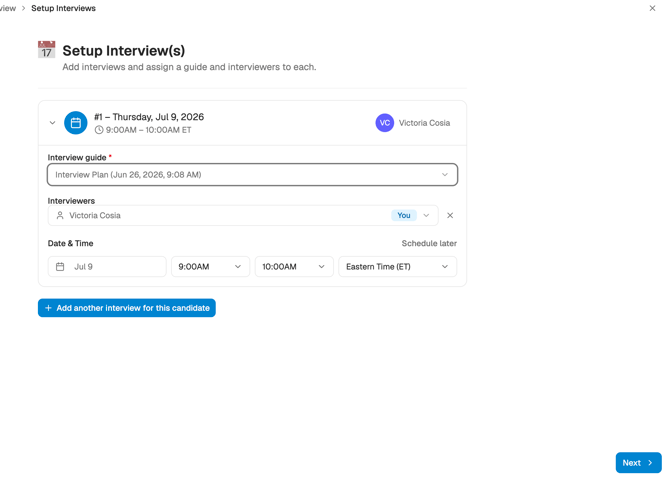
- On the Setup Interview(s) screen, assign an Interview Guide, select the Interviewers and set a Date & Time. Click Next.
- Review the details on the Review & Submit screen and click Schedule Interview.
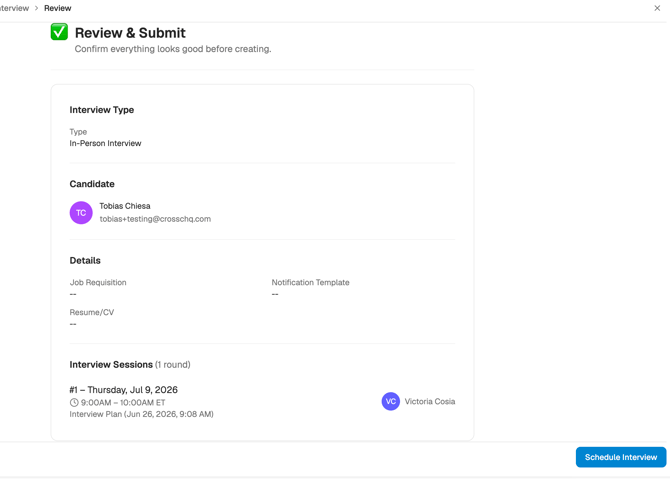
With automatic meeting creation turned on, a Teams meeting is only created when the interview has a date and time. If you select Schedule Later, no Teams meeting is created.
Join the Meeting
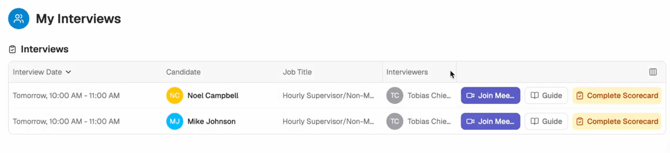
If Crosschq created the meeting, the candidate and the interviewers receive the Teams link in their scheduling emails. The interview also appears in My Interviews with a Join Meeting button. From My Interviews, you can also open the Interview Guide or the Scorecard.
You can also use Crosschq Interview Assistant in a meeting you scheduled yourself in Outlook or Teams.
Use Crosschq Interview Assistant
- In the Teams meeting, open Apps, search for Crosschq Interview Assistant and add it. When Crosschq creates the meeting, the app is already added for you.
- The panel lists your upcoming Crosschq interviews and selects the one that matches the meeting's participants. If it does not select one, choose the interview from the list.
The panel shows:
- Interview questions: The questions from the interview guide, to follow during the conversation.
- Interview scorecard: Add scores and notes for each question directly in Teams. Responses sync to Crosschq in real time.
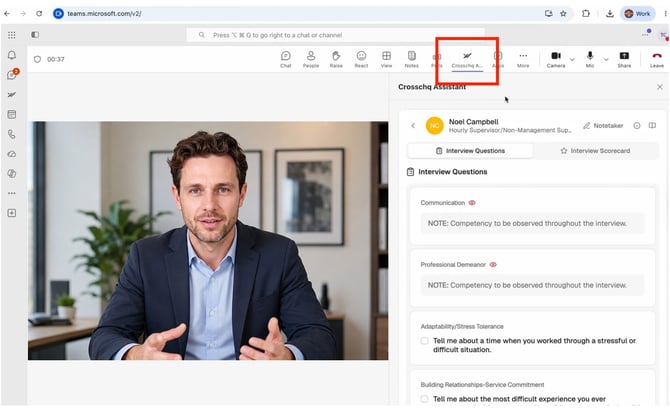
The panel identifies interviewers by their Microsoft sign-in address. If an interviewer signs in to Teams with a different email than the one they use for Crosschq, reach out to our Support team to add that address to their account.
Complete the Scorecard
After the interview, open the interview record in Crosschq. Complete the scorecard, add any additional feedback and click Submit Scorecard. The interview moves to the Completed Scorecard section, and the interview report is available from the Interview Management screen.
If an interviewer does not submit their scorecard, they receive automatic reminders until they do. You can configure these reminders in Interview > Message Templates.
Changing or Removing the Connection
- New organizer mailbox: Run the new script the card shows for that mailbox, then click Verify again.
- Different Microsoft tenant: Crosschq clears the organizer and the verification, and turns off automatic meeting creation. Repeat Steps 3 to 5.
- Disconnect: Reach out to our Support team.
To revoke access on your end:
- In the Microsoft Entra admin center > Enterprise applications, delete the Crosschq Interview Meetings app or revoke its permissions. This stops Crosschq immediately.
- To remove Crosschq from the access policy, run
Set-CsApplicationAccessPolicy -Identity "Crosschq-Interview-Meetings" -AppIds @{Remove="<Crosschq app ID>"}. The app ID is in the script from Step 4, and it is also shown as Application ID on the app's page in Enterprise applications. - Remove the organizer's policy grant only if the policy lists no other app.
Troubleshooting
When contacting Support, include your Organization name, the time of the issue and the exact message you saw.
Feel free to reach out to our Support team if you have any further questions.