![Crosschq Logo 534x115.png]](https://support.crosschq.com/hs-fs/hubfs/Crosschq%20Logo%20534x115.png?height=40&name=Crosschq%20Logo%20534x115.png)
- Overview
- Prerequisites
- Step 1 — Configure your custom domain in Crosschq
- Step 2 — Register the DNS records with your domain provider
- Step 3 — Verify the domain
- Step 4 — Send a test email
- Step 5 — Enable the custom domain
Overview
By default, all emails sent by Crosschq — reference requests, interview invitations, reports, and notifications — are delivered from Crosschq's domain. The Custom Email Domain feature allows your organization to send those emails from your own domain instead (e.g. no-reply@yourcompany.com).
This setting applies at the organization level and affects all Crosschq apps.
This feature must be enabled by Crosschq for your organization before it appears in your settings. Contact support@crosschq.com to request access.
New domains: If your organization has not previously used the custom domain to send emails, a warm-up process is required before the domain can handle your full email volume. Crosschq will manage this process — contact support@crosschq.com for details.
Prerequisites
- Admin access to your Crosschq account
- A registered domain owned by your organization (e.g.
yourcompany.comor a subdomain likemail.yourcompany.com) - Access to your organization's DNS settings, or a technical team member who can add DNS records on your behalf
- The Custom Email Domain feature enabled for your organization by Crosschq
Step 1 — Configure your custom domain in Crosschq
Navigate to Organization Settings > General > Email Domain.
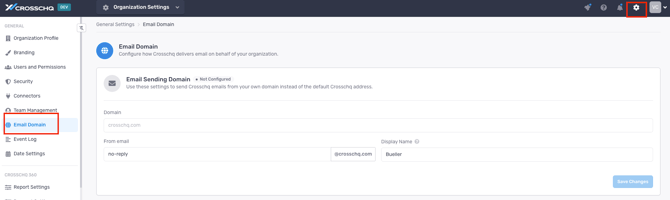
Complete the following fields:
- Domain — enter the domain or subdomain you want to use for sending (e.g.
yourcompany.comormail.yourcompany.com). This must be a domain your organization owns and controls. - Display Name — the sender name that will appear in the recipient's inbox (e.g.
Acme Corp). This defaults to your organization name but can be changed. - From Email — the email address that will appear as the sender (e.g.
no-reply@yourcompany.com). This defaults tono-replybut can be customized.
Click Save Changes. This registers the domain with Crosschq's email provider — no emails will be sent from the custom domain yet.
Step 2 — Register the DNS records with your domain provider
After saving, Crosschq will display a set of DNS records that need to be added to your domain provider (e.g. GoDaddy, Cloudflare, Route 53). These records allow Crosschq's email provider to verify that your organization owns the domain and is authorized to send from it.
.png?width=670&height=334&name=Captura%20desde%202026-09-02%2014-34-50%20(1).png)
This step must be completed by your organization's technical team. Share the DNS records shown in Crosschq with whoever manages your domain's DNS settings.
DNS propagation can take anywhere from 20 minutes to 24 hours depending on your domain provider. Crosschq has no control over this timing.
Step 3 — Verify the domain
Once your technical team has added the DNS records, return to Organization Settings > General > Email Domain and click Refresh.
Crosschq will check whether the DNS records are reachable. If the records have propagated, the domain status will update to Verified.
.png?width=670&height=334&name=image%20(7).png)
If the status does not change after clicking Refresh, the DNS records may not have propagated yet. Wait a few minutes and try again. If the issue persists, confirm with your technical team that the records were added correctly.
Step 4 — Send a test email
Once the domain is verified, click Send Test Email to confirm that emails are being delivered correctly from the custom domain.
.png?width=670&height=38&name=image%20(8).png)
-2.png?width=284&height=121&name=image%20(9)-2.png)
Check the recipient inbox to confirm the email arrived from the correct address and that the display name and from address appear as configured.
At this stage, the domain is verified but not yet enabled. All Crosschq emails will still be sent from Crosschq's default domain until Step 5 is complete.
Step 5 — Enable the custom domain
Once you have confirmed the test email looks correct, click Enable to activate the custom domain for your organization.
.png?width=670&height=333&name=image%20(11).png)
From this point on, all emails sent by Crosschq across all apps — reference requests, interview invitations, reports, notifications, and more — will be delivered from your custom domain.
Enabling the custom domain cannot be undone from the Crosschq interface. If you need to disable or modify the custom domain after enabling it, contact support@crosschq.com.