Follow the steps below to connect Greenhouse with Crosschq:
- Enable the Greenhouse integration
- Configure API settings
- Configure app settings
- Additional 360 configuration
Enable the Greenhouse integration
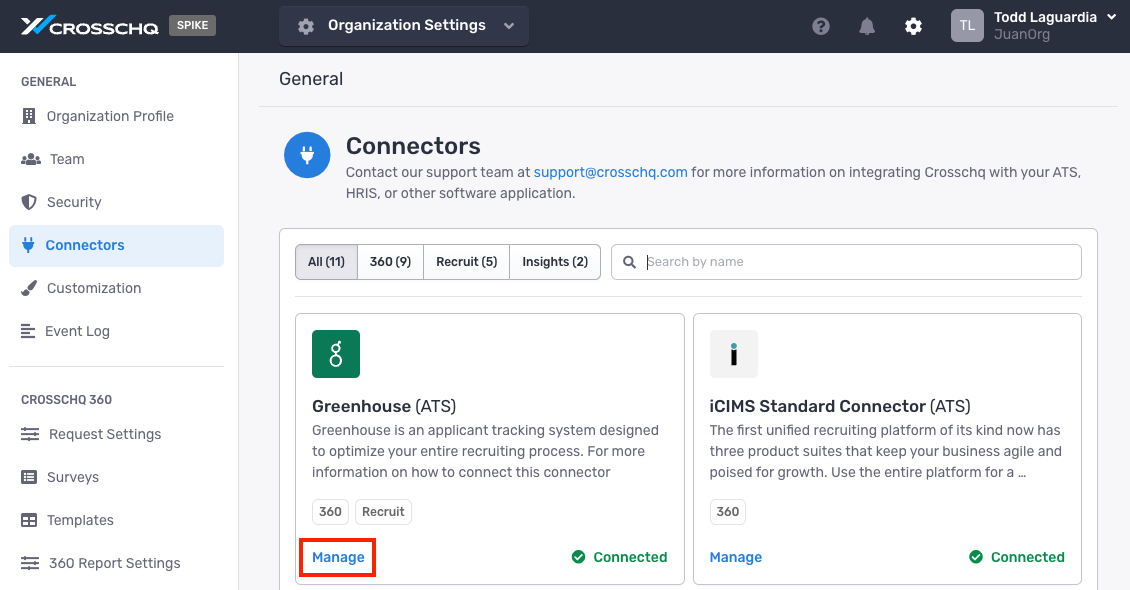
Search for the Greenhouse connector from Organization Settings > Connectors. Click Manage from the Greenhouse section
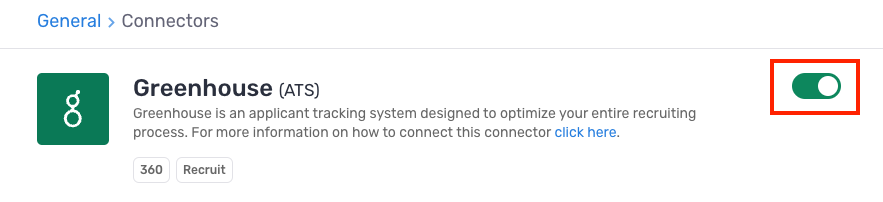
On the next page, turn on the Greenhouse connector by clicking the toggle on the right. The toggle should turn green.
Configure API settings
Share token with Greenhouse
Click the Set up Greenhouse button.

- You will be redirected to the Greenhouse authorization screen. Enter your Greenhouse account email and click Log in to Greenhouse. If you are not already logged in to Greenhouse, you will be prompted to do so before completing the authorization.
- Grant the required permissions when prompted.

- Once OAuth authorization is complete, the new API will be enabled automatically.
Once you have obtained your API token, contact Greenhouse Technical Support by using live chat or opening a ticket. They will send a Safely link where you can securely share the token. Their support team will connect the two platforms to one another. If, at any point, you need to adjust connector settings, simply return to Organization Settings > Connectors > Greenhouse and click on the Manage button.
Generate Harvest API key
The Greenhouse Harvest API key allows Crosschq to interact with your ATS data (for example, pulling the candidate's recruiter into reference requests, adding new prospects to Greenhouse, and pulling job-level fields as filters into Crosschq Voice campaigns).
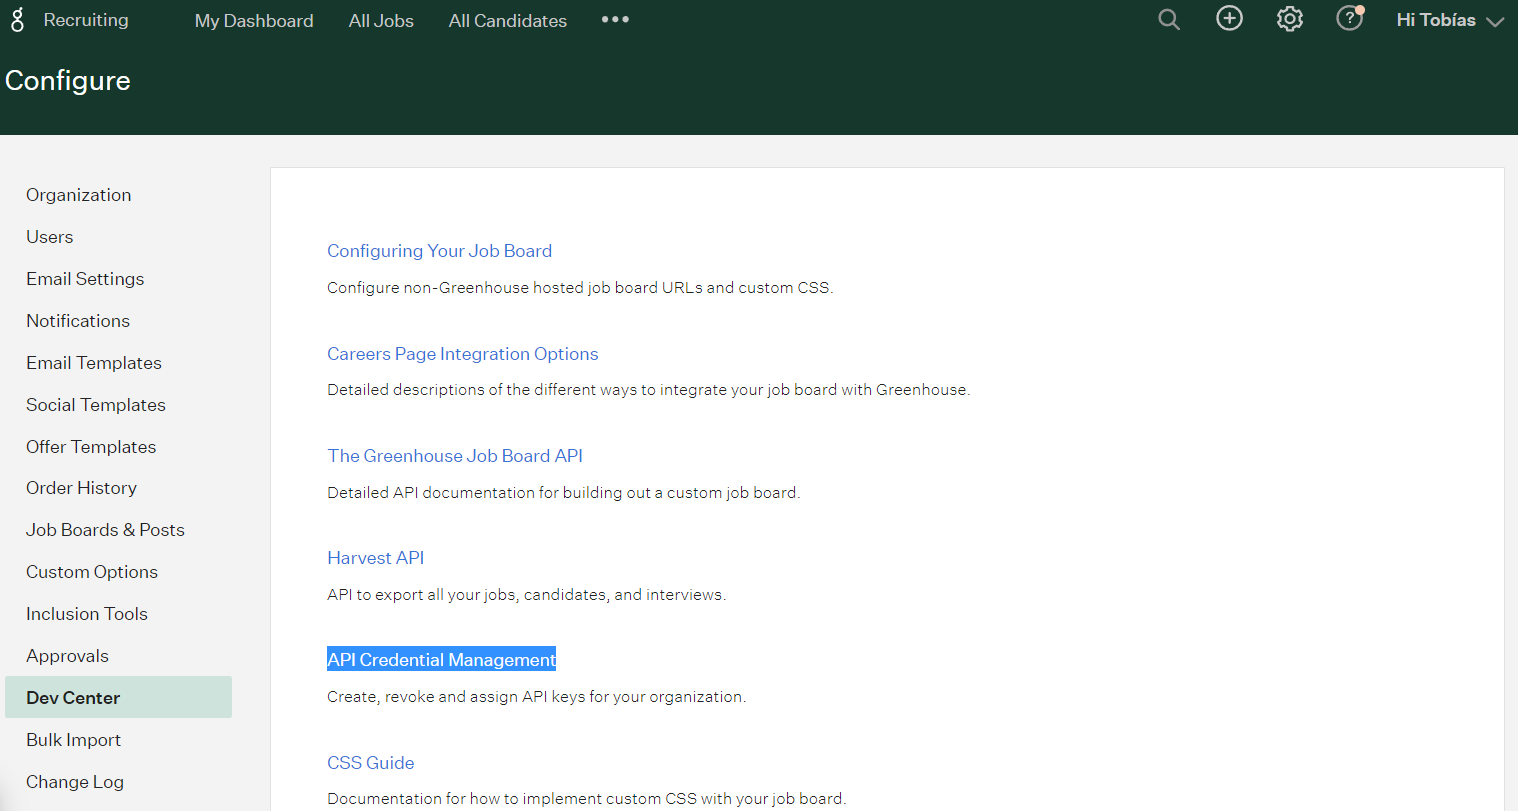
To generate the API key, navigate to the Greenhouse Dev Center, and click on API Credential Management.
Next, click the Create New API Key button to generate the API key for Crosschq.

In the subsequent popup window, enter a Description and choose Harvest from the Type drop-down. Add "Crosschq" to the source identifier. Then, click the Create button and copy the API key. The API key will only be exposed this one time, so make sure it is stored in a secure location.
From there, you will need to select the appropriate permissions that Crosschq can access. Select the following permissions:
While access to some endpoints is relevant to specific Crosschq apps, we recommend granting access to all of the endpoints listed below. This will make it easier to set up other Crosschq apps in the future.
Applications
GET: Retrieve Application
PATCH: Update Application
POST: Add Attachment to Application
Candidates
GET Retrieve Candidate
GET List Candidate
POST: Add Note
POST: Add Prospect
POST: Add Employment
Users
GET Retrieve User
GET List User
Job Stages
GET: Retrieve Job Stage
GET: List Job Stages
GET: List Job Stages for Job
Jobs
GET: Retrieve Job
GET: Hiring team
Prospect Pool
GET: List Prospect Pools
Custom Field
GET: Custom fields
POST: Create custom field
PATCH: Update custom field
EEOC
GET: Retrieve EEOC Data for Application
GET: List EEOC
Departments
GET: List Departments
Rejection Reasons
GET: List Rejection Reasons
Offices
GET: List Offices
Sources
GET: List Sources
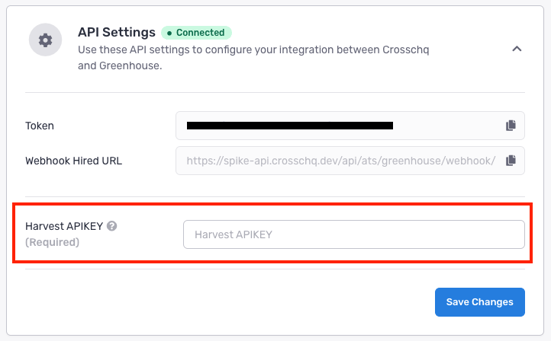
Save the updates you made to your API key. Now, navigate back to the Greenhouse Connector API settings in Crosschq (Organization Settings > Connectors > Greenhouse). Paste the API key that you copied from Greenhosue into the Harvest APIKEY field. Click Save Changes.
Enable Greenhouse webhooks
Webhooks allow specific events to be updated in real-time in Crosschq, as well as trigger campaign surveys in Crosschq Voice.
Crosschq supports the following Greenhouse webhooks:
- Candidate Hired
- Candidate Rejected
To enable these webhooks, copy the Webhook Hired URL from the Greenhouse connector API settings in Crosschq.
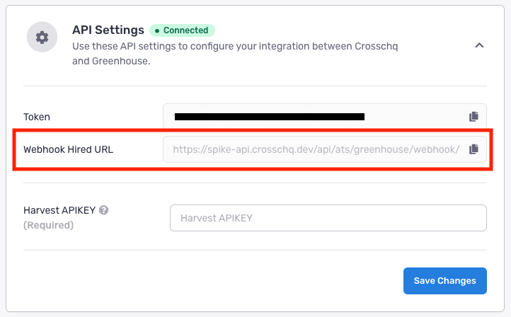
The Webhook Hired URL in Crosschq will be used to create both hired and rejected status webhooks in Greenhouse.
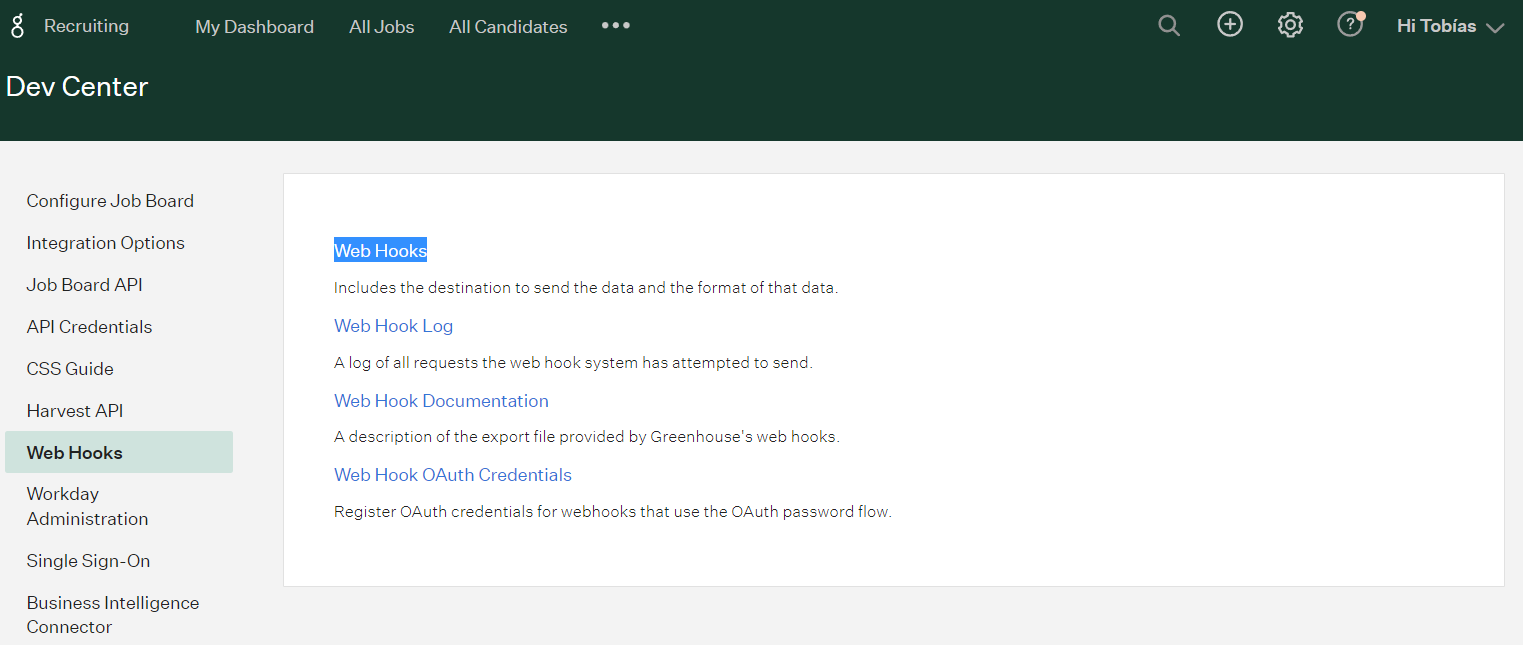
Next, navigate to your Greenhouse instance and navigate to Settings > Dev Center, Web Hooks. From here, select Web Hooks again from the main menu.
-
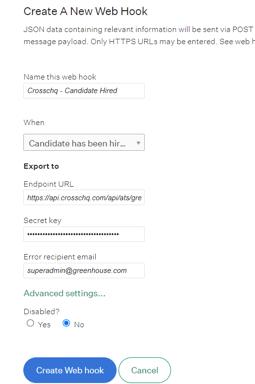
- First, give a Name to the webhook.
- In the When drop-down, select "Candidate has been hired."
- In the Endpoint URL field, paste the Greenhouse Webhook Hired URL that you copied from Crosschq.
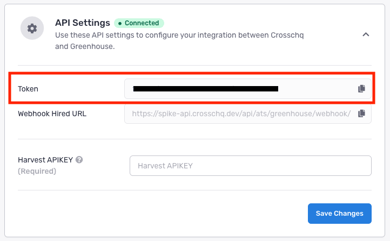
- In the Secret Key box, copy and paste the token field from the Greenhouse API settings in Crosschq.
- Optionally, enter an Error recipient email, which is typically the email address of a super administrator.
- Check the No option to ensure that WebHook is not disabled.
- Once all of these fields have been entered, click Create Webhook.
- Repeat these steps to create a Rejection webhook, but under the When dropdown, select "Candidate or Prospect Rejected."
Configure app settings
Once your API settings are saved, you can configure additional settings for specific Crosschq Apps.
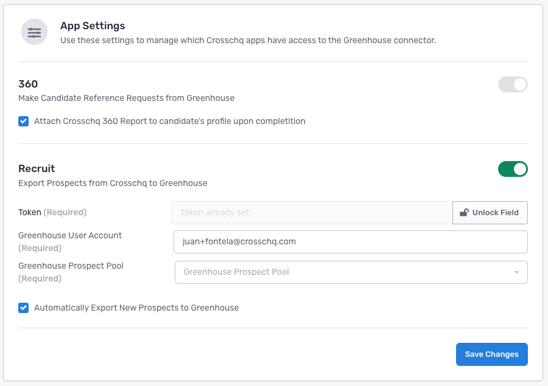
360 settings
When you enable Attach Crosschq 360 Report to candidate's profile upon completion, we will upload completed reference reports to the candidate's profile in Greenhouse if the reference was initiated from the ATS.
Recruit settings
The additional Recruit settings allow you to export prospects from Crosschq to Greenhouse. To enable this feature, you will need to set up a prospect pool from the CRM section in Greenhouse. Click here to learn more about setting up a prospect pool.
If you do not have the CRM function in Greenhouse, you can still export prospects and manually upload them to Greenhouse.
Secondly, you will need to generate a Candidate Ingestion API key from Greenhouse.
Voice settings
If your Crosschq license includes access to the Voice app, enable the Voice toggle to allow triggering of surveys to recipients.

Generating Candidate Ingestion API key
First, go to the Greenhouse Dev Center, and click on the API Credential Management link.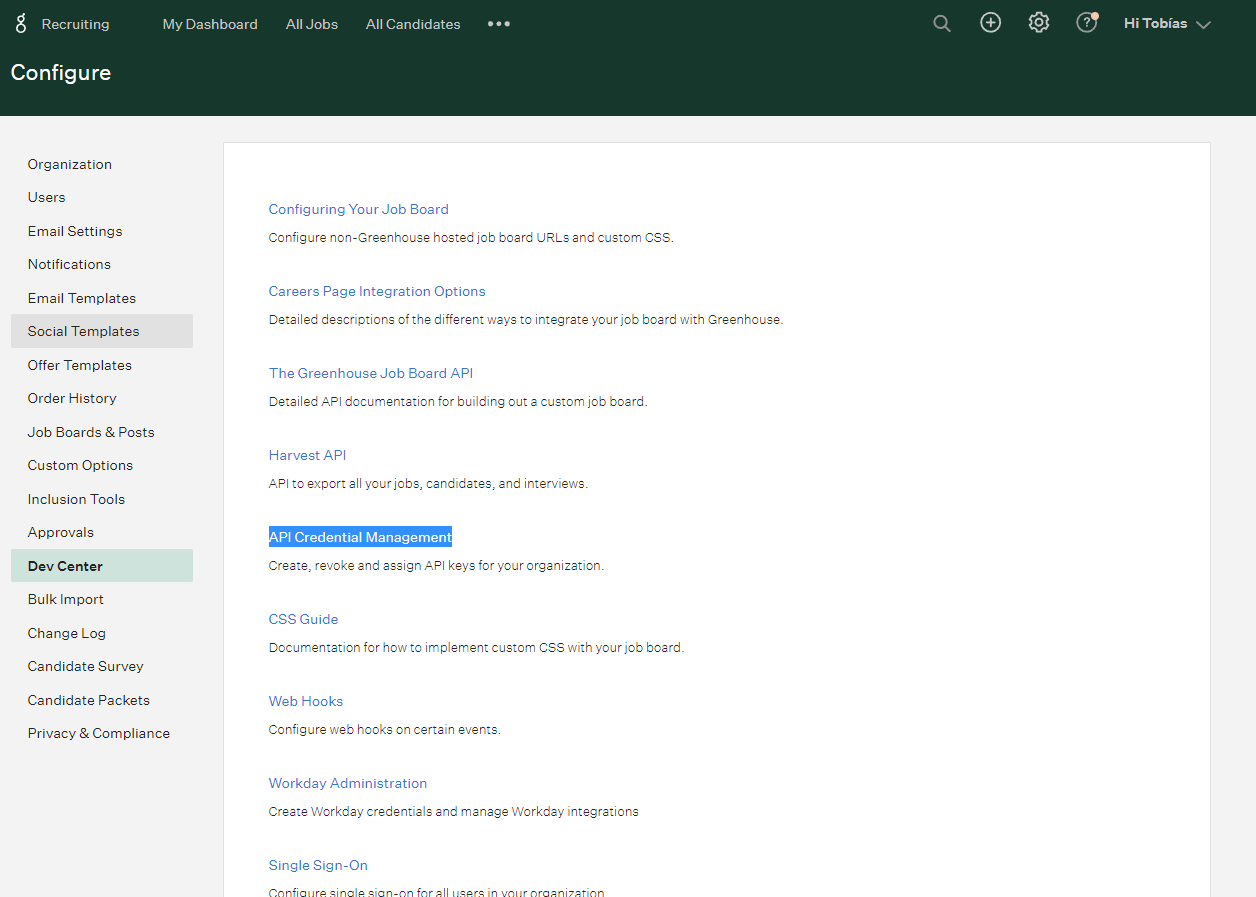
Click the Create New API Key button to generate the API key for Crosschq.
In the popup window, enter a Description and choose Candidate Ingestion from the Type drop-down. Also, choose Crosschq from the ClientApplication drop-down. Then, click the Create button and copy the API key.
Navigate back to the Greenhouse Connector App Settings in Crosschq. Enable the prospect export feature by clicking the toggle on the right. The toggle should turn green.
Under the Token field, paste the copied Candidate Ingestion API key.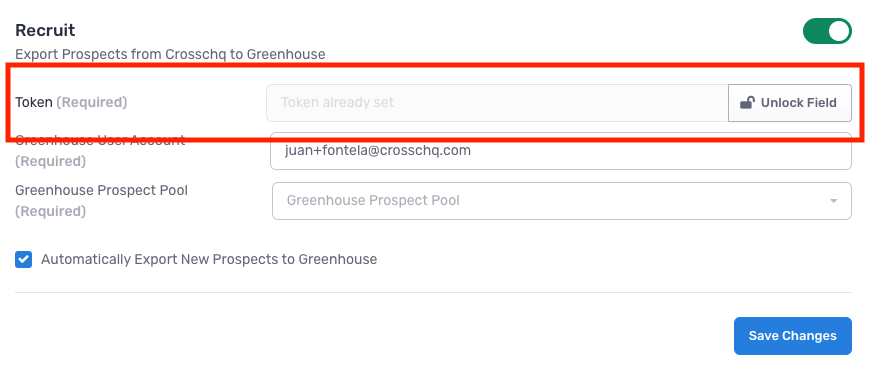
Next, enter in a Greenhouse admin email to be associated with the connection.
Under the Greenhouse Prospect Pool field, select the correct pool for where Crosschq prospects should be exported.
The Pool ID Number is actually the name of a prospect pool. Your Greenhouse admin will likely want to create a specific prospect pool for Crosschq candidates, and then select that pool from the drop-down menu.
Lastly, if you want to enable automatic exporting of prospects to Greenhouse, click the final check box in this section.
After completing the Greenhouse connection, all of your prospects will automatically or manually export into Greenhouse.
Additional 360 configuration
The following sections will outline extra steps to make sure your Greenhouse connection is successfully linked.
Add Crosschq as a stage in an interview plan
Once your Greenhouse connector in Crosschq is configured, create a new job within Greenhouse and add Crosschq as a stage within your interview plan.
You can also bulk-add Crosschq to all your existing jobs by following these steps:
- Access jobs, check the box to bulk select all jobs, and click Stages/Interviews.
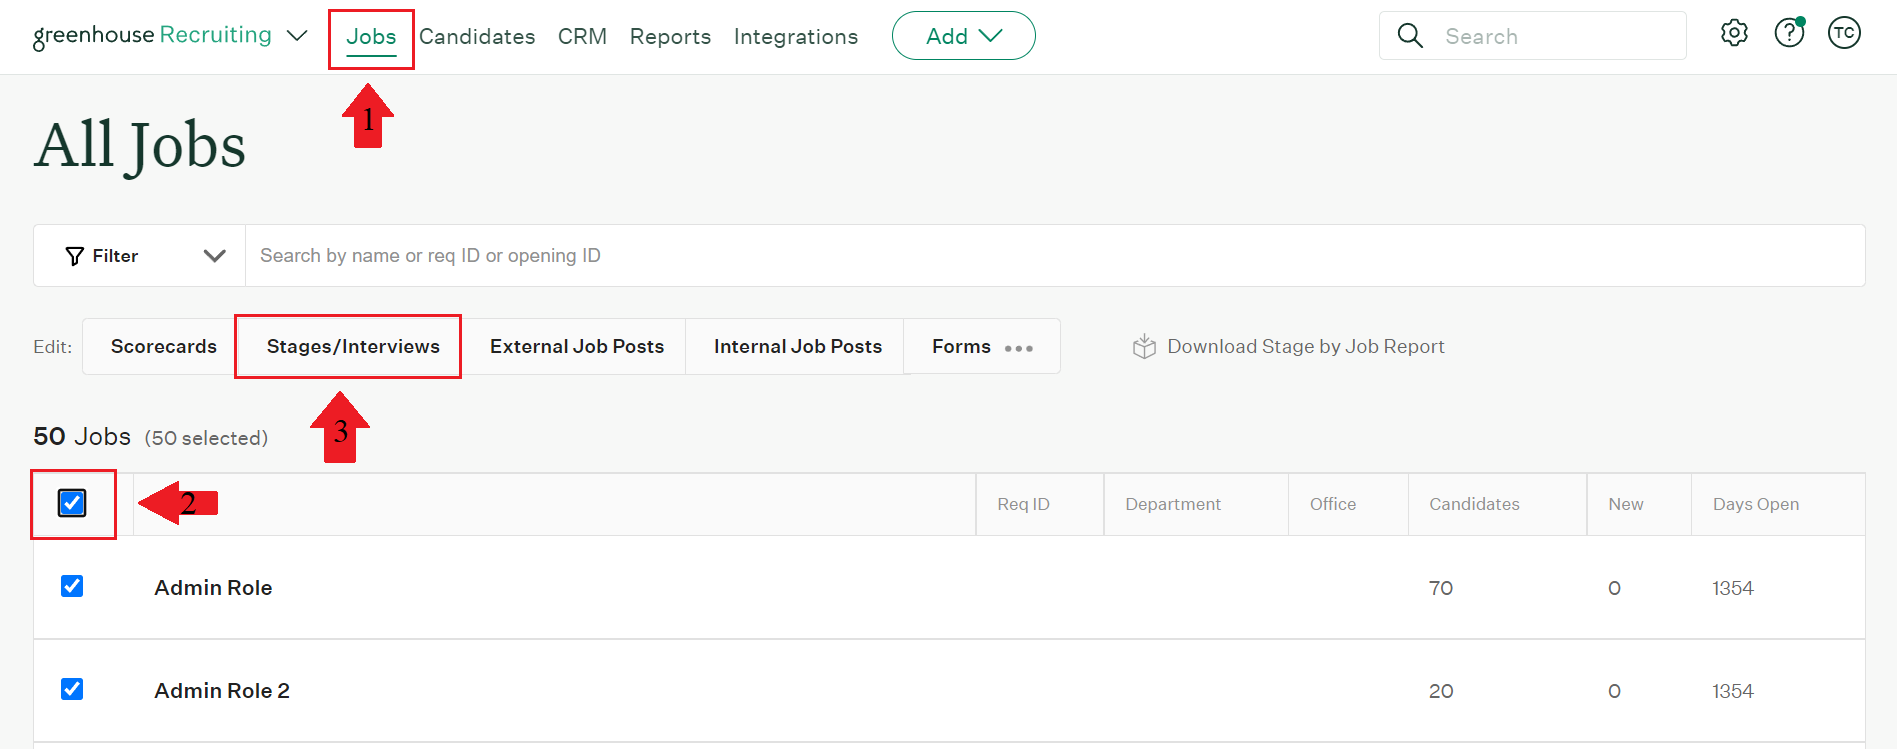
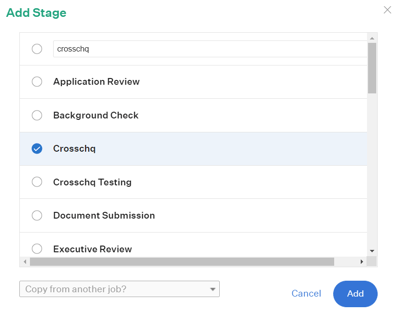
- Next, select Add a stage within the "Re-Order Stages" section, search for Crosschq, and click Add. Then save the changes.
Configure Crosschq templates
Templates are reference request configurations that are used to trigger requests from ATS connectors. You have to set up your Crosschq templates to be able to send Crosschq requests from an ATS.
Within Crosschq, go to Organization Settings > Templates. Select Create New Template.
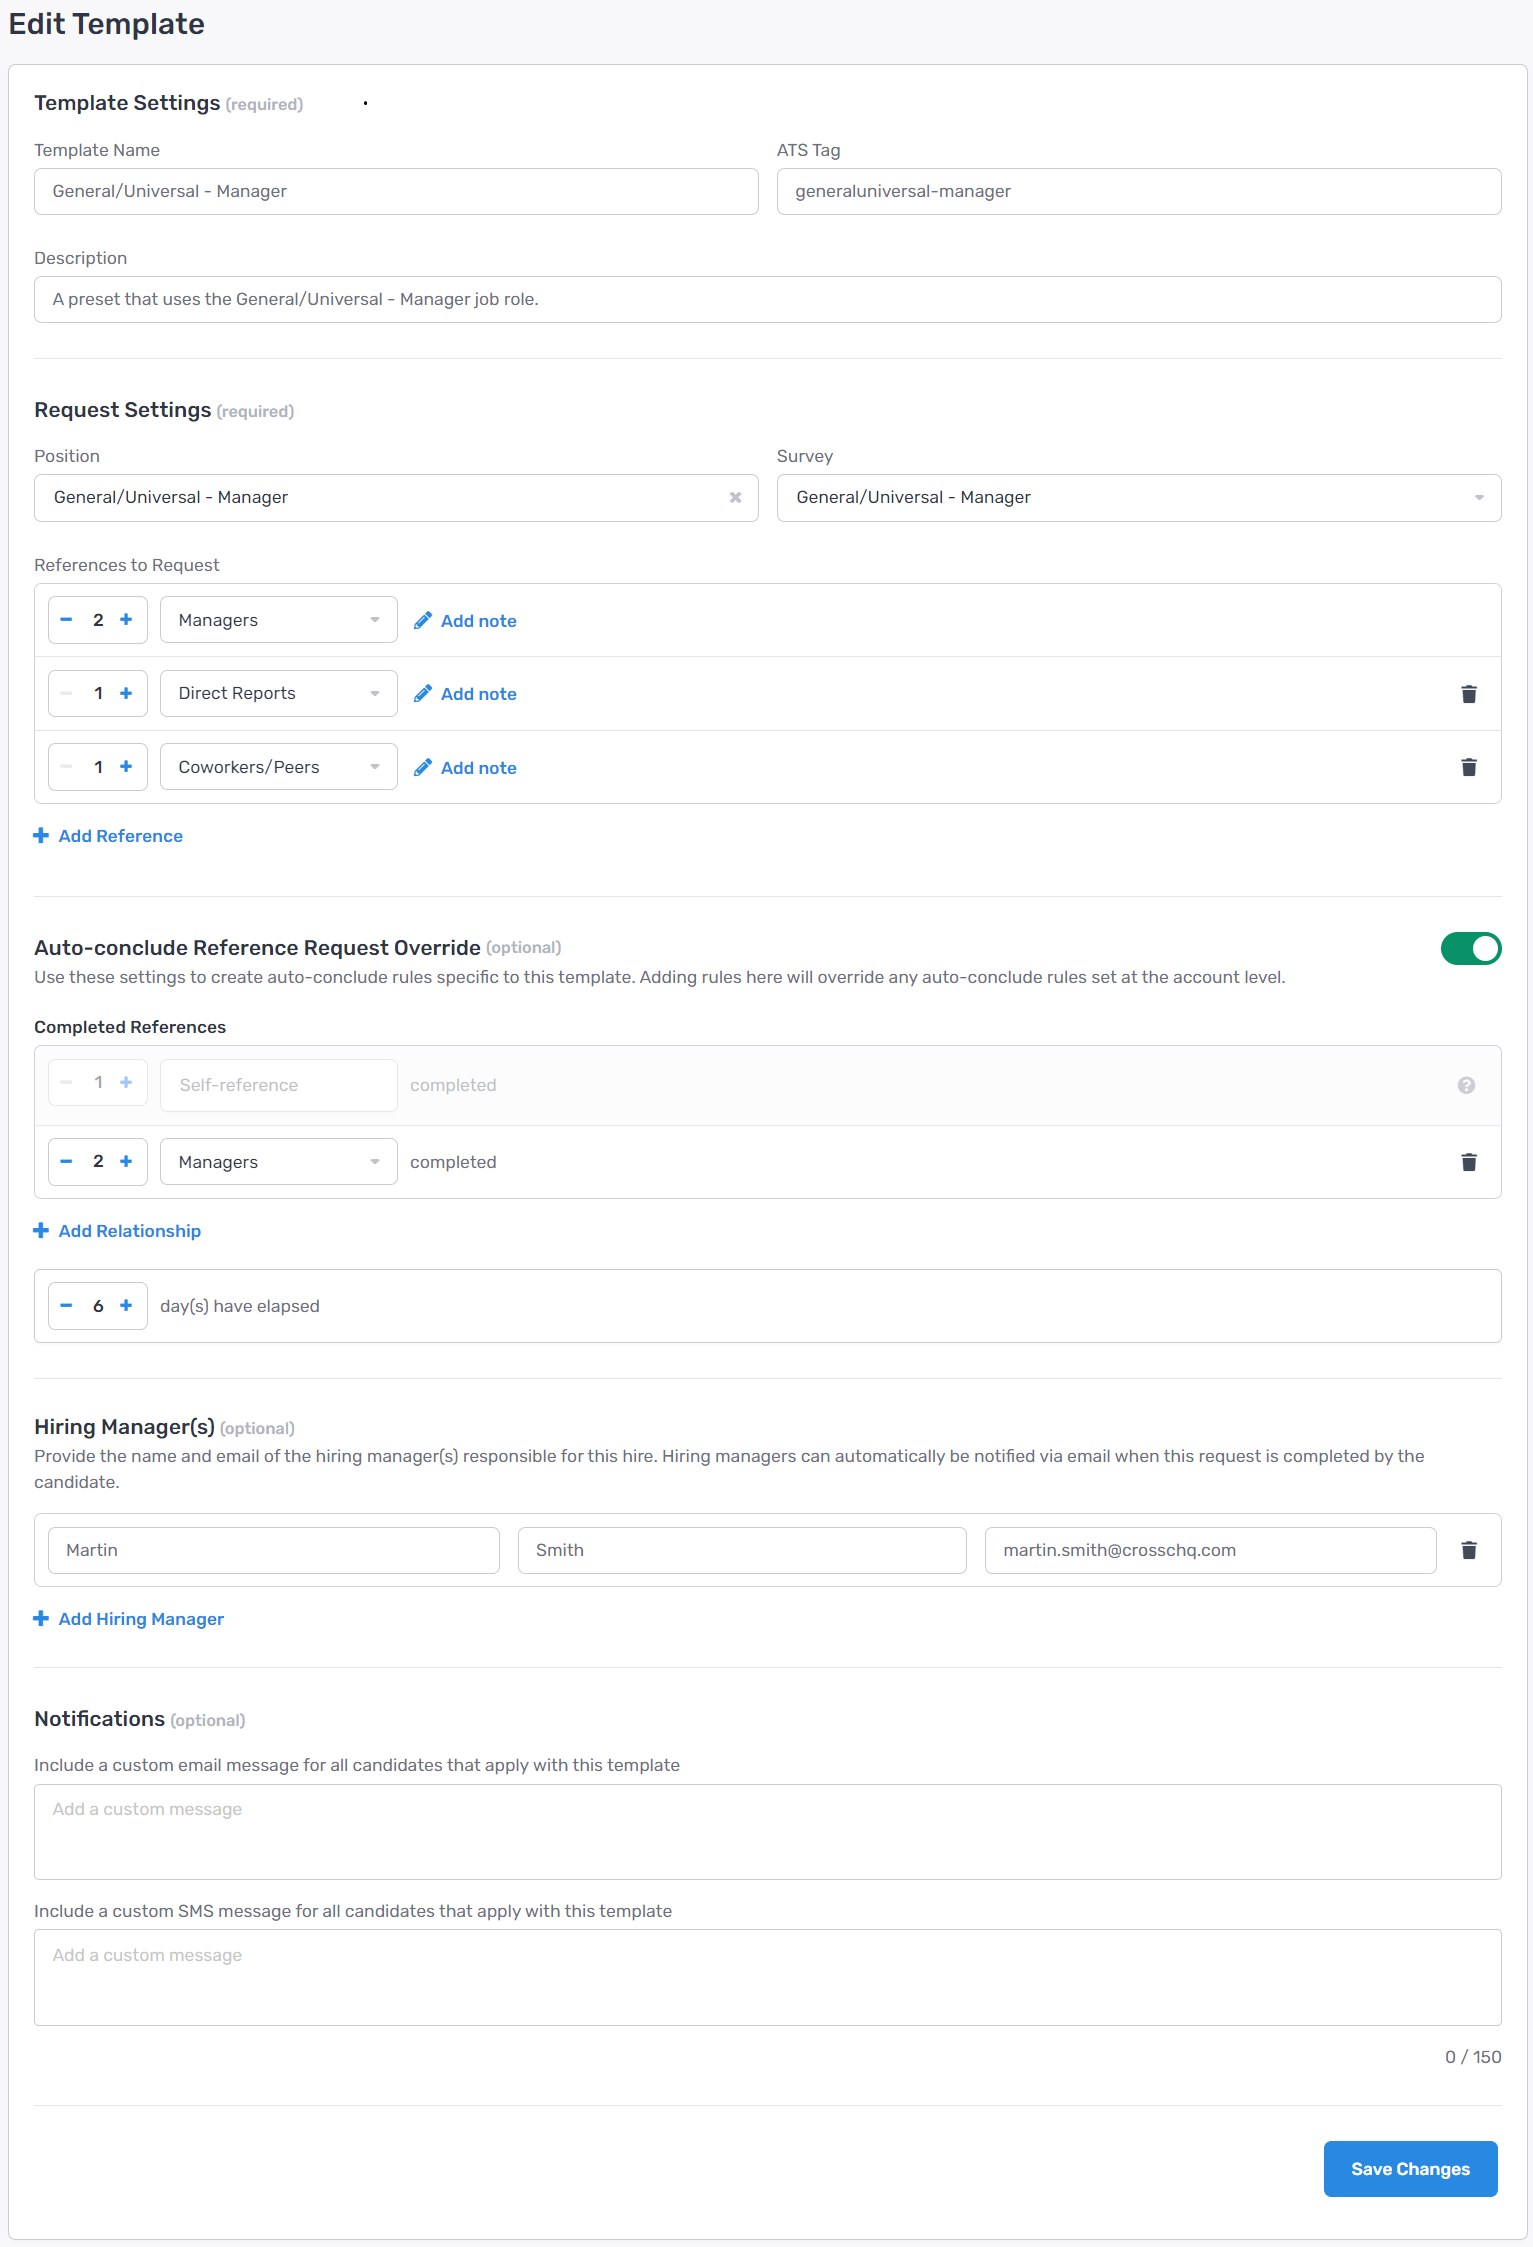
Enter the required information such as the template name, add an ATS Tag for that template, and create a description of the template.
Within the Request Settings, add in the position, select the appropriate survey, and configure the number/type of references you want to be associated with this request. Please note, the relationship type can either be specified or you can select any relationship type and let the candidate determine the type of reference. Additionally, you can add customized notes to each specific reference request, i.e. "Please provide a manager reference from X company."
From there, add optional hiring manager information. Finally, you can create custom emails or text messages associated with each template by filling out the custom notifications section. When you are done, select Create Template.
At any point, if you need to edit or delete a template select the three dots next to the template and you will be able to manage from there.

Requestors and Hiring Managers
Read this section to understand how users in the ATS are going to be assigned to the Crosschq request.
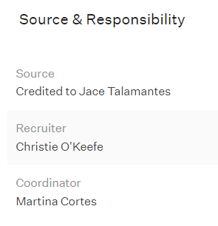
Crosschq pulls the Recruiter from the details section within a candidate's profile in Greenhouse.
Crosschq will assign as requestor the Greenhouse user listed as "Recruiter" within the candidate's profile. If there is no recruiter listed in the candidate's profile, Crosschq will assign the user listed as the candidate's "Coordinator". If there are no users listed as recruiter or coordinator, Crosschq will assign the user listed as "Credited To" within the source section.
Crosschq pulls the requestor from the candidate's profile and not from the job.
As for the Hiring Managers, Crosschq will add all users listed as Hiring Managers within the job's hiring team in Greenhouse.
Sending a Crosschq from Greenhouse
To send a candidate through the Crosschq process in Greenhouse:
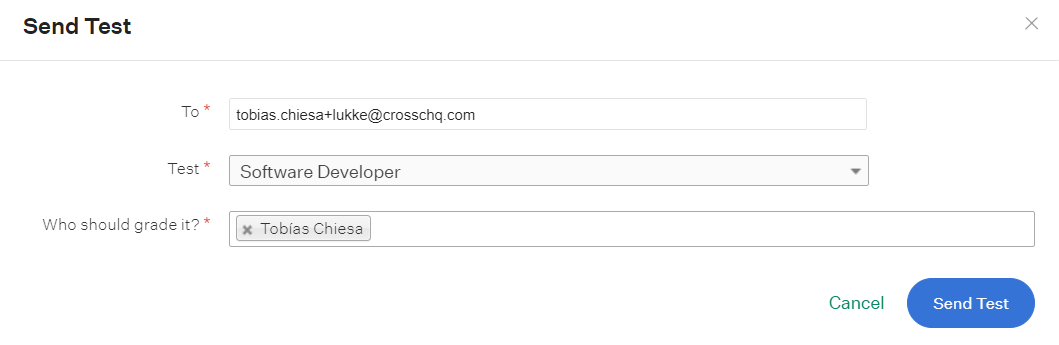
- Move your candidate to the Crosschq stage and select Send Test.
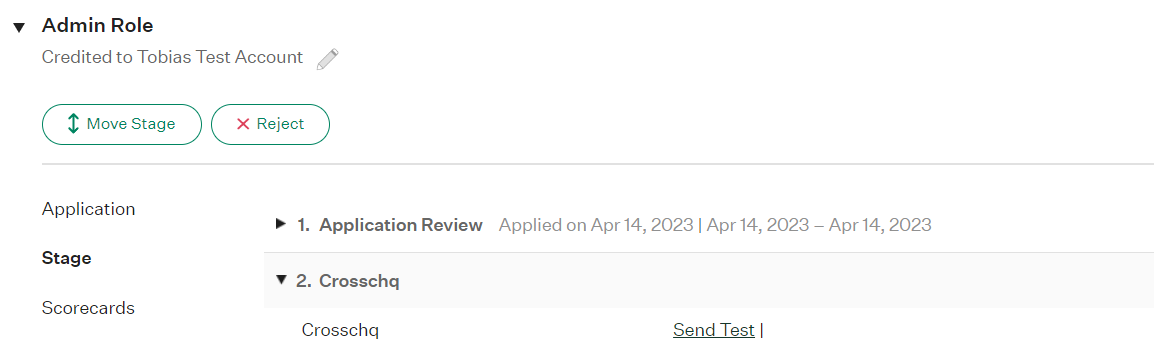
- Make sure the candidate's email address is correct, select the Crosschq Template, and select whom you would like to "grade" the request/have access to notifications, usually, this is the recruiter/candidate owner. Then click the Send Test button to send the Crosschq to the candidate.
The candidate will receive an email message that includes a link to begin the Crosschq process.
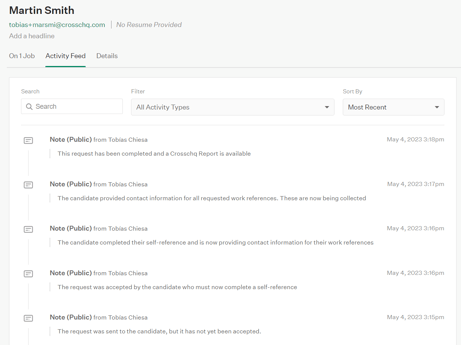
You will be able to keep track of each request status change by accessing the Activity Feed section of Greenhouse:
Viewing a Crosschq Report
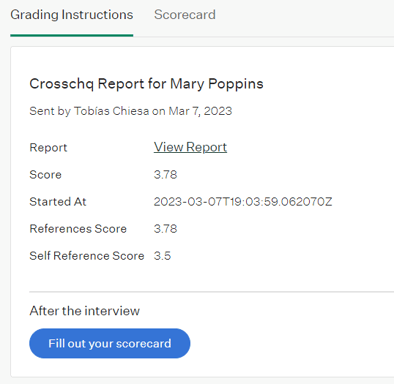
When the candidate completes the self-reference and all of the references respond to the surveys, the report will be available within the Greenhouse platform. Additionally, the recruiter and hiring manager will also get an email informing them that the Crosschq report is completed. (If the hiring manager doesn't have a Crosschq account a link to create a Viewer account will automatically be sent to the hiring manager.) The figure below depicts an example in which a candidate has received his overall Crosschq score and the process is complete.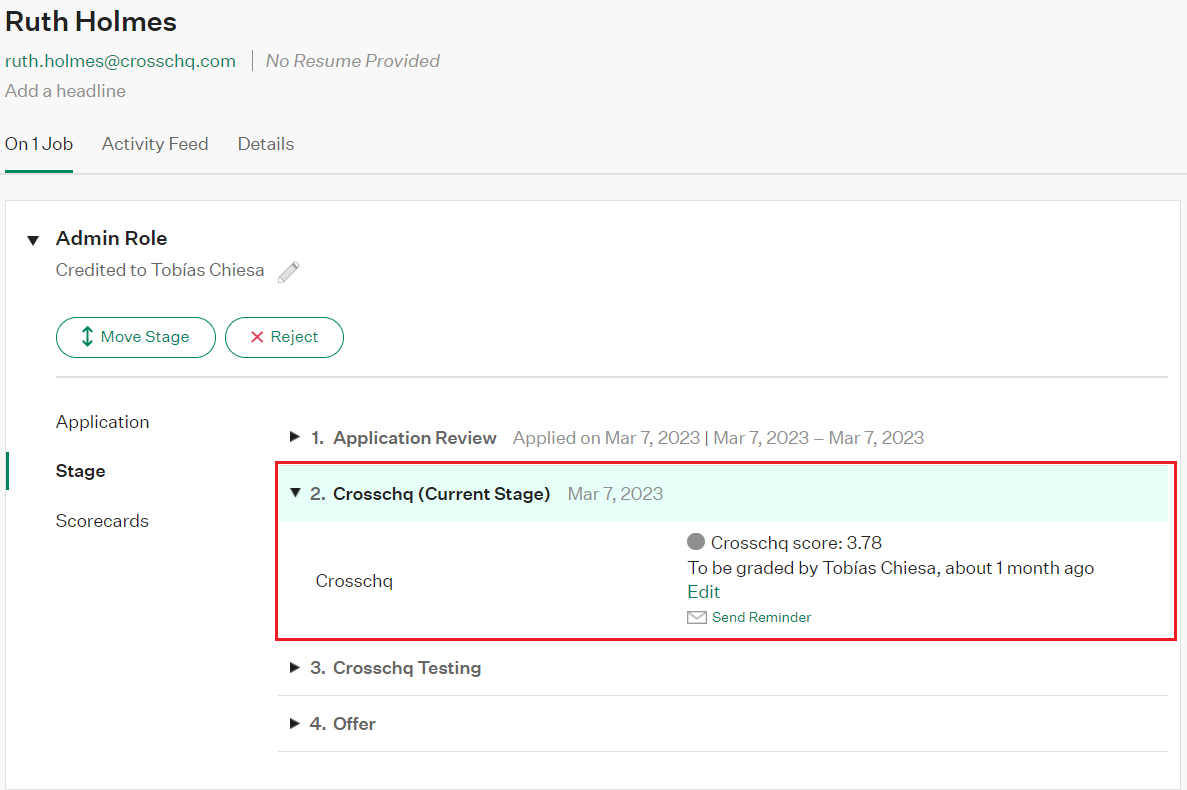
There are two ways to view the Crosschq report:
- Click the report icon next to the Crosschq stage and then click View Report which will take the user to the completed report in Crosschq.
Note: Only those with Crosschq accounts will be able to access the Crosschq report within Crosschq.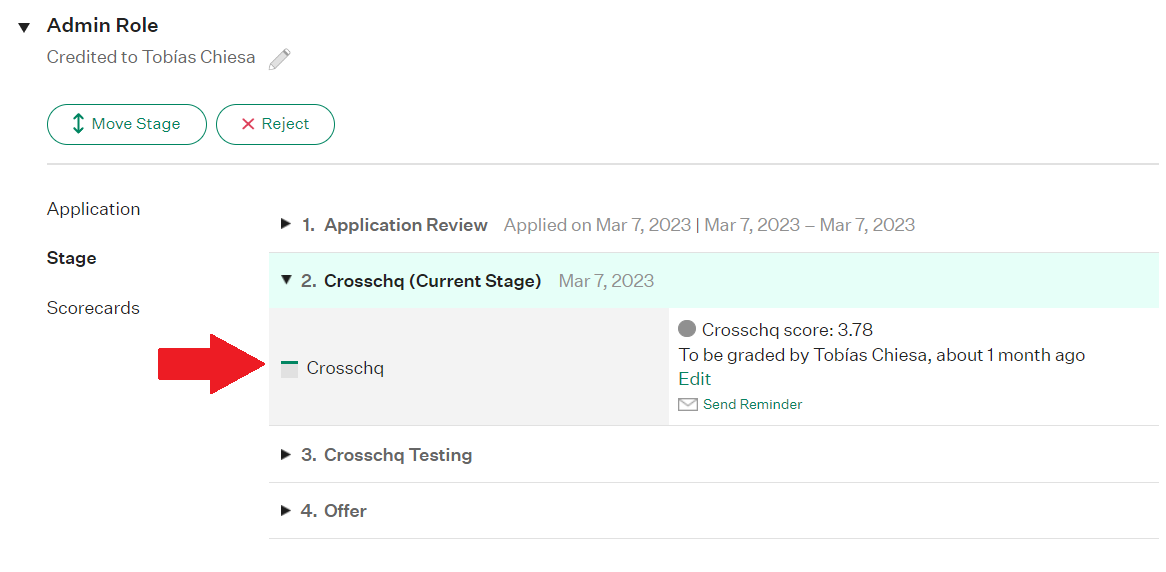
-
Access the Details section within the candidate's profile and scroll down to the Attachments section. You will find the Crosschq report attached in PDF.
Greenhouse users that have enterprise accounts will be able to view a more detailed version of the Crosschq report and status updates related to the report. To access this, users will select the private tab in the candidate's profile.

To send Crosschq requests in bulk, follow these steps within the Stage Transitions flow of a specific job requisition setup:
-
Select the Crosschq stage from the stage dropdown.
-
Choose Send Take Home Test.
-
Select who should be credited with the action.
-
Specify when the Crosschq request should be sent after the candidate moves into that stage.
-
Click Save.

Next, you'll need to configure the correct template that is associated with this stage transition and job requisition.

Select the correct template for the job requisition from the drop-down menu and save.

Finally, reconfigure the stage transition one more time and save.
You're all set whenever a candidate is moved into the Crosschq stage for this specific job requests will be sent automatically.