![Crosschq Logo 534x115.png]](https://support.crosschq.com/hs-fs/hubfs/Crosschq%20Logo%20534x115.png?height=40&name=Crosschq%20Logo%20534x115.png)
- How the integration works
- Before you begin
- Install the Crosschq package in Salesforce
- Configure the Crosschq app in Salesforce
- Enable the Salesforce connector in Crosschq
- Grant access to your users
- Add Crosschq to your Salesforce pages
- Configure Crosschq templates
- Sending a Crosschq from Salesforce
- Tracking status
- Viewing a Crosschq report
- What Crosschq reads and writes
- Troubleshooting
How the integration works
The Salesforce connector lets your recruiting team start Crosschq 360 reference checks from a candidate's record in Salesforce and see the results — status, score, and the completed report — without leaving Salesforce.
Because Salesforce does not ship with recruiting objects, the connector maps Crosschq concepts onto standard Salesforce records:
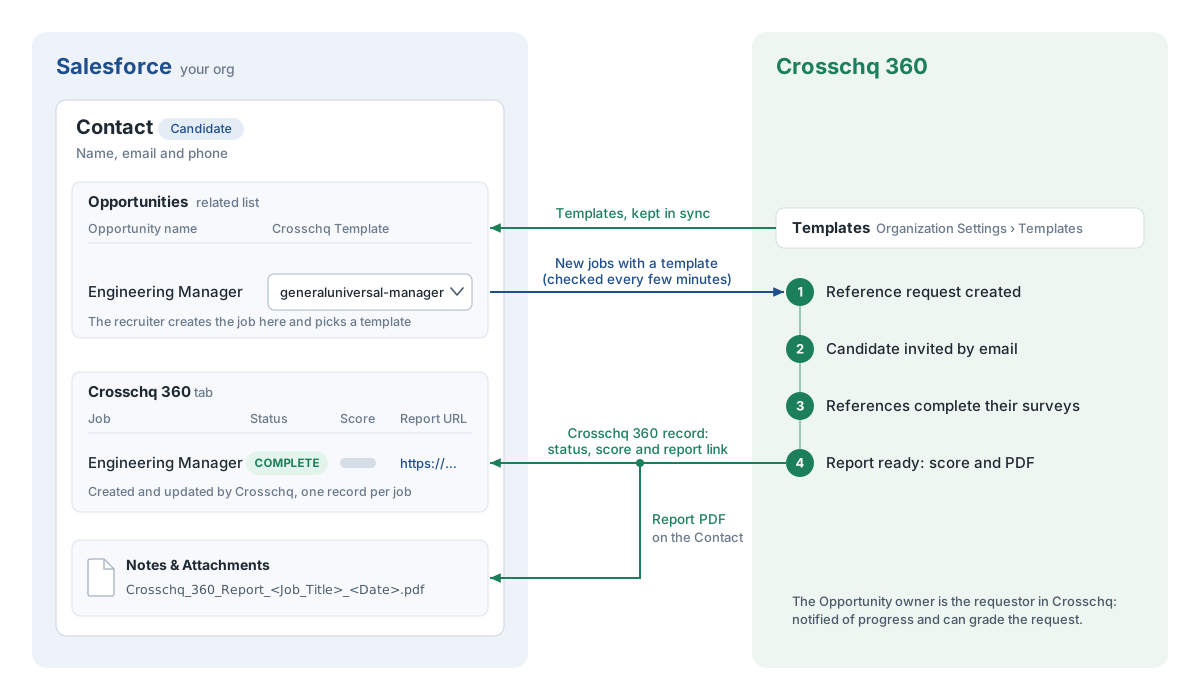
In practice:
- From the candidate's Contact, the recruiter creates a new Opportunity, enters the job title as its name, selects the Crosschq template to use, and saves. That is the only action required.
- Crosschq checks your Salesforce org every few minutes for jobs with a Crosschq template that haven't been checked yet. When it finds one, it creates the reference check and emails the candidate a link to begin the Crosschq process.
- Crosschq adds a Crosschq 360 record to the candidate's Contact showing the job and the status SENT.
- As the candidate and their references complete their surveys, the status on that record updates automatically.
- When the report is complete, the score and a link to the report appear on the Crosschq 360 record, and a PDF copy of the report is attached to the Contact.
The owner of the Opportunity is the requestor in Crosschq — the person who is notified of progress and can grade the request. Your Crosschq templates are kept in sync automatically, so the template options your recruiters see on the Opportunity always match what is configured in Crosschq.
Before you begin
You will need:
- A Salesforce administrator to install the package, configure the Crosschq app in Setup, and add the Crosschq fields to your Opportunity and Contact pages.
- A Crosschq administrator with access to Organization Settings > Connectors.
- A dedicated integration user in Salesforce. Crosschq connects to your org as a Salesforce user. Create a dedicated user (for example,
crosschq.integration@yourcompany.com) rather than using a real person's account, so the integration is not affected when an employee changes roles or leaves. This user needs the permissions described in What Crosschq reads and writes.
Recruiters do not need to be set up in Crosschq in advance. The owner of an Opportunity becomes the requestor for its reference check, and if they don't have a Crosschq account yet, one is created for them automatically (see Sending a Crosschq from Salesforce). It's worth letting your recruiters know to expect a welcome email from Crosschq.
Install the Crosschq package in Salesforce
The installation links are published in Crosschq, in the Salesforce connector view under Organization Settings > Connectors > Salesforce > Manage. There are two links, labelled Production and Sandbox Environment. We recommend installing in a sandbox first.
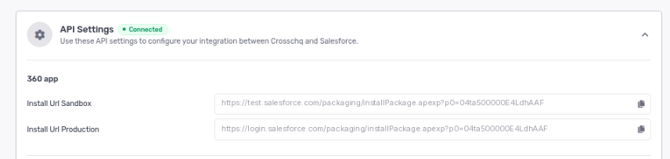
- Open the installation link for the org you want to connect and log in as an administrator.
- When prompted, enter the installation key shown next to the links.
- Select Install for Admins Only. You will grant access to recruiters in a later step using the permission set included in the package.
- Click Install. Installation usually completes in a few minutes; Salesforce sends a confirmation email when it is done.
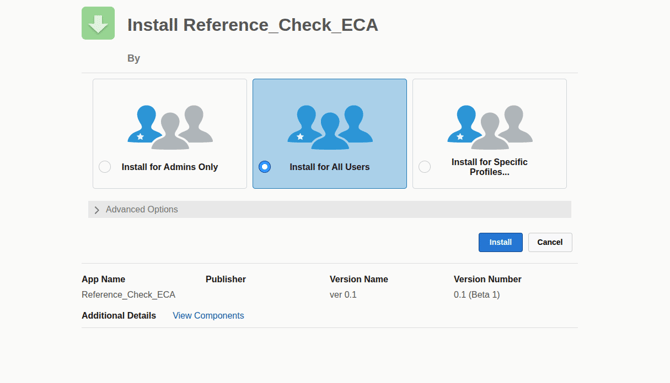
The package adds the following to your org:
- The Crosschq Template picklist on Opportunity, pre-loaded with two starter templates:
generaluniversal-managerandgeneraluniversal-team-member. The rest of your templates are added automatically once the connector is enabled. - The Crosschq 360 custom object, where Crosschq records each reference check and its results.
- The Crosschq 360 connected application used for secure API access.
- The Crosschq Integration permission set.
Configure the Crosschq app in Salesforce
The package installs the Crosschq 360 app, but Salesforce requires each org to authorize it. This is done once by your Salesforce administrator.
Enable the connection and choose the integration user
- In Salesforce Setup, search for External Client App Manager and open it.
- Find Crosschq 360 in the list, click the dropdown arrow at the end of the row, then Edit Policies.
- Under OAuth Policies, check Enable Client Credentials Flow.
- In Run As, select the dedicated integration user you created earlier, then Save.
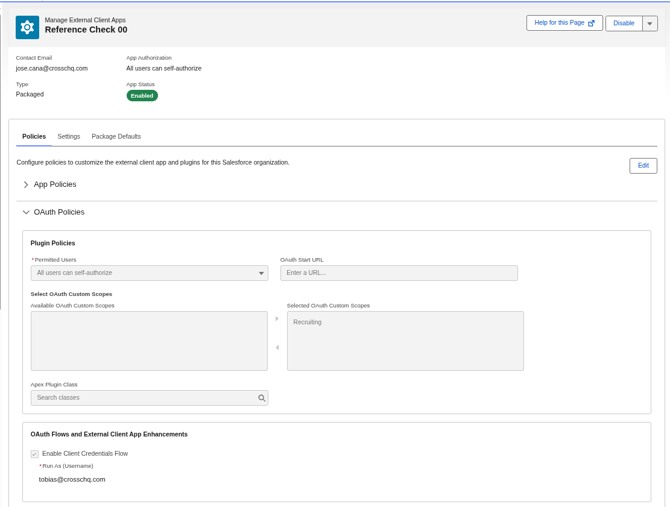
- While on the Policies tab, review two more settings:
- IP Relaxation — set to Relax IP restrictions. If your security policy requires IP restrictions on integrations, contact Crosschq Support before enabling the connector.
- Permitted Users — either setting works. Admin approved users are pre-authorized is the tighter option; if you choose it, add the integration user's profile or permission set to the app.
Collect the credentials Crosschq needs
- Back in External Client App Manager, click the app name Crosschq 360 to open it.
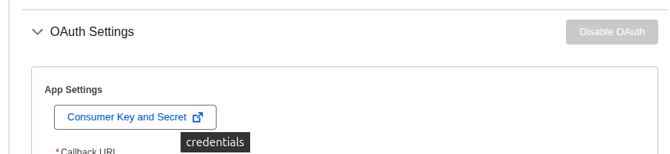
- Open the Settings tab and scroll down to OAuth Settings.
- Click Consumer Key and Secret. Salesforce will ask you to verify your identity before showing the values.
- Copy the Consumer Key and Consumer Secret. You will paste them into Crosschq in the next step. The secret is only shown in Salesforce, so keep it somewhere safe.
10. Note your org's My Domain URL (for example, https://yourcompany.my.salesforce.com). You can find it in Setup under My Domain.
Enable the Salesforce connector in Crosschq
- In Crosschq, go to Organization Settings > Connectors.
- Find Salesforce and click Manage.
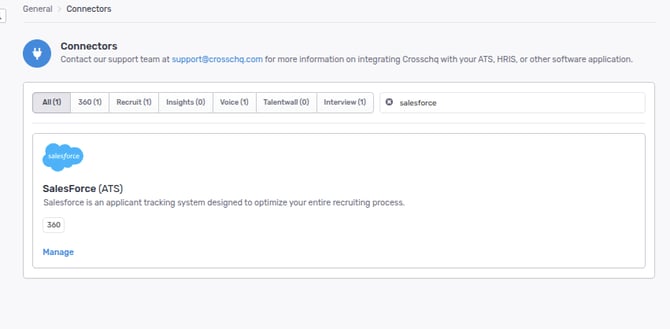
- Turn on the connector using the toggle on the right. The toggle should turn green.
- Under API settings, enter:
- Salesforce URL — your My Domain URL
- Consumer Key — copied from Salesforce
- Consumer Secret — copied from Salesforce
- Click Test connection. Crosschq saves the credentials and makes a small request to your org to confirm they work. If the test fails, see Troubleshooting.
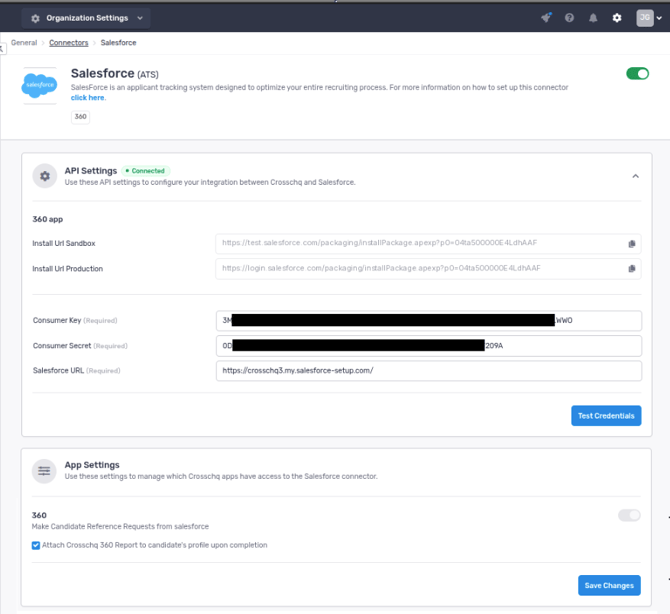
Once the connection is confirmed, Crosschq syncs the rest of your templates to Salesforce (see Configure Crosschq templates).
If you ever need to change these settings, return to Organization Settings > Connectors > Salesforce and click Manage.
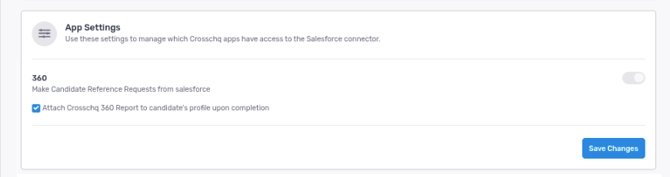
360 settings
Once your API settings are saved, you can configure the Crosschq 360 settings for the connector. When you enable Attach Crosschq 360 report to the candidate's Contact upon completion, Crosschq uploads the completed report PDF to the candidate's Contact record in Salesforce.
Grant access to your users
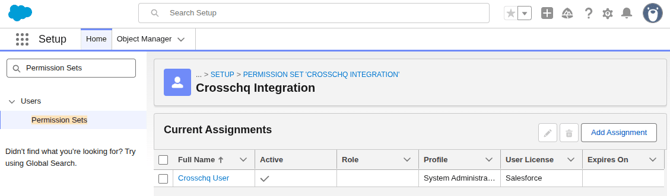
In Salesforce, the package installs a permission set called Crosschq Integration. It grants access to the Crosschq Template field on Opportunity and to the Crosschq 360 object. Assign it to:
- The integration user — required. Without it, Crosschq cannot read your jobs or write Crosschq 360 records in your org.
- Recruiters who create jobs, and anyone else who should see reference check results.
To assign it:
- In Salesforce Setup, go to Permission Sets and open Crosschq Integration.
- Click Manage Assignments, then Add Assignment.
- Select the users and click Assign.
The integration user needs two additional permissions so Crosschq can keep the Crosschq Template picklist in sync with your templates: Customize Application and Modify Metadata Through Metadata API Functions. Grant these to the integration user through a permission set or its profile. Assign them to the integration user only, not to recruiters.
Add Crosschq to your Salesforce pages
These steps are done by your Salesforce administrator. Two pages need a change: the Opportunity page, so recruiters can choose a template when they create a job, and the Contact page, so they can see reference check results.
Opportunity: add the Crosschq Template field
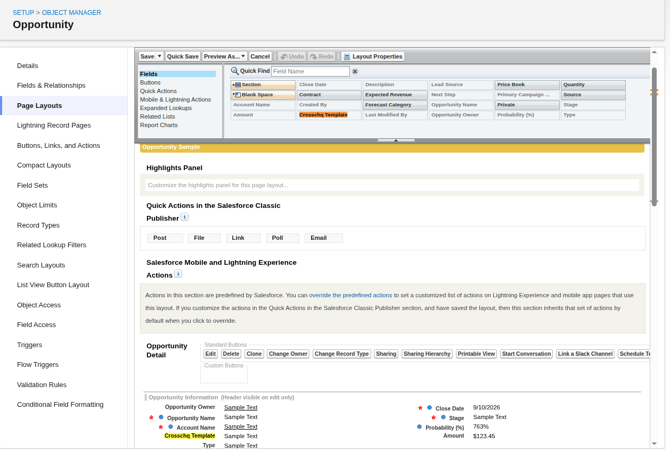
The New Opportunity form is built from the Opportunity page layout, so the field has to be on the layout to appear when a recruiter creates a job.
- In Salesforce Setup, go to Object Manager > Opportunity > Page Layouts and open the layout your recruiters use.
- From the palette at the top, drag Crosschq Template onto the layout — the Opportunity Information section, next to Opportunity Name, is a natural place for it.
- Click Save.
Contact: add the Crosschq 360 tab
Most customers add Crosschq 360 as a tab next to Details on the Contact page. The standard Opportunities related list should already be on the Contact page — recruiters use its New button to create jobs.
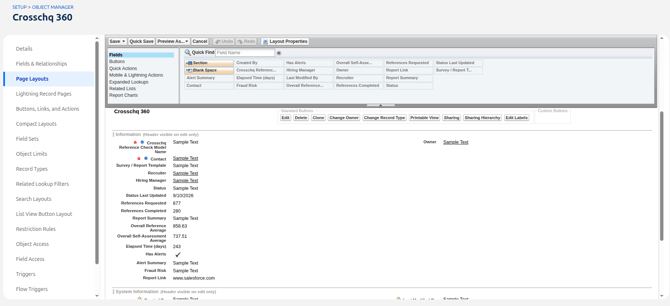
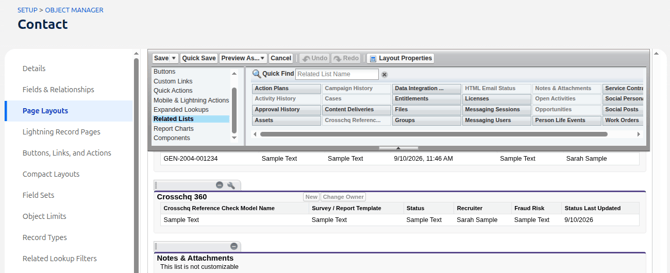
First, add the related list to the Contact page layout. The Crosschq 360 related list has to be on the page layout before it can be placed in a tab.
- In Salesforce Setup, go to Object Manager > Contact > Page Layouts and open the layout your recruiters use.
- In the palette at the top, select Related Lists and drag Crosschq 360 onto the layout. While you're here, confirm Opportunities is also in the related lists.
- Click Save.
If you prefer, the Crosschq 360 related list can be placed on the Related tab instead.
Configure Crosschq templates
Templates are reference request configurations used to trigger requests from ATS connectors. You need to set up your Crosschq templates before you can send requests from Salesforce.
In Crosschq, go to Organization Settings > Templates and select Create New Template. Enter the template name, add an ATS tag, and complete the request settings — position, survey, and the number and type of references. See the Crosschq 360 templates guide for the full walkthrough.
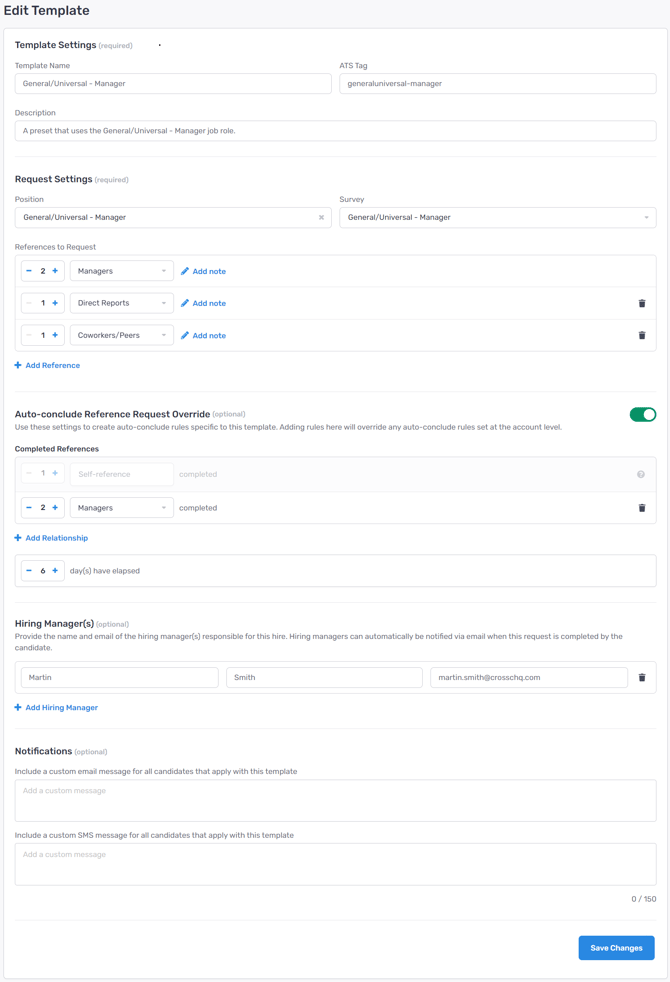
Templates sync to Salesforce automatically. The package installs the Crosschq Template picklist on Opportunity with two starter templates. As soon as the connection is confirmed, Crosschq adds the rest of your templates, and from then on every template you create, rename, or delete in Crosschq is reflected in Salesforce — usually within a few minutes.
A few things to know:
- Deleting a template in Crosschq deactivates it in Salesforce rather than removing it. Jobs that already use it keep their setting, but a job with a deactivated template will not start a new reference check until a valid template is selected.
- Renaming a template in Crosschq updates the label recruiters see in Salesforce; existing jobs are unaffected.
- The picklist only accepts templates that exist in Crosschq. Recruiters cannot type a template name that is not on the list.
Sending a Crosschq from Salesforce
Note: The following steps describe how to trigger a reference check from within an opportunity. We also offer the option to manually trigger a reference check by clicking a button within the Contact object. Reach out to support@crosschq.com to learn how to configure this feature.
A reference check starts when a job with a Crosschq template is created for a candidate. Always create the job from the candidate's Contact — that is what links the candidate to the job.
- Open the candidate's Contact record and scroll to the Opportunities related list.
- Click New.
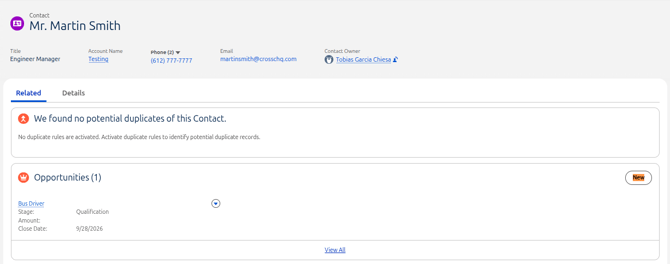
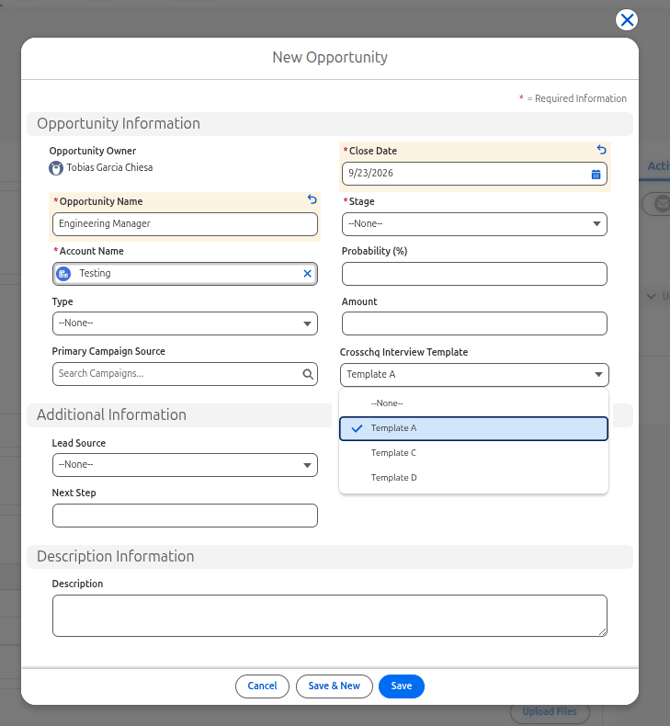
- In the New Opportunity form, fill in:
- Opportunity Name — the job title, exactly as it should appear in Crosschq and in the report file name (for example, Engineering Manager).
- Crosschq Template — the template Crosschq should use for this check.
- The standard required fields — Account Name (pre-filled from the Contact), Close Date, and Stage — following your team's conventions for recruiting jobs.
- Click Save.
Make sure the candidate's Email on the Contact record is correct — this is where the invitation is sent.
Crosschq checks your org about every five minutes. When it finds the new job, it confirms the template is valid, creates the reference check, and emails the candidate a link to begin the Crosschq process. At the same time it adds a Crosschq 360 record to the Contact showing the job, the template used, and the status SENT. Nothing further is needed from the recruiter.
You can also start a check for a job that already exists: open the Opportunity, set Crosschq Template, and save. The job must be linked to the candidate — if it was created from the Opportunities tab rather than from the Contact, add the candidate as a Contact Role on the Opportunity first.
Who the requestor is. The requestor in Crosschq — the person who is notified of progress and can grade the request — is the owner of the Opportunity, matched to a Crosschq user by email address. If the owner doesn't have a Crosschq account yet, Crosschq creates one automatically and sends them a welcome email. New accounts are created as Viewers by default; your Crosschq administrator can change the default role in Crosschq's sign-up settings.
Note: A reference check is only started when the job has a valid Crosschq Template, is linked to the candidate, and the candidate's Contact has a valid email address. If any of these is missing, no Crosschq 360 record will appear on the Contact. Fix the job or the email and Crosschq will pick it up on the next check. Changing a job's template after its check has started does not send a new request.
Tracking status
Each reference check appears as a Crosschq 360 record on the candidate's Contact, with the job it belongs to and a Status that updates automatically as the request progresses. You can see it in the Crosschq 360 tab on the Contact, in list views, and in Salesforce reports.
Additional statuses may be added over time as the connector evolves.
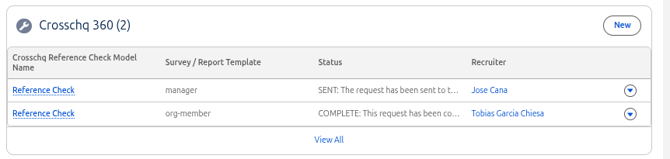
The Crosschq 360 record appears within about five minutes of saving the job. After that, status changes appear in Salesforce shortly after they happen in Crosschq.
Viewing a Crosschq report
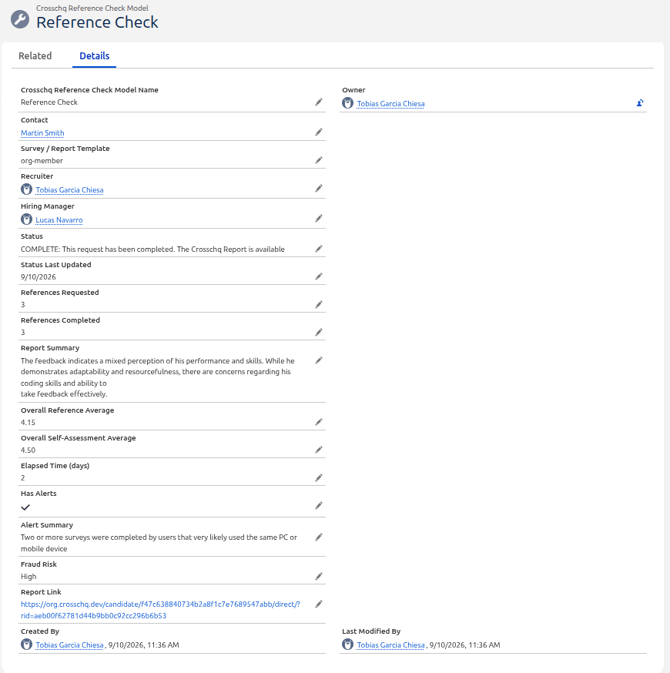
When the candidate completes the self-reference and all references respond, the Crosschq 360 record in Salesforce is updated with:
- Score — the candidate's overall Crosschq score
- Report URL — a link to the full interactive report in Crosschq
A PDF copy of the report is also attached to the candidate's Contact record under Notes & Attachments. Each file is named after the job and the completion date, in the form Crosschq_360_Report_<Job_Title>_<Date>.pdf.
The requestor also receives an email from Crosschq when the report is complete.
-1.png?width=670&height=800&name=image%20(19)-1.png)
There are two ways to view the report:
- Click the Report URL on the Crosschq 360 record to open the completed report in Crosschq. Only users with Crosschq accounts can access the report this way.
- Open the PDF from Notes & Attachments on the Contact record. The PDF can be viewed by anyone with access to the Contact in Salesforce.
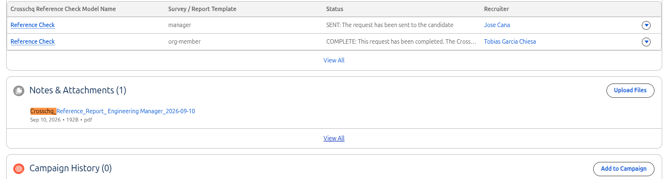
If a report is regenerated in Crosschq, the PDF in Salesforce is updated as a new version of the same file rather than a second copy. Earlier versions remain available in the file's version history in Salesforce.
What Crosschq reads and writes
Crosschq connects to your Salesforce org as the integration user you configured and only accesses the data needed for the integration.
Crosschq uses the Opportunity owner's name and email address to identify the requestor and, if needed, to create their Crosschq account. Crosschq does not read or modify any other Salesforce data, and it never changes your Opportunities or Contacts.
About the template sync. Keeping the Crosschq Template picklist in sync means Crosschq updates a picklist definition in your org, which Salesforce treats as a configuration change. This is why the integration user needs the Customize Application and Modify Metadata Through Metadata API Functions permissions. These changes are recorded in your org's Setup Audit Trail. Crosschq does not use these permissions for anything other than the template picklist.
All communication uses HTTPS. Crosschq authenticates using OAuth 2.0 client credentials issued by your own Salesforce org, and you can revoke access at any time from External Client App Manager in Salesforce Setup.
Troubleshooting
Test connection fails in Crosschq.
In Salesforce, open External Client App Manager > Crosschq 360 > Edit Policies and confirm Enable Client Credentials Flow is checked and a Run As user is selected. Also check that the Salesforce URL is your My Domain URL (starting with https:// and ending in .my.salesforce.com), and that the Consumer Key and Secret were copied completely.
The Crosschq Template field doesn't appear on the New Opportunity form.
The field isn't on the Opportunity page layout, or the user doesn't have the Crosschq Integration permission set. See Add Crosschq to your Salesforce pages.
The Crosschq 360 tab doesn't appear on Contact records.
The Lightning page hasn't been activated, or was activated for a different app than the one the user is in. Open the Contact page in Lightning App Builder and check Activation. Also confirm the user has the Crosschq Integration permission set — without it the object is hidden.
Crosschq 360 isn't offered as a related list in Lightning App Builder.
The related list has to be on the Contact page layout first. See Add Crosschq to your Salesforce pages.
The Crosschq Template dropdown only shows the two starter templates.
The connector hasn't completed its first sync. Check that the connector is turned on and that Test connection succeeds. Also confirm the integration user has the Customize Application and Modify Metadata Through Metadata API Functions permissions — without them Crosschq cannot update the template list.
A template is missing from the dropdown, or shows as inactive.
New templates appear within a few minutes of being created in Crosschq. Deleted templates show as inactive and cannot be selected for new jobs.
I saved a job with a template but no Crosschq 360 record appeared on the Contact.
Check, in this order:
- The job has a valid Crosschq Template (not an inactive one).
- The job is linked to the candidate. Open the Opportunity and confirm the candidate appears under Contact Roles. Jobs created from the Contact's Opportunities list are linked automatically; jobs created elsewhere are not.
- The candidate's Contact has a valid email address.
- The connection works — in Crosschq, open the Salesforce connector and run Test connection. Common causes on the Salesforce side: the integration user was deactivated or lost the Crosschq Integration permission set; IP restrictions are enforced on the app; the Consumer Secret was rotated in Salesforce without being updated in Crosschq.
A recruiter received an unexpected welcome email from Crosschq.
This is expected. When a reference check starts for a job whose owner doesn't have a Crosschq account, Crosschq creates one and invites them to set it up. The email is legitimate and lets them follow the request and read the report.
The report PDF didn't attach to the Contact.
Check that Attach Crosschq 360 report to the candidate's Contact upon completion is enabled in the Salesforce connector's 360 settings, and that the integration user can create files in your org. The Report URL on the Crosschq 360 record still works regardless.
For anything else, contact support@crosschq.com with your Salesforce Org ID (Setup > Company Information) and the job (Opportunity) in question.