Read the sections below to learn more about the steps necessary to connect Crosschq 360 with Workday:
- Integration System User
- Security Group
- Crosschq Assessment Statuses
- Set Templates
- Sending a Crosschq Request from Workday
Workday Report Credentials
This section provides a detailed guide on how to configure the three available methods for granting Crosschq access to your Workday report.
Option 1: Basic Authentication
Integration System User
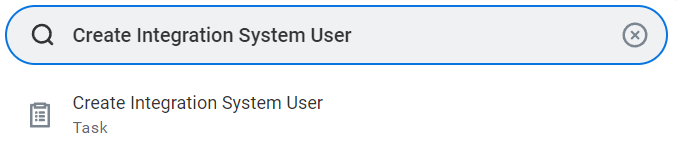
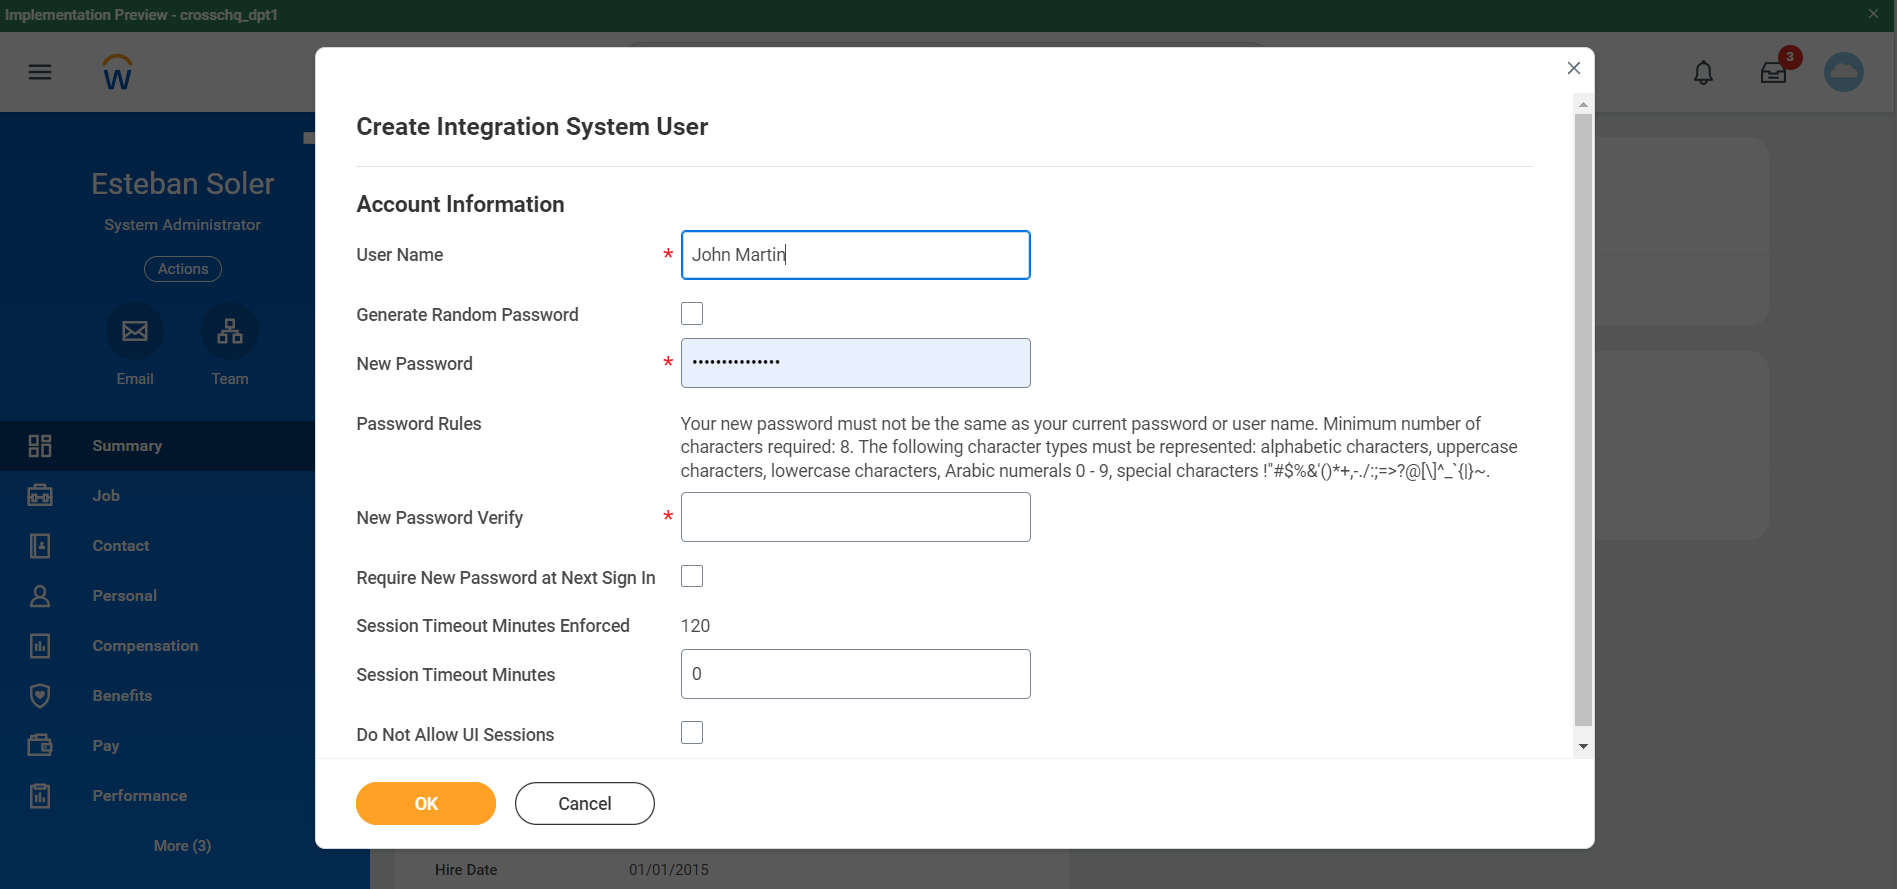
To begin enabling the Workday ATS integration, use the search bar to search for Create Integration System User.
Once you’ve done so, complete the following fields:
- Username
- New Password
- New Password (Verify)
Click OK, check the information on the next page, and select Done.
Security Group
The user created in the last step must be linked to a security group. There are two ways to link the user with a security group:
- A - Assign the user to an existing security group;
- B - Create a security group and then assign users.
A - Assign the user to a security group
If you already created your security group, go to the user profile, select the three dots, hover over Security Profile, select Assign Integration System Security Groups and assign the user to the desired security group.

B - Create a security group
Use the search bar to search for Create Security Group and fill out the fields according to the following:
- Type of tenants security group, please select the “Integration System Security Group (Unconstrained)” option;
- Name, please call the security group “Crosschq”. Remember you will need to search for the security group later.
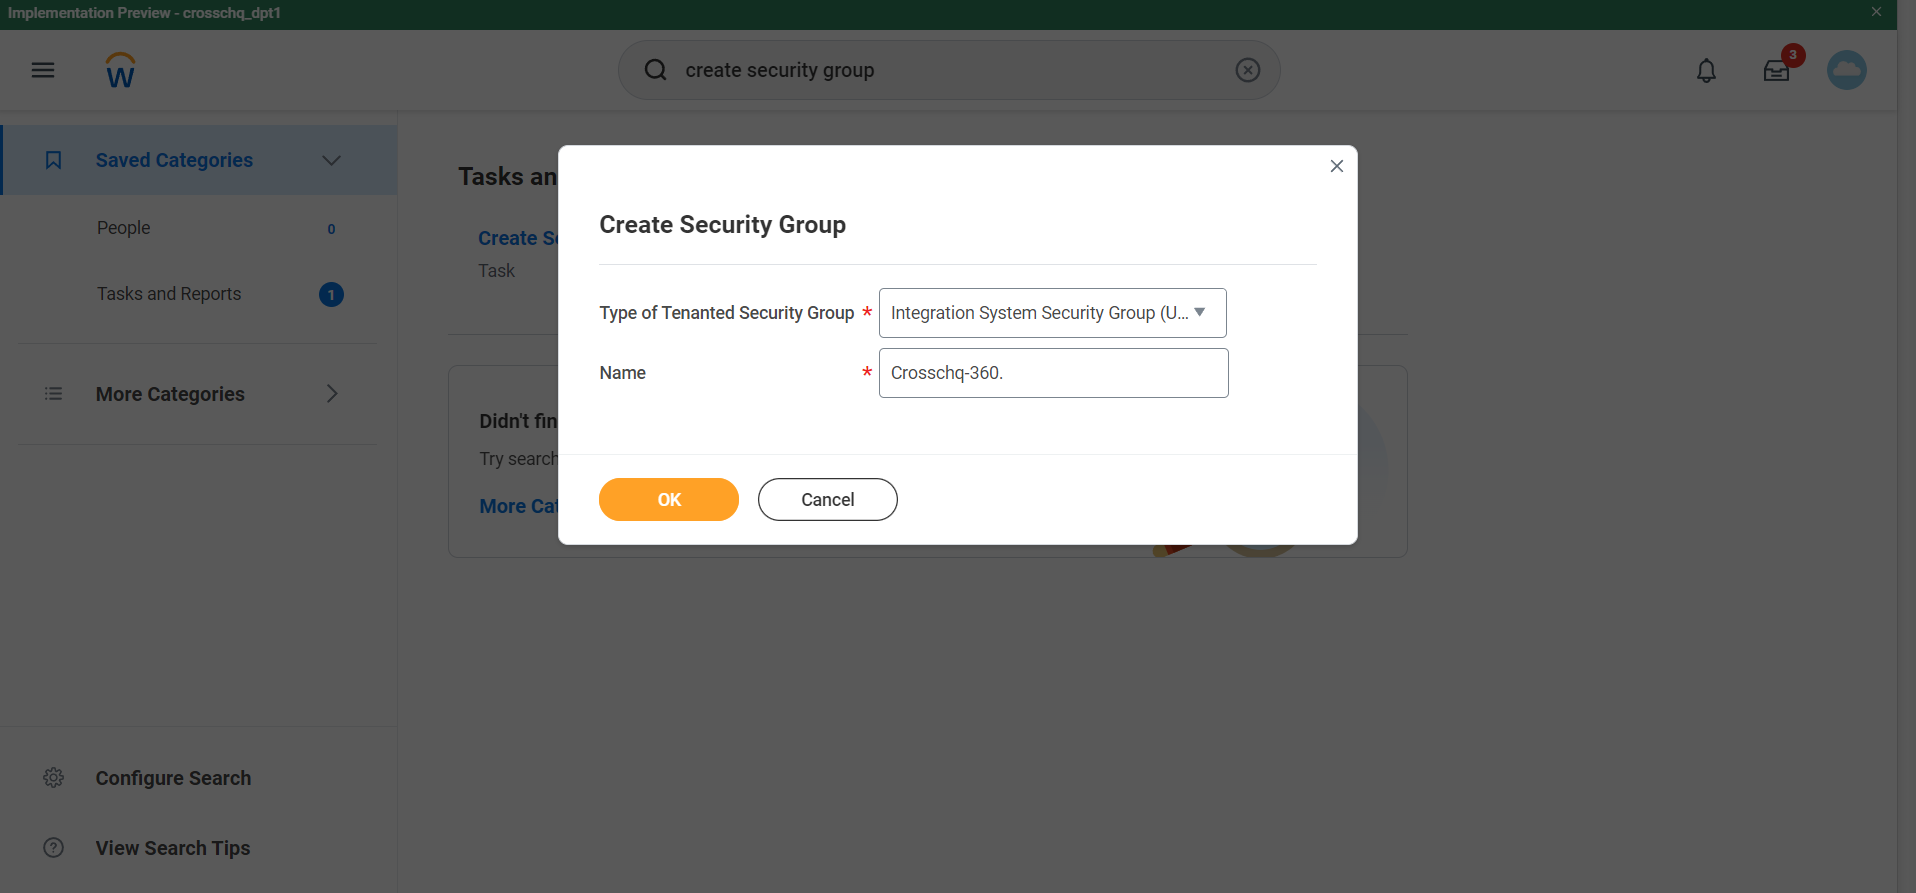
Then, select OK. You will be redirected to the next page where you have to search for the user you want to link with the security group.
Click the Integration System Users field and select the user created in the last step.
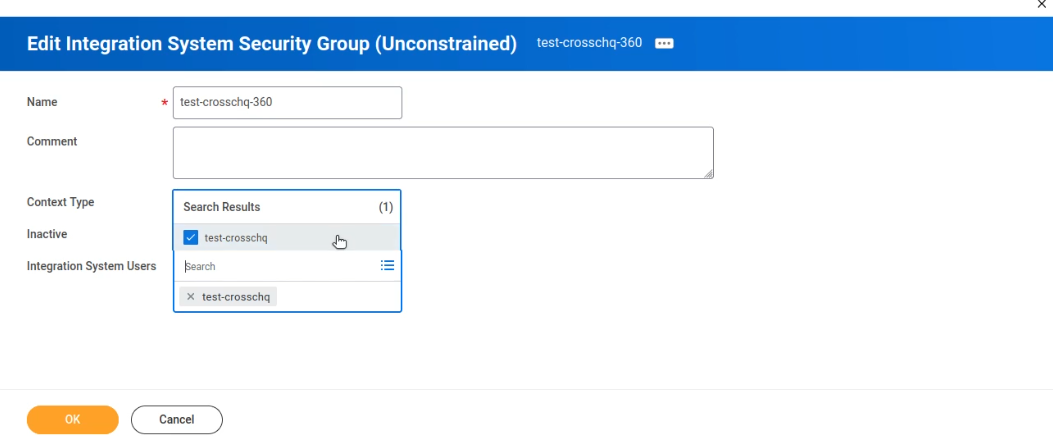
Click OK and Done.
Configuring security group data access and permission
Use the search bar to search for the Domain Security Policies for Functional Area task.
Fill out the Functional Area field with the Recruiting option, then click OK.
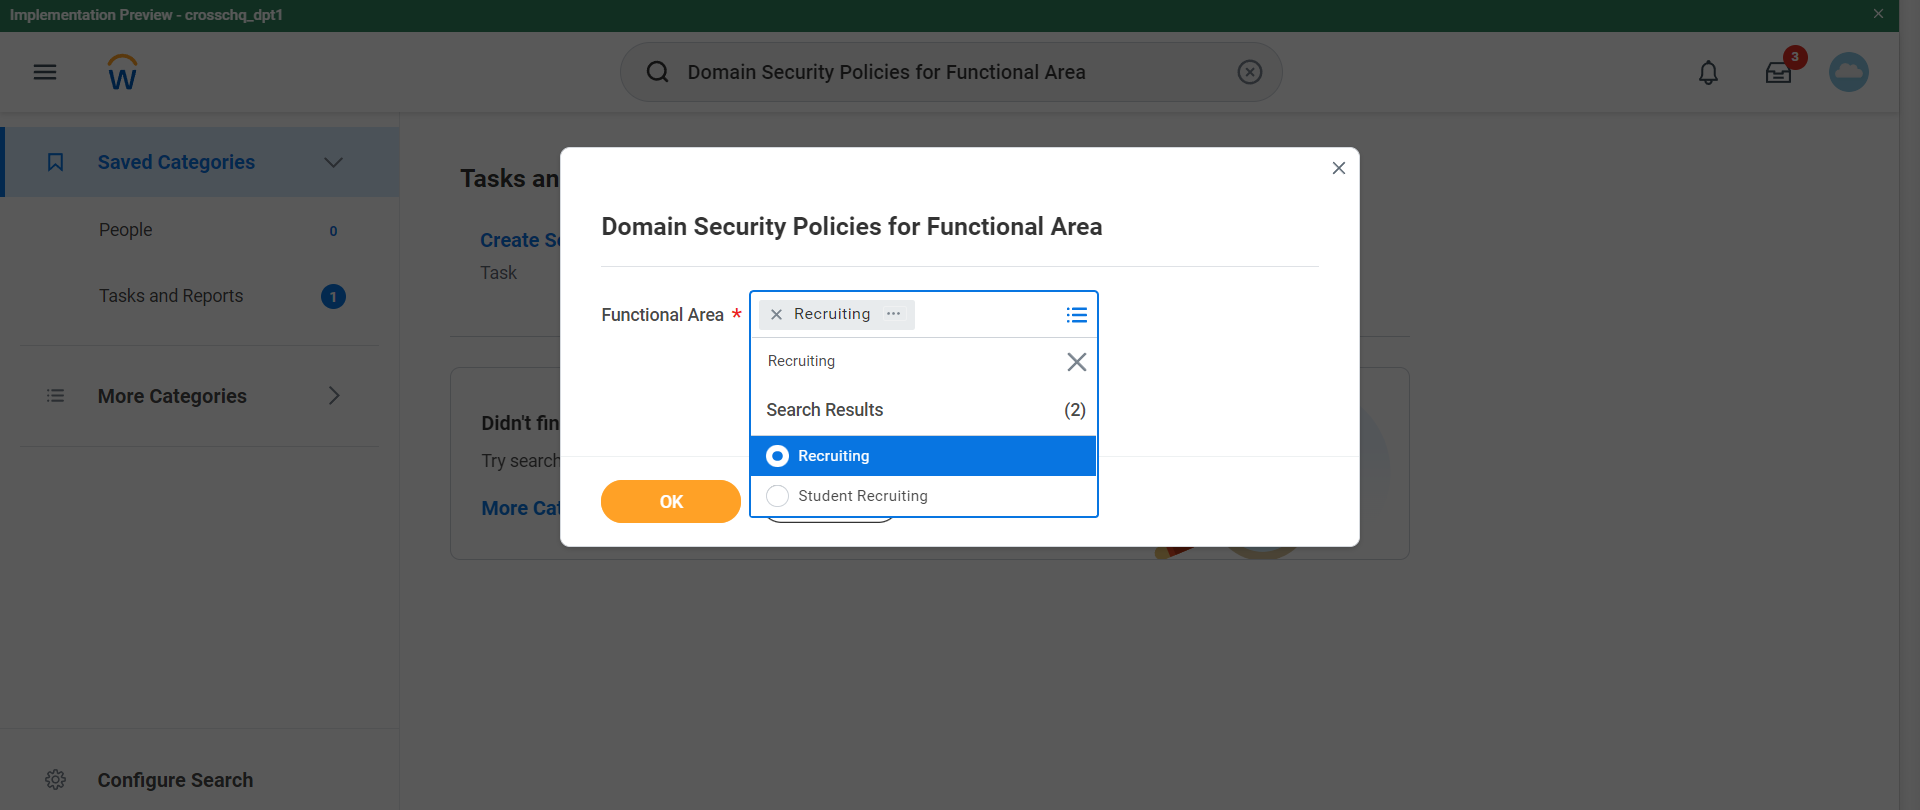
Once you’ve clicked OK you will be redirected to the next page.
Within the Recruiting domain details, you will be able to configure the permissions for the security group you’ve created before.
You have to add the following permissions to the security group:
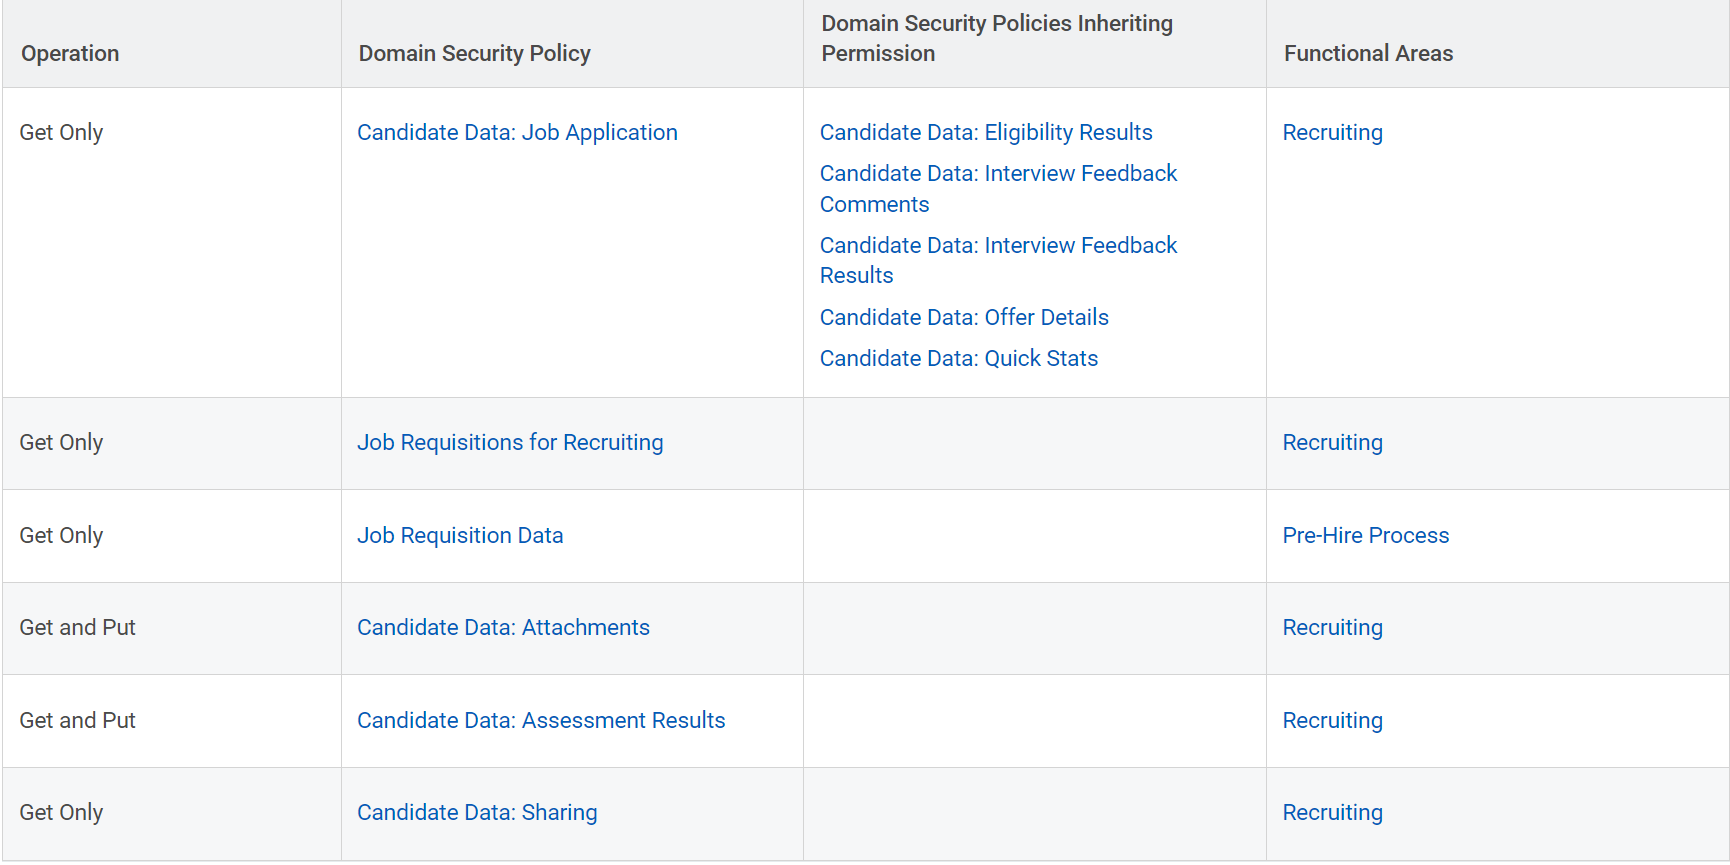
- (Get Only) Candidate Data: Job Application
- (Get AND Put) Candidate Data: Assessment Results
- (Get AND Put) Candidate Data: Attachments
- (Get Only) Candidate Data: Sharing
- (Get Only) Job Requisition Data
- (Get Only) Job Requisitions for Recruiting
The following process must be repeated for each individual permission:
1) Select the permission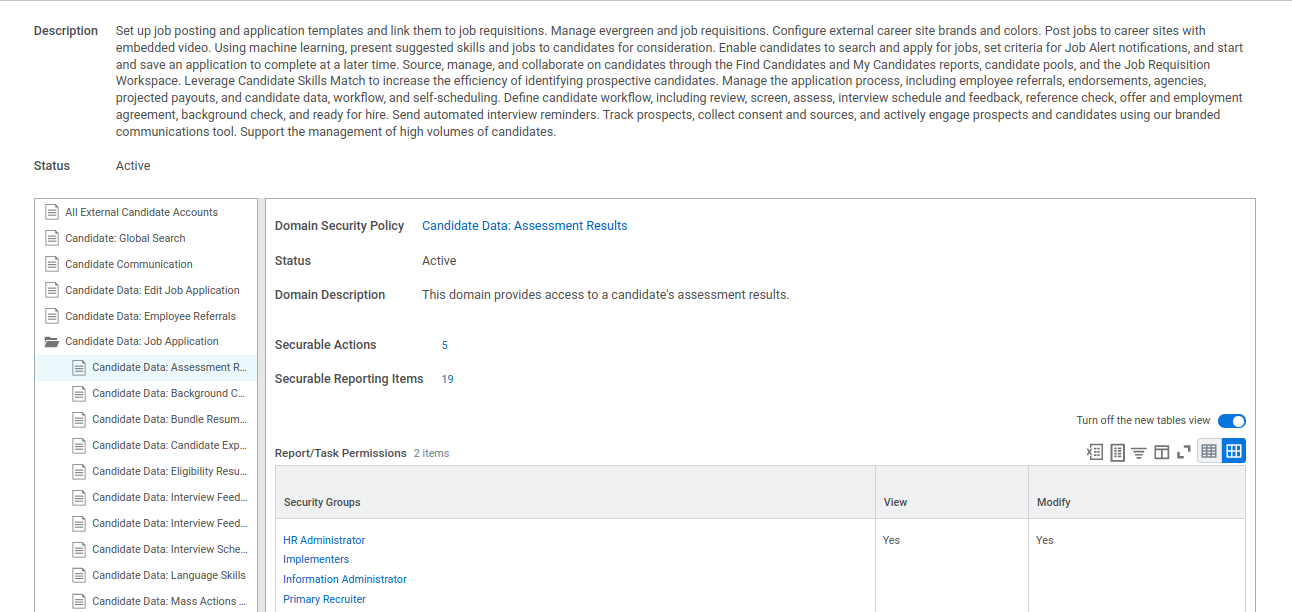
*note: the image shows the candidate Data: Assessment Results permission
2) Scroll down and select Edit Permissions.
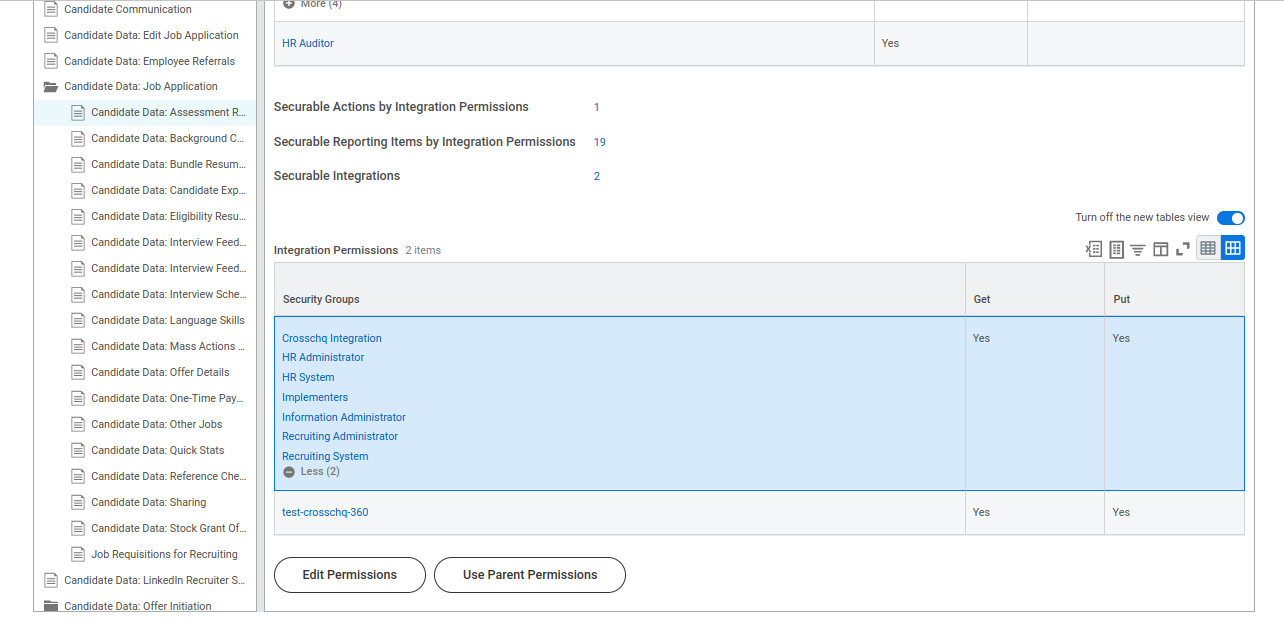
3) Add the security group you have created before.
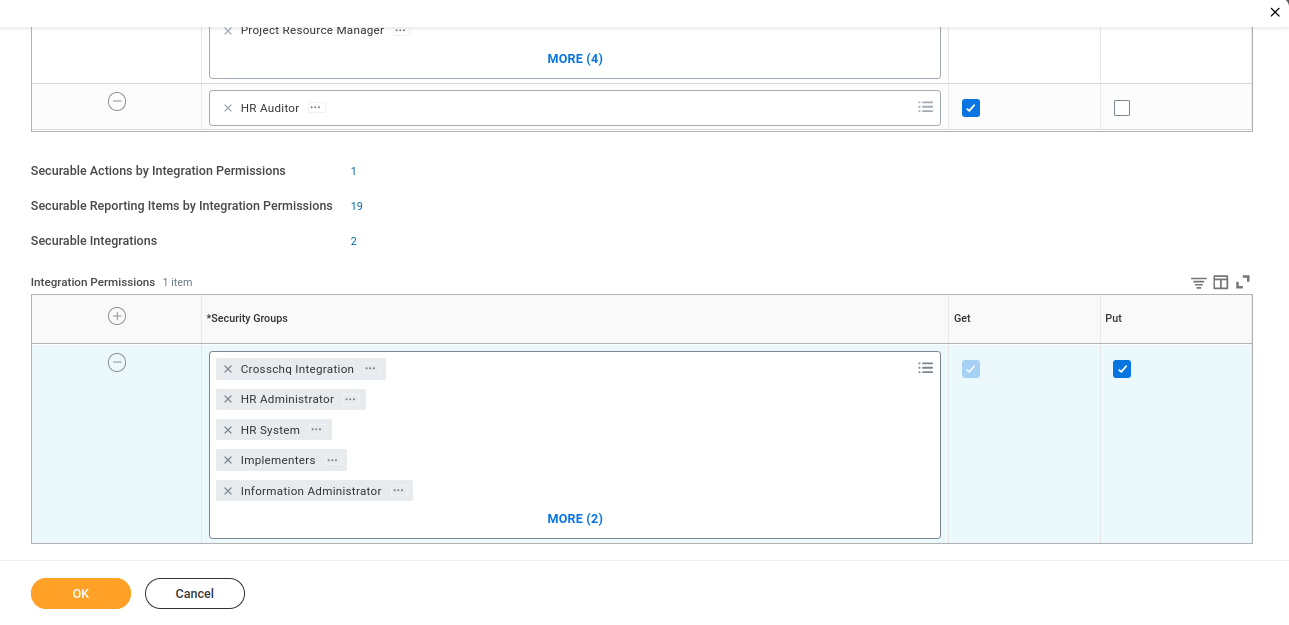
Important: Set GET and PUT permissions. The following table shows which domain should have GET and PUT permissions.
An alert asking to check if these checkboxes are selected will prompt.
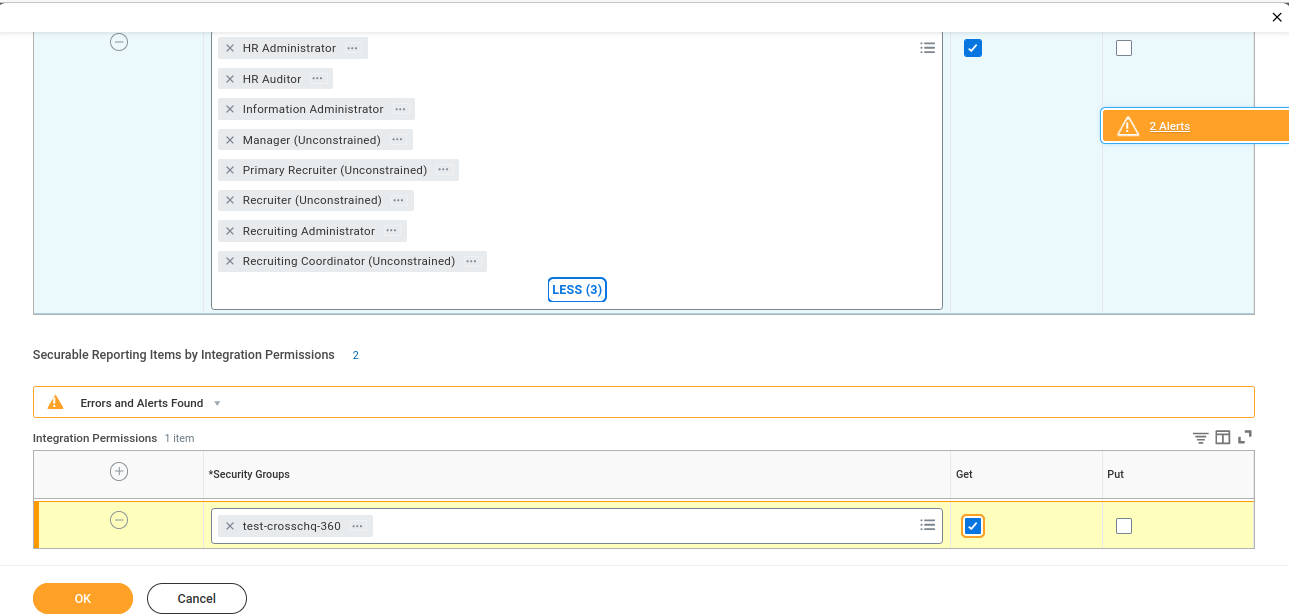
4) For changes to be effective you will have to complete the Activate Pending Security Policy Changes task.
Once you’ve linked the security group with the permissions, use the search bar to search for Activate Pending Security Policy Changes and click OK. This process will save the modifications.
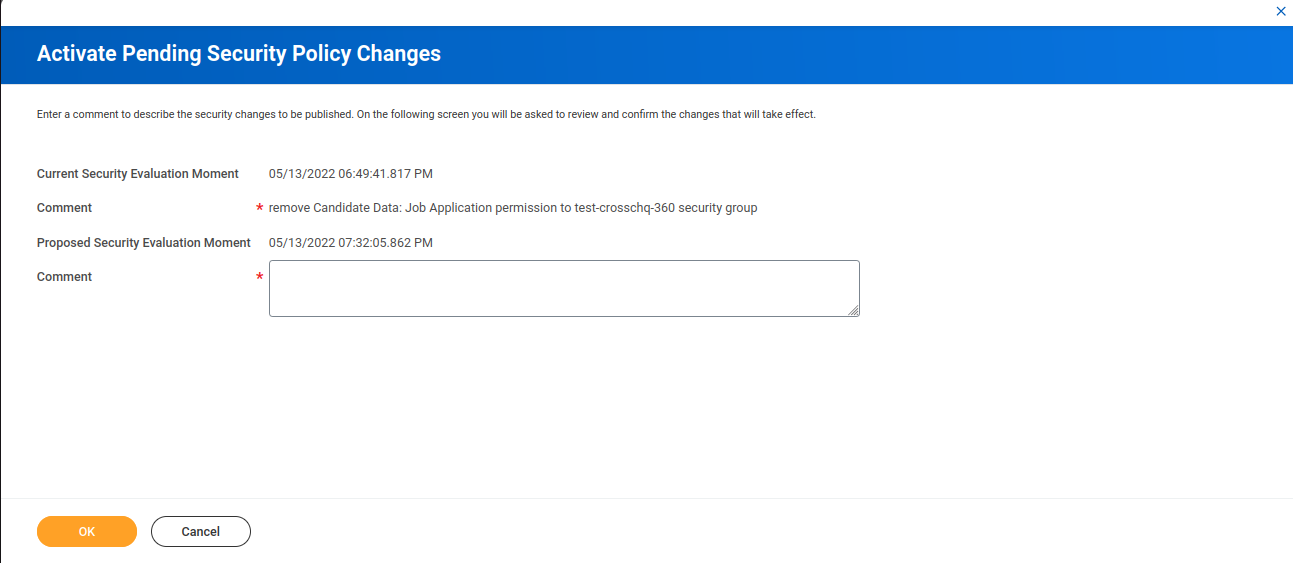
Click OK again.
After this step is completed, enter the following information into the Workday API settings section, within the Organization Settings in the Crosschq platform.
- ATS tenant
- ATS username
- ATS password
.png?width=670&height=279&name=image%20(166).png)
Option 2: OAuth 2.0 authentication (Vía JWT)
This method provides a more secure way for Crosschq to access your information compared to Basic Authentication. Unlike the Code Grant method, the JWT method uses a specific user to access the report. One of the final steps in this section will guide you through creating an Integration System User.
To begin the configuration, go to the Workday settings in Crosschq and select the Oauth 2.0 (JWT) option.
-1.png?width=670&height=330&name=image%20(69)-1.png)
Now navigate to your Workday instance on a separate tab to set up the authentication on the Workday side.
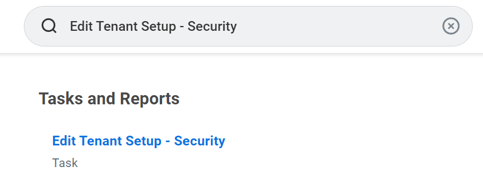
Use the search bar to search for Edit Tenant Setup - Security.
Access the task, scroll down to locate the OAuth 2.0 Settings section, and check the OAuth 2.0 Clients Enabled box.
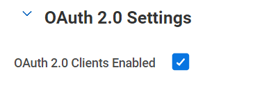
Click OK to save the changes. This will enable the OAuth 2.0 authentication method.
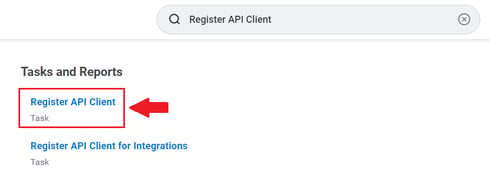
Next, search for Register API Client and access this section. Here you will generate the specific API that Crosschq will use to access your Workday Report.
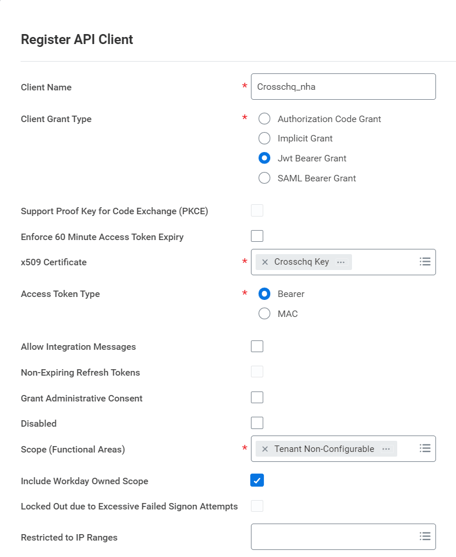
Configure the following fields:
- Client name: Type the desired name for your API;
- Client Grant Type: Select "Jwt Bearer Grant";
- x509 Certificate: select "Create x509 Public Key". You will be redirected to a different section. There you will see the following fields:
- Name: type the desired name for your x509 public key;
- Certificate: Paste the Public Key you will find within the Workday Connector section in Crosschq.

Then, press OK;
- Access Token Type: Select Bearer;
- Scope (Functional Areas): Select Workday REST API >
- Contact Information
- Jobs & Positions
- Pre-Hire Process
- Recruiting
- Staffing
- Tenant Non-Configurable

Click OK to save the changes. After Clicking OK, the following information will show up on the API client page:
- Client ID
- Workday REST API Endpoint
- Token Endpoint
- Authorization Endpoint
The next and last step is to create an Integration System User (ISU) that Crosschq will use to access your information in Workday.
Search for Create Integration System User and access the task.

- Add a name to your user;
- Create a password;
- Activate the Do Not Allow UI Sessions checkbox. This box prevents others to log in to the Workday user interface using ISU credentials, the ISU will still be able to use web services/integrations.
Then click Ok.

Next, you need create a security group for the Integration System User (ISU). Simply enter Create Security Group in the search bar and select the corresponding task to continue.

- Name the security group and select Integration System Security Group (Unconstrained) within the Type of Tenanted Security Group field. Click OK.
- On the next screen under Integration System Users select the ISU you previously created and click OK.

Now you need to assign domains to the Security Group. Navigate to the security group you just created (if you’re unable to locate it, you can search for the name in the search bar, and make sure your search option is “All of Workday” on the left column).
Go to the security group’s related actions icon, hover over Security Group, and click Maintain Domain Permissions for Security Group.

In here you will provide the specific permissions for Crosschq to access the information in the report.
All the following permissions are mandatory for Crosschq to access the report data and must be added within Domain Security Policies permitting Modify access
|
Domain Security Policy Permissions
|
|||
| Operation | Domain Security Policy | Domain Security Policies Inheriting Permission | Functional Areas |
| View and Modify | Worker Data: Current Staffing Information | Staffing | |
| View and Modify | Worker Data: Organization Information | Worker Data: Management Chain Worker Data: Organizations |
Staffing |
| View and Modify | Worker Data: Employment Data | Staffing | |
| Get Only | Person Data: Marital Status | Personal Data | |
| Get Only | Worker Position: View | Staffing | |
| Get Only | Person Data: Date of Birth | Personal Data | |
| Get Only | Person Data: Gender | Personal Data | |
| Get Only | Person Data: Work Contact Information | Person Data: Work Email | Contact Information |
| Get Only | Person Data: Work Phone | Contact Information | |
| Get Only | Worker Data: Worker ID | Personal Data | |
| Get Only | Person Data: Education | Worker Profile and Skills | |
| Get Only | Person Data: Ethnicity | Personal Data | |
| Get Only | Job Requisitions for Recruiting | Recruiting | |
| Get Only | Job Information | Jobs & Positions | |
| Get Only | Reports: Job Requisition & Positions | Pre-Hire Process | |
| Get Only | Person Data: Home Contact Information | Person Data: Home Address Person Data: Home Email Person Data: Home Instant Messenger Person Data: Home Phone Person Data: Home Web Address |
Contact Information |
| Get Only | Candidate Data: Personal Information | Candidate Data: Birth Place Candidate Data: Citizenship Status Candidate Data: Date of Birth Candidate Data: Disabilities Candidate Data: Ethnicity Candidate Data: Gender Candidate Data: Gender Identity Candidate Data: Marital Status Candidate Data: Military Status Candidate Data: National and Government IDs Candidate Data: Nationalities Candidate Data: Pronoun Candidate Data: Religion Candidate Data: Sexual Orientation Candidate Data: Sexual Orientation & Gender Identity Candidate Data: Social Benefits Data |
Recruiting |
| Get Only | Job Profile: View | Jobs & Positions | |
| Get Only | Worker Data: Public Worker Reports | Staffing | |
| Get Only | Candidate Data: Assessment Results | Recruiting | |
| Get Only | Candidate Data: Sharing | Recruiting | |
| Get Only | Candidate Data: Attachments | Recruiting | |
| Get Only | Candidate Data: Job Application | Candidate Data: Eligibility Results Candidate Data: Interview Feedback Comments Candidate Data: Interview Feedback Results Candidate Data: Offer Details Candidate Data: Quick Stats |
Recruiting |
| Get Only | Job Directory | Jobs & Positions | |
| Get Only | Job Requisition Data | Pre-Hire Process | |
| Get Only | Worker Data: All Positions | Staffing | |
| Get and Put | Candidate Data: Assessment Results | Recruiting | |
| Get and Put | Candidate Data: Attachments | Recruiting |

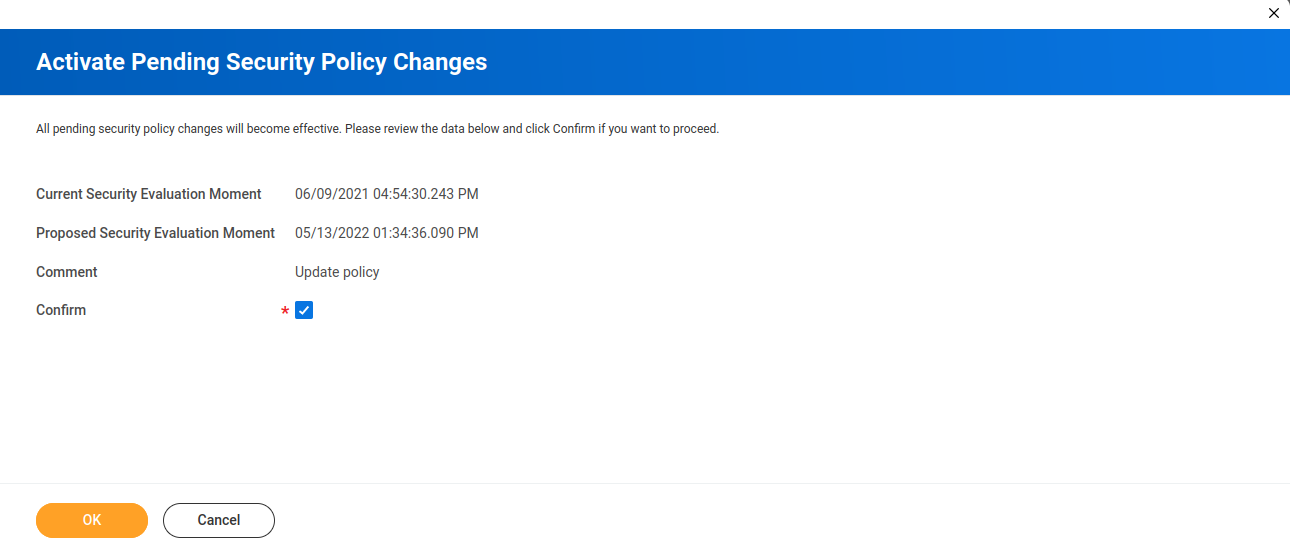
Once the domains are added, we need to confirm the changes. Go to the search bar and type "Activate Pending Security Policy Changes" and click the task.
Add any comments you have, click OK, check the confirm box, and click OK again.

With the completion of the steps in Workday, you will now have all the necessary information to enter into Crosschq to finalize the integration process.
Navigate back to Crosschq and enter all the data requested:

- Tenant: Paste the Tenant tag - this value will show up within the API Client section of Workday, at the top of the page, with a green background. See the image below:
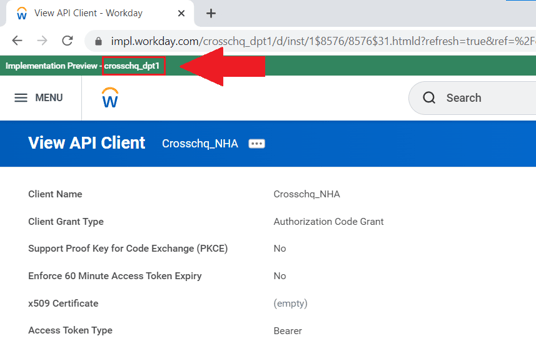
- Client ID: Paste the Client ID;
- Username: the username of the Integration System User (ISU);
- REST Endpoint: Paste the Workday REST API Endpoint;
- Token Endpoint: Paste the Token Endpoint;
- OAuth Endpoint: Paste the Authorization Endpoint;
Next, click Test Credentials. If the credentials are working fine, the next section called "Data Mapping" will be available and you will see the Connected status in green within Crosschq. If you do not see this status, please contact support@crosschq.com.

Now you can jump to the following step: Data Mapping and Sync Settings.
Create Crosschq Assessment Statuses
Create the following Assessment Statuses for Crosschq. Use the search bar to search for Maintain Assessment Statuses.
Next, click on the plus sign to start creating an assessment status. Here is a list of the statuses that must be created:
- Crosschq Send Invite - ID: Crosschq_Send_Invite
- Crosschq Sent - ID: Crosschq_Sent
- Crosschq Accepted - ID: Crosschq_Accepted
- Crosschq Assigning - ID: Crosschq_Assigning
- Crosschq Collecting - ID: Crosschq_Collecting
- Crosschq Concluded - ID: Crosschq_Concluded
- Crosschq Auto Concluded - ID: Crosschq_Auto_Concluded
- Crosschq Canceled - ID: Crosschq_Canceled
- Crosschq Auto Canceled - ID: Crosschq_Auto_Canceled
- Crosschq Completed - ID: Crosschq_Completed
- Crosschq Declined - ID: Crosschq_Declined
- Crosschq Invited - ID: Crosschq_Invite
The following fields must be completed for each status:
- Assessment Status Name
- Check Overall Status
- Check Test Status
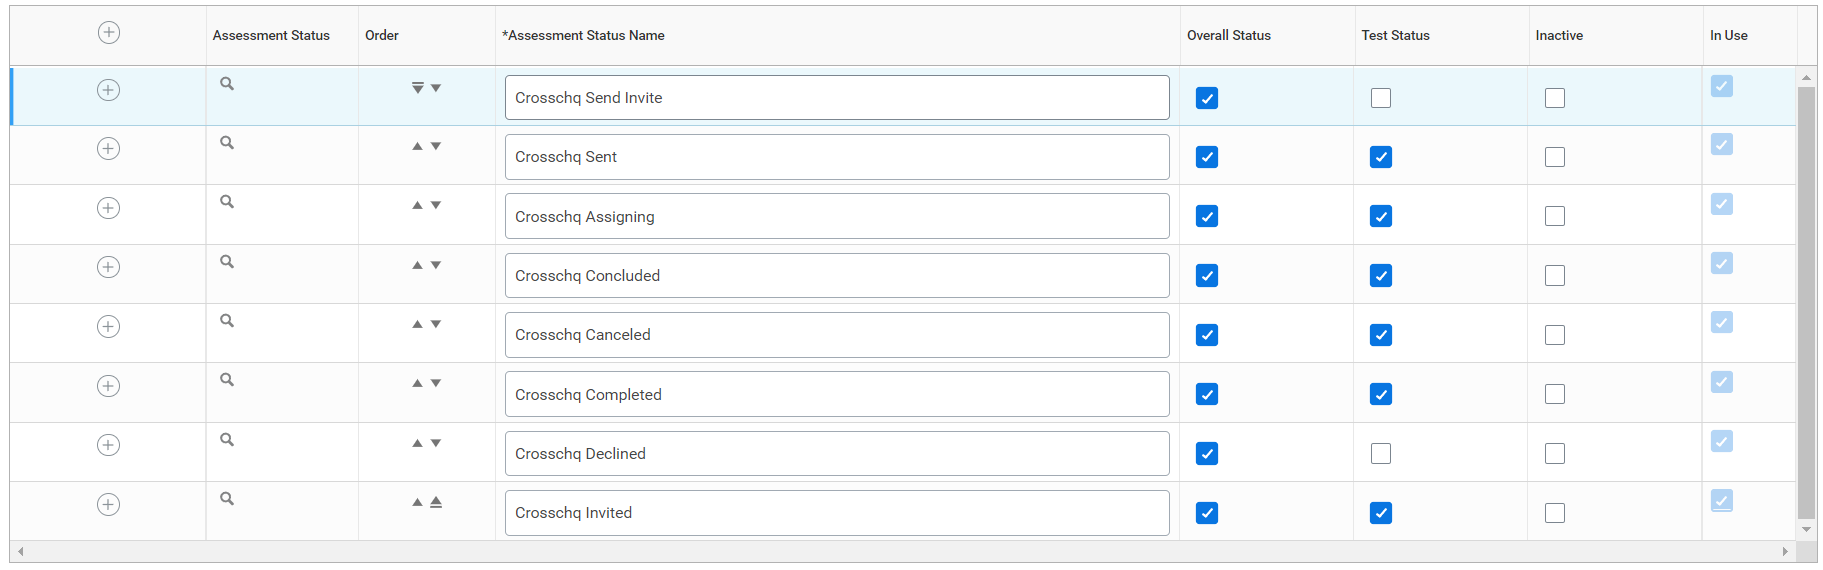
Click OK once you have added all the statuses.
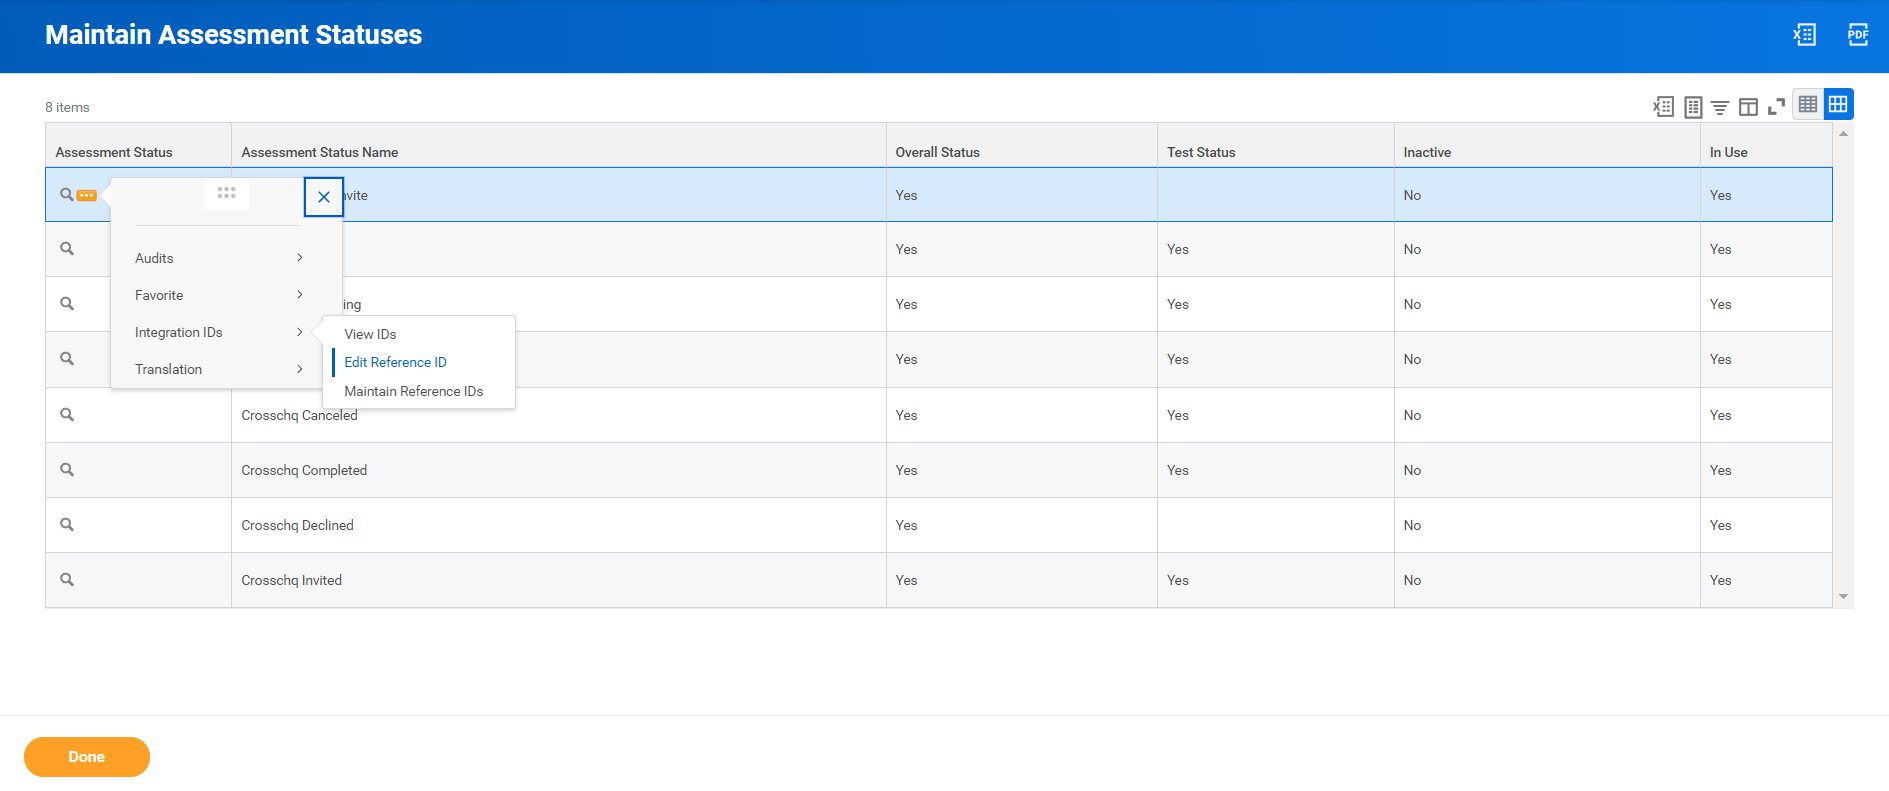
On the next page, you must edit the reference ID of each assessment status. Make sure the reference ID is the exact status from the list above. (Paste only the information in italics and bold).
To do this, hover over the assessment status column, click the three dots, go to Integration IDs > Edit Reference ID, and type the ID within the Reference ID value field. Repeat this process for each Assessment Status.

Set Templates
Within Crosschq, go to Organization Settings > Templates. Select Create New Template.
Enter the required information such as template name, add in an ATS Tag for that template if required, and create a description of the template.
Within the Request Settings, add in the position, select the appropriate survey, and configure the number/type of references you want to be associated with this request. Please note, the relationship type can either be specified or you can select any relationship type and let the candidate determine the type of reference. Additionally, you can add customized notes to each specific reference request, i.e. "Please provide a manager reference from X company."
From there, add in optional hiring manager information. Finally, you can create custom emails or text messages associated with each template by filling out the custom notifications section. When you are done, select Create Template.
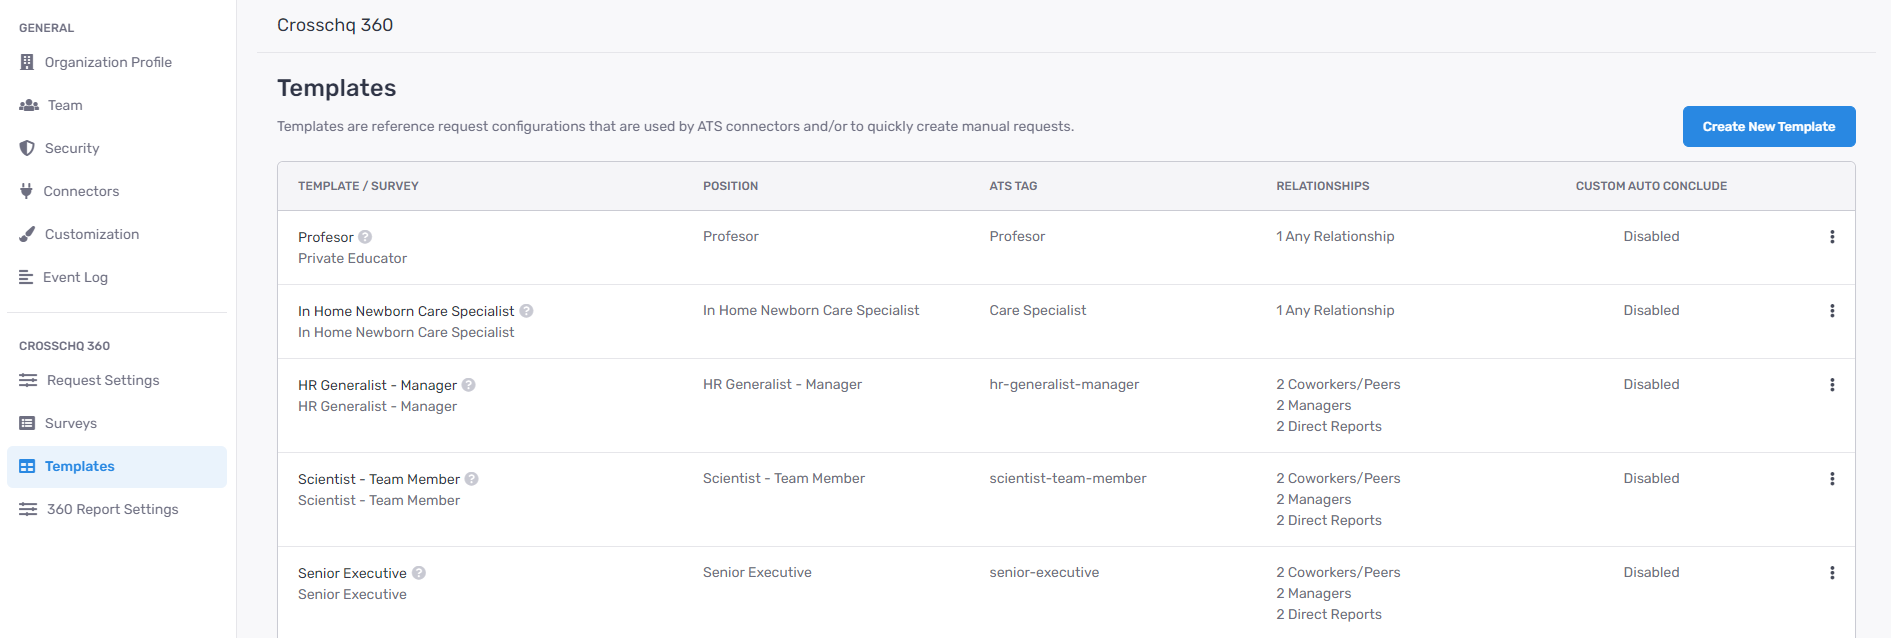
At any point, if you need to edit or delete a template, select the three dots next to the template and you can manage from there.

Repeat these steps for all necessary templates.
To complete this process you will need to then create your Crosschq templates within Workday. Proceed with the following:
1) Navigate to Workday and search for Maintain Recruiting Assessment Tests;
2) Create the assessments in Workday using the “Name” for the template in Crosschq and click OK;
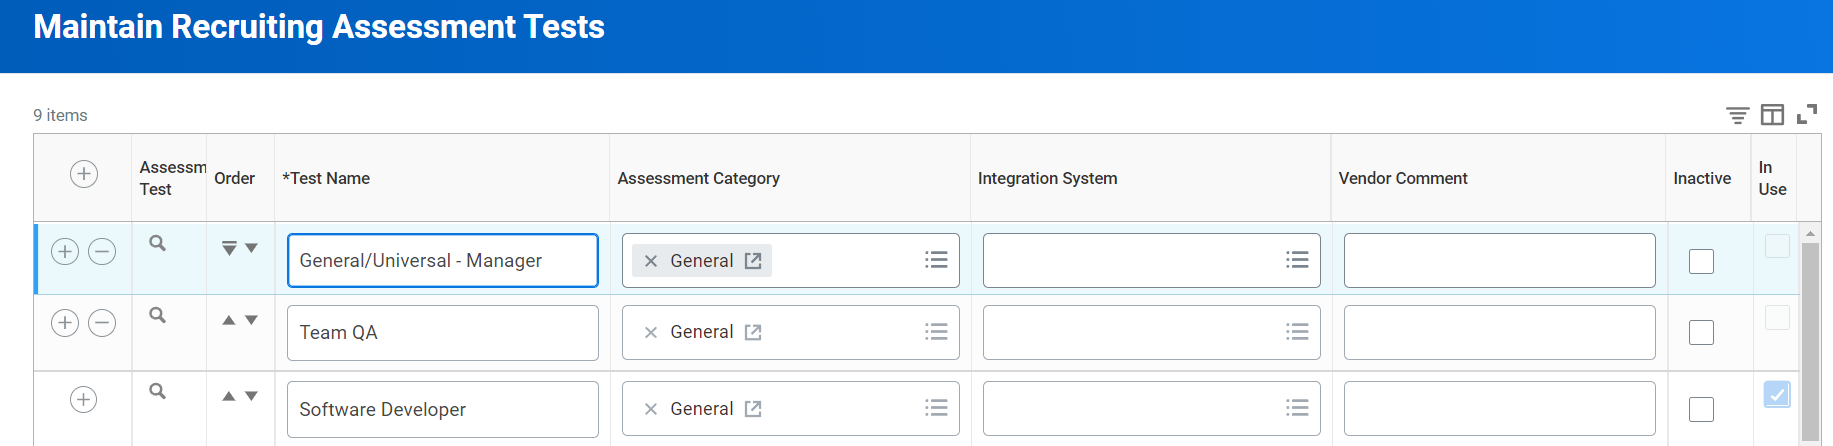
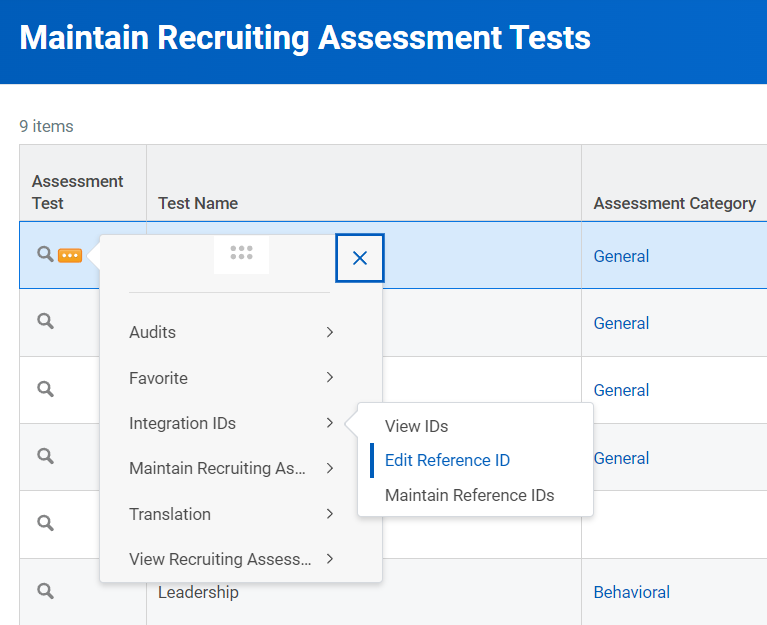
3) After creating the inline assessment, hover over the Assessment Test column, click the three dots, go to Integration IDs > Edit Reference ID, and paste the TAG value from the Crosschq template into the reference ID.
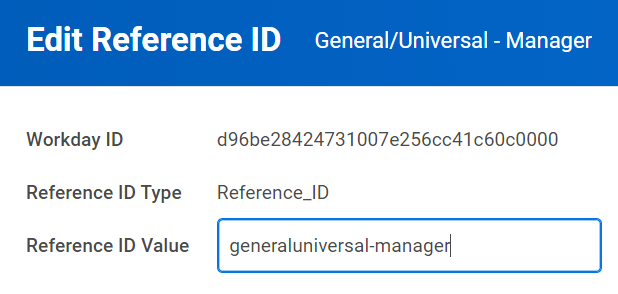
Note that both the Template Name and ATS tag in Crosschq should match the Assessment Name and Reference ID field in the Inline Assessment in Workday.
Sending a Crosschq Request from Workday
The candidate must create an account and apply for a job within Workday.
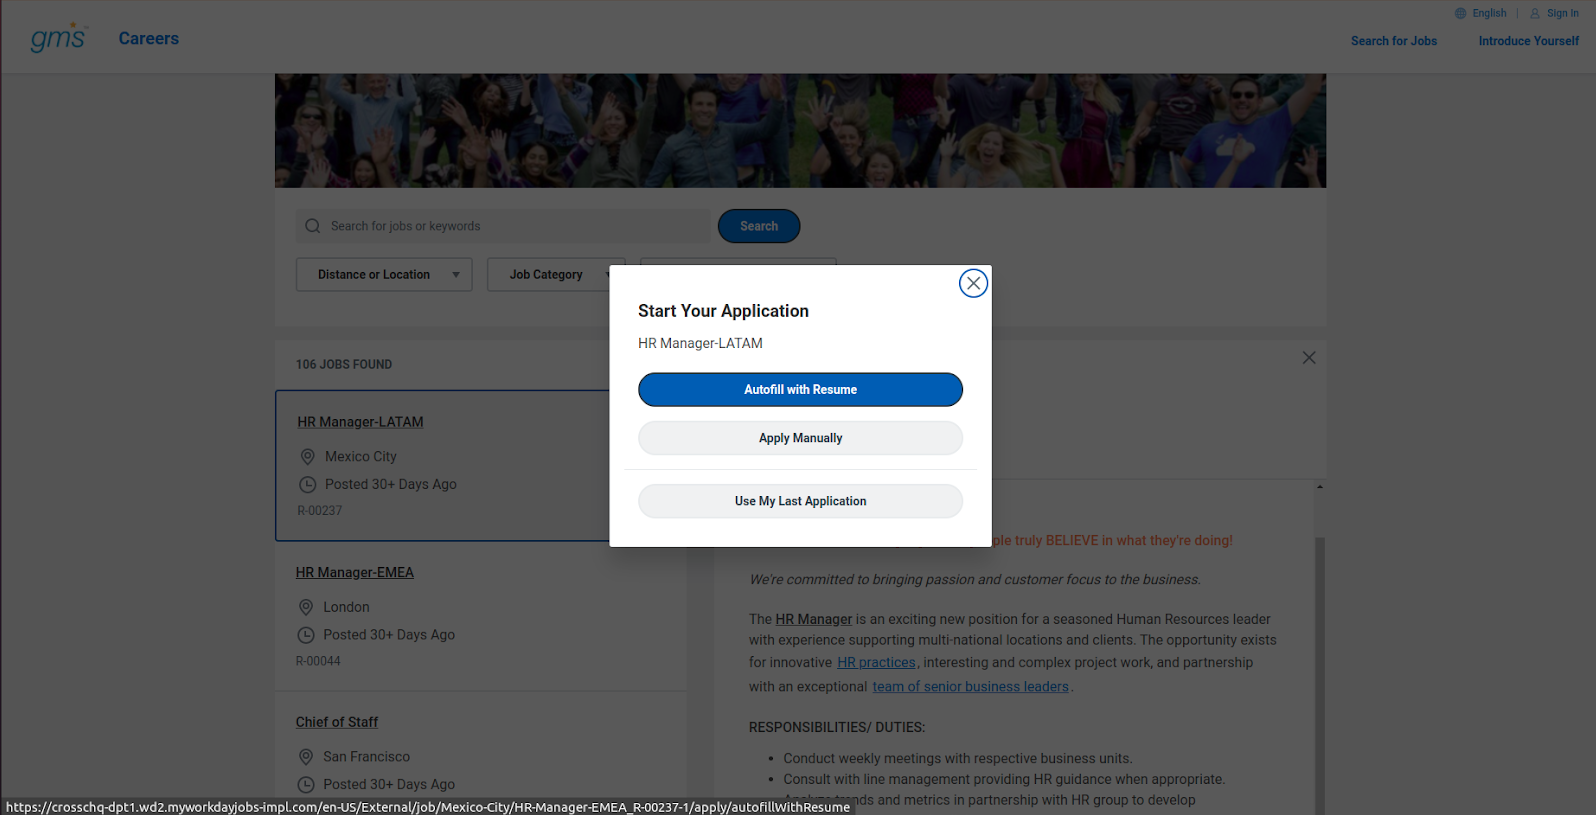
Once the candidate has completed their application, the recruiter will be able to locate them within Workday.
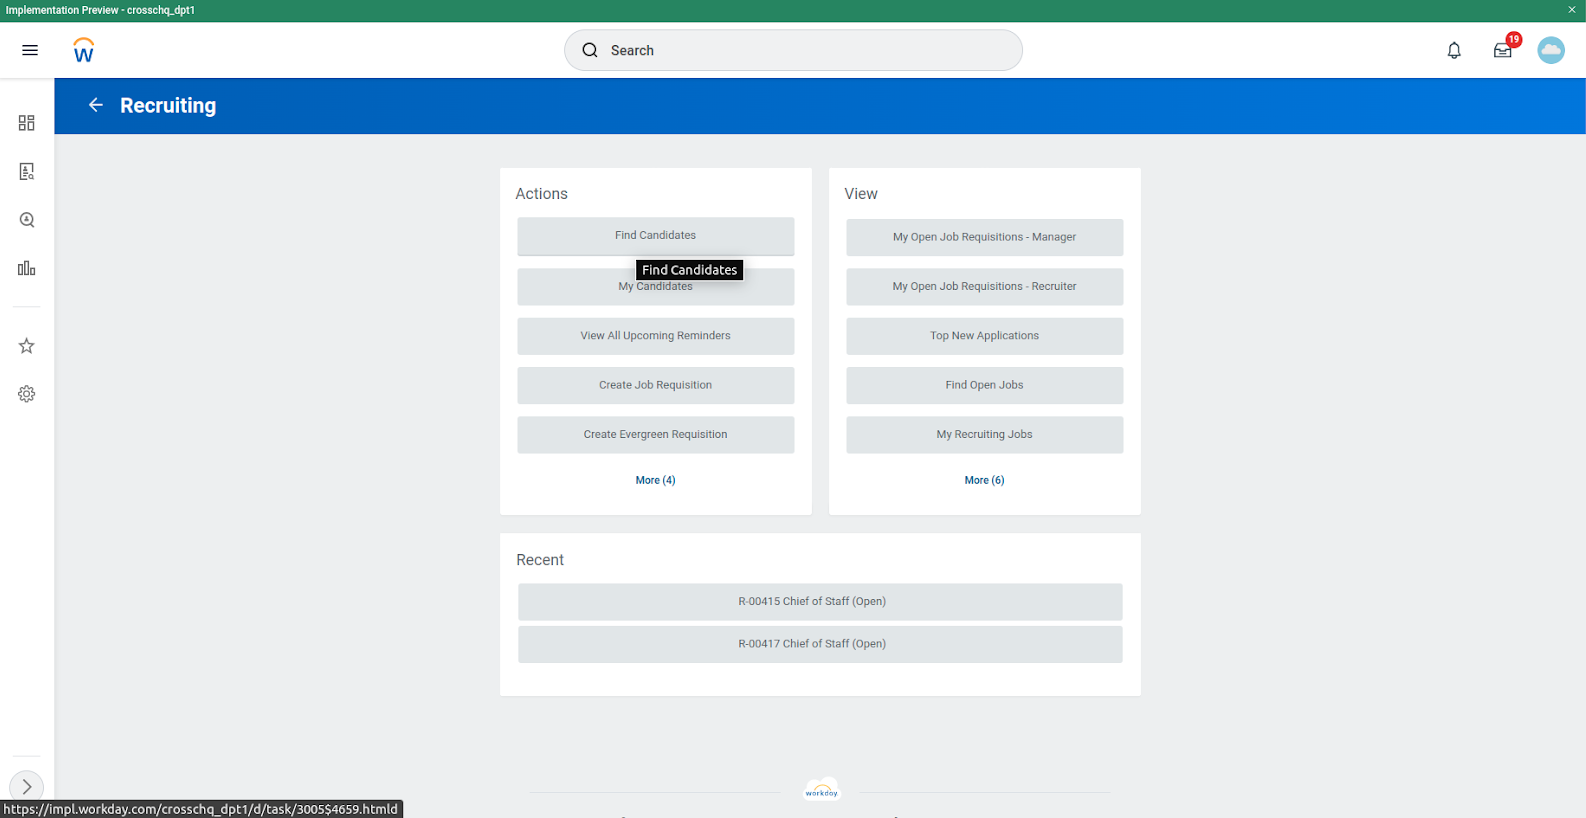
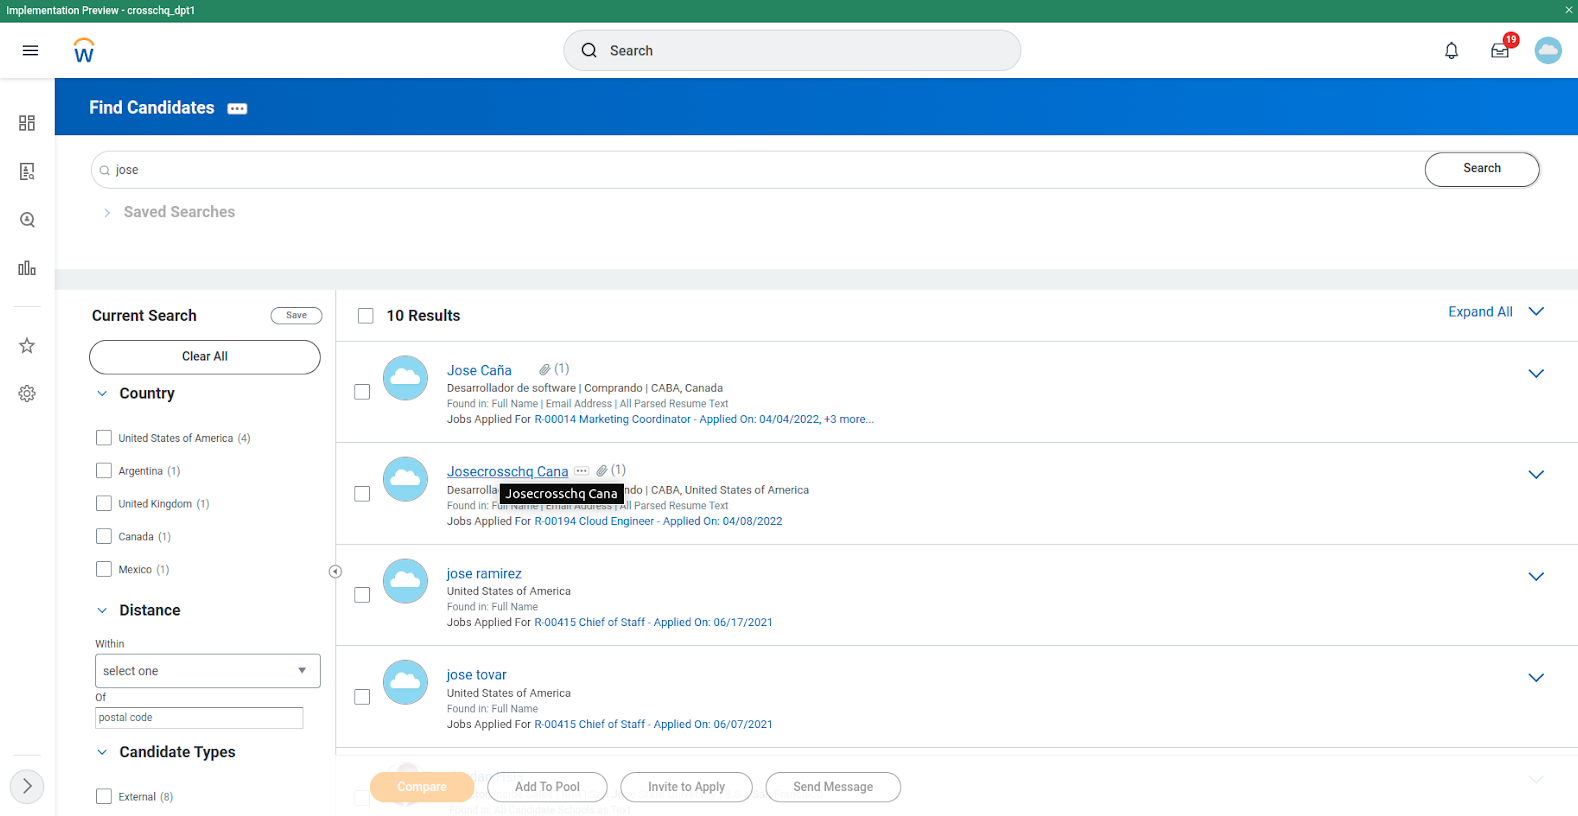
To get started, search for the candidate on Workday Recruiting.
- Click on “Find Candidates”.
- Access the candidate's profile.
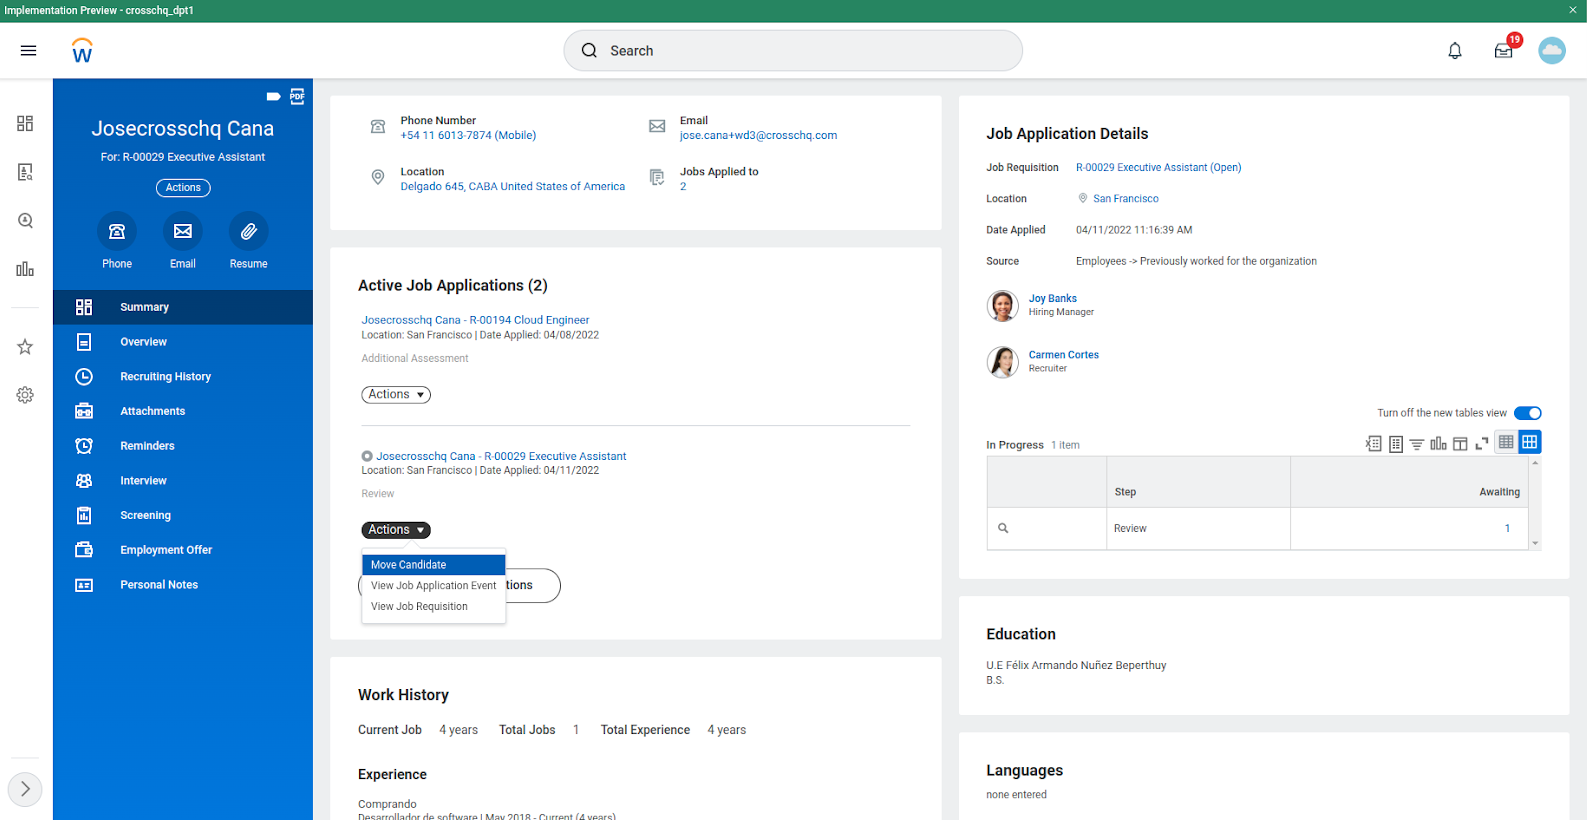
Next, move your candidate to the assessment stage.
- Click on Actions from Job Application, and click on Move Candidate
- Check Move Forward and select “Assessment” and click OK
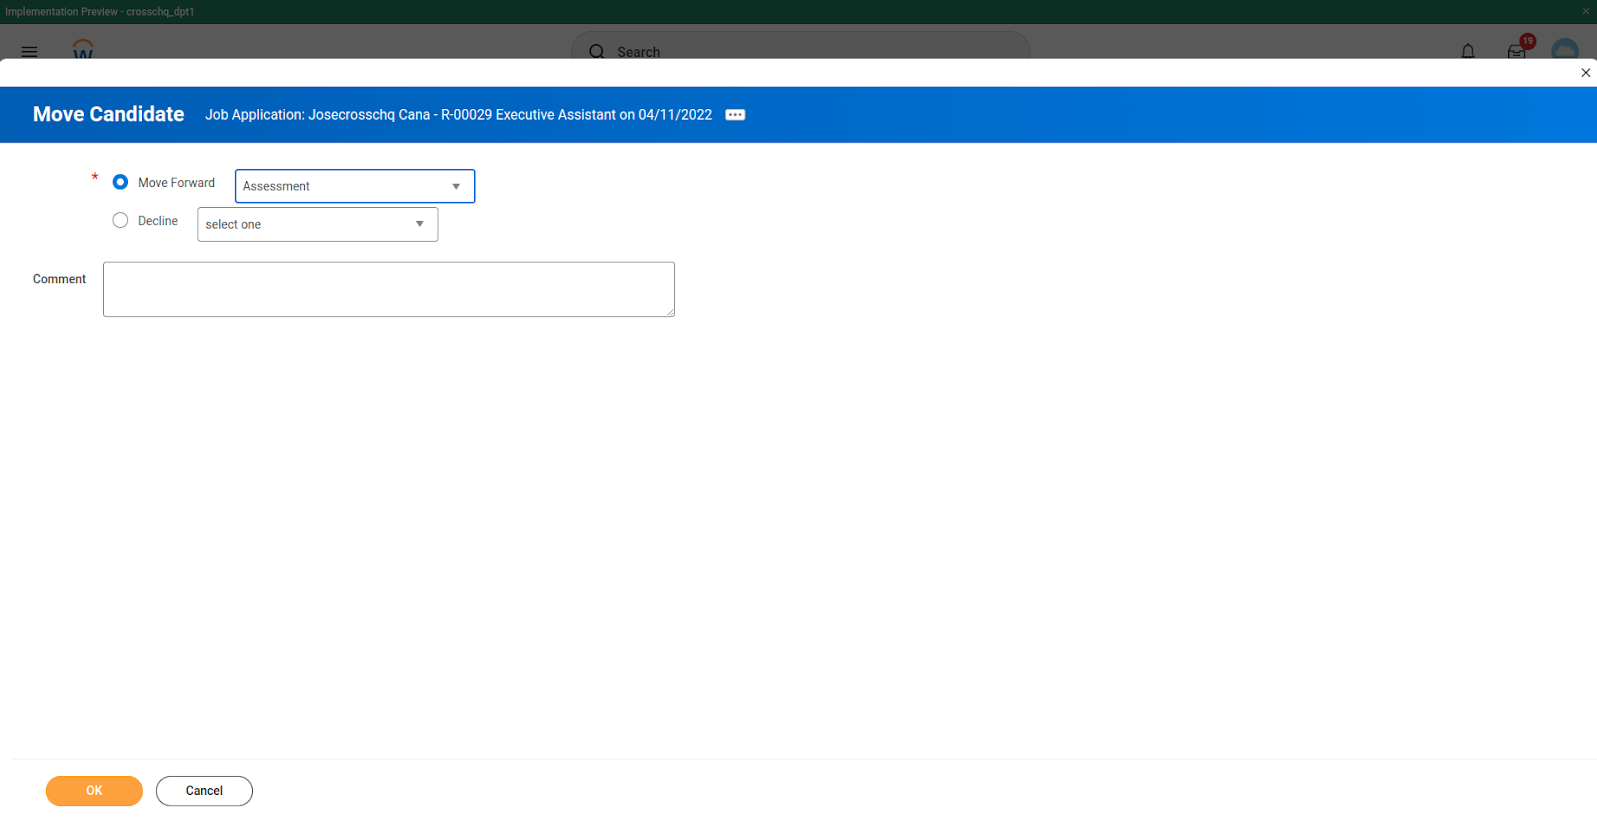
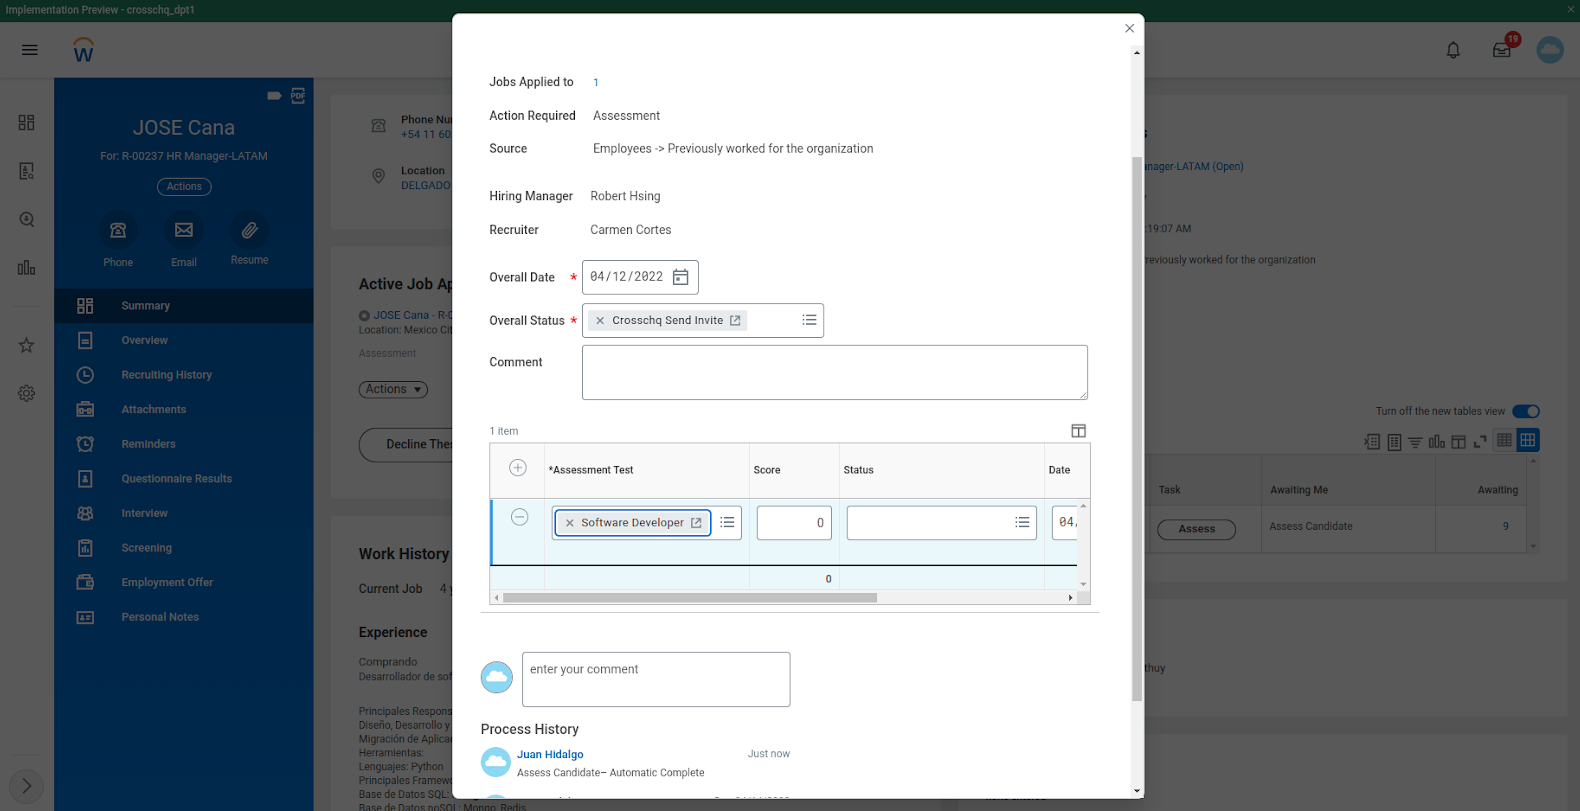
- Click on Assess to select the Survey Template

Within the Overall Status, select “Crosschq Send Invite”, and on the Assessment Test select the Survey Template that applies to the job you are hiring for, in this case, “Software Developer”. Select submit to send your Crosschq request to the candidate.
Note: The Survey Template (e.g. Software Developer) must be previously created in Crosschq within the templates section.
From here you will be able to track the status of the Crosschq request until it is completed. Once completed, you will see the Crosschq Report within Workday. If a candidate is marked as hired, this status will also be ingested into Crosschq.
We have implemented a new auto-cancelation feature, now when candidates are marked as rejected they will automatically have their reference request canceled within Crosschq.