- Getting started with Custom Questions
- Survey Editor
- Publishing Custom Questions
- Assigning Custom Questions to a job competency survey
- Translations
Custom Questions
For those with admin and super admin permissions, Crosschq offers the ability to create custom questions and append them to existing Crosschq surveys.
NOTE: It is essential to review the existing Crosschq questions before creating custom questions so you are not asking the same or redundant questions.
You can create Custom Questions by accessing Organization Settings > Surveys > Custom Questions.
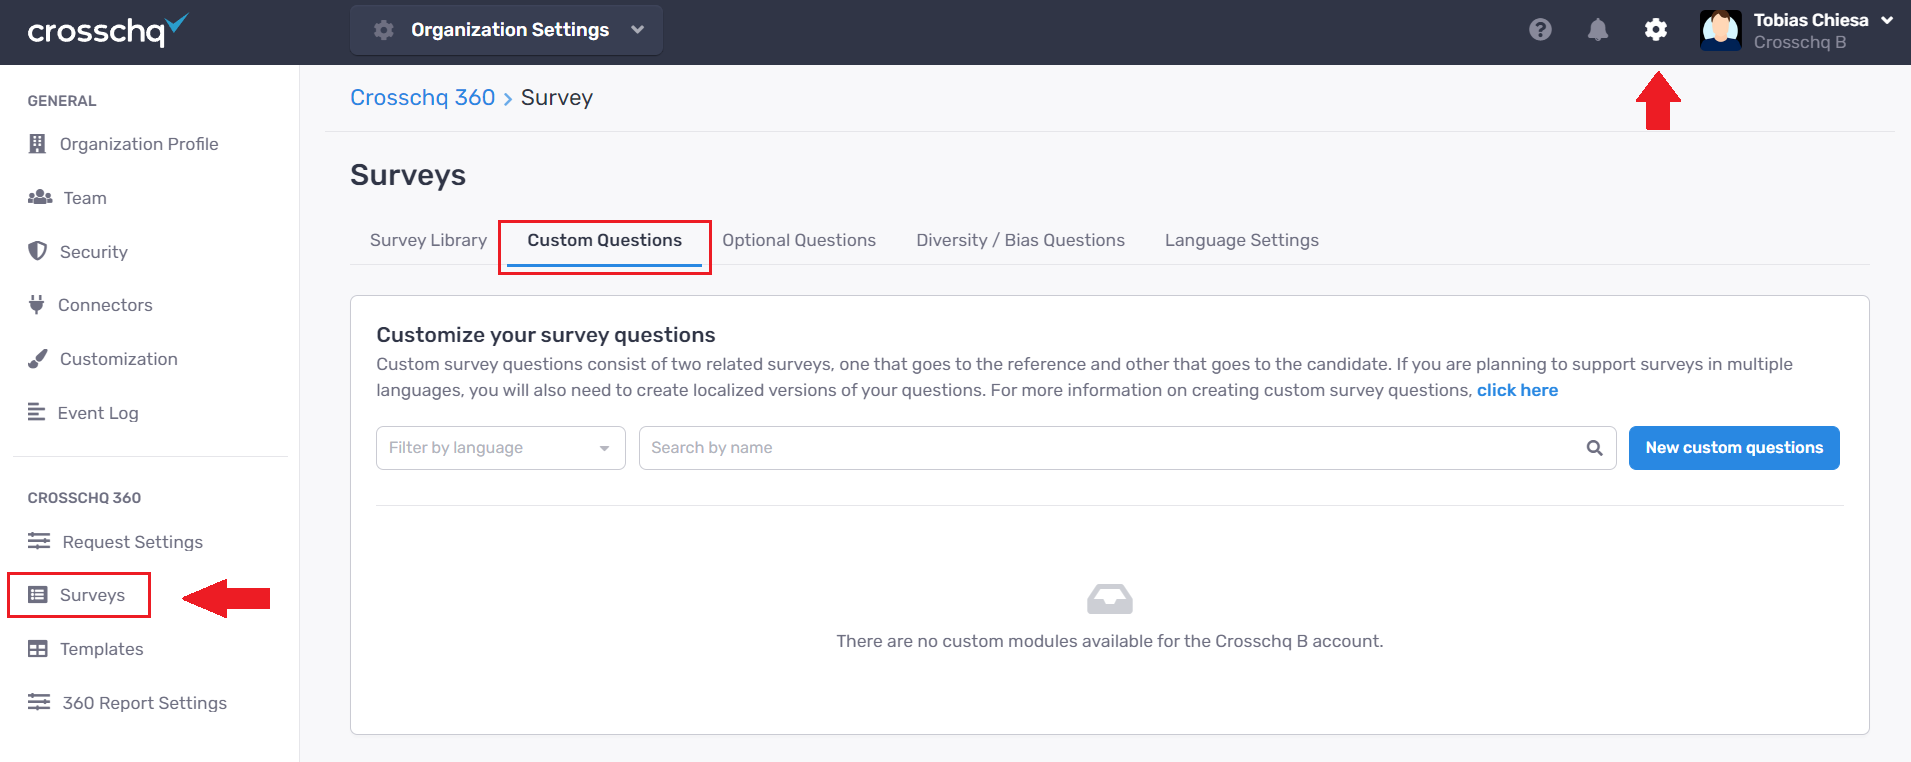
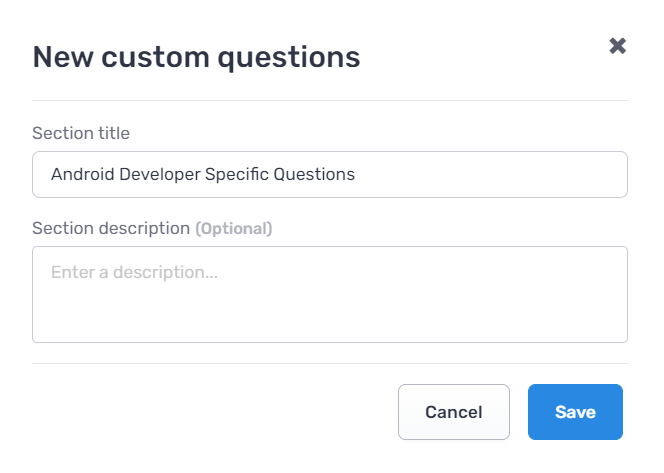
To get started, select the New custom questions. Then add a Title and a Description for this section.
Note that both the title and description are external values. These will be displayed in references and candidate surveys.
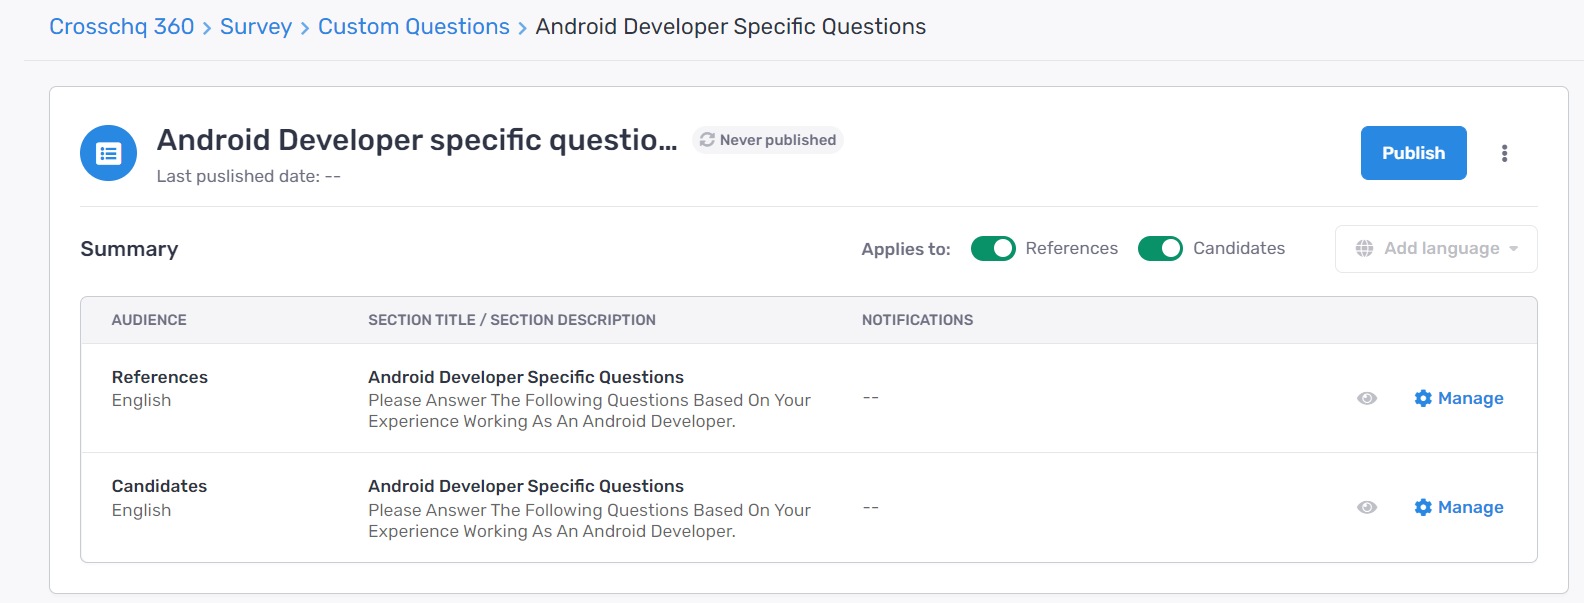
Once you click save you will be redirected to the module management section.
Survey Editor
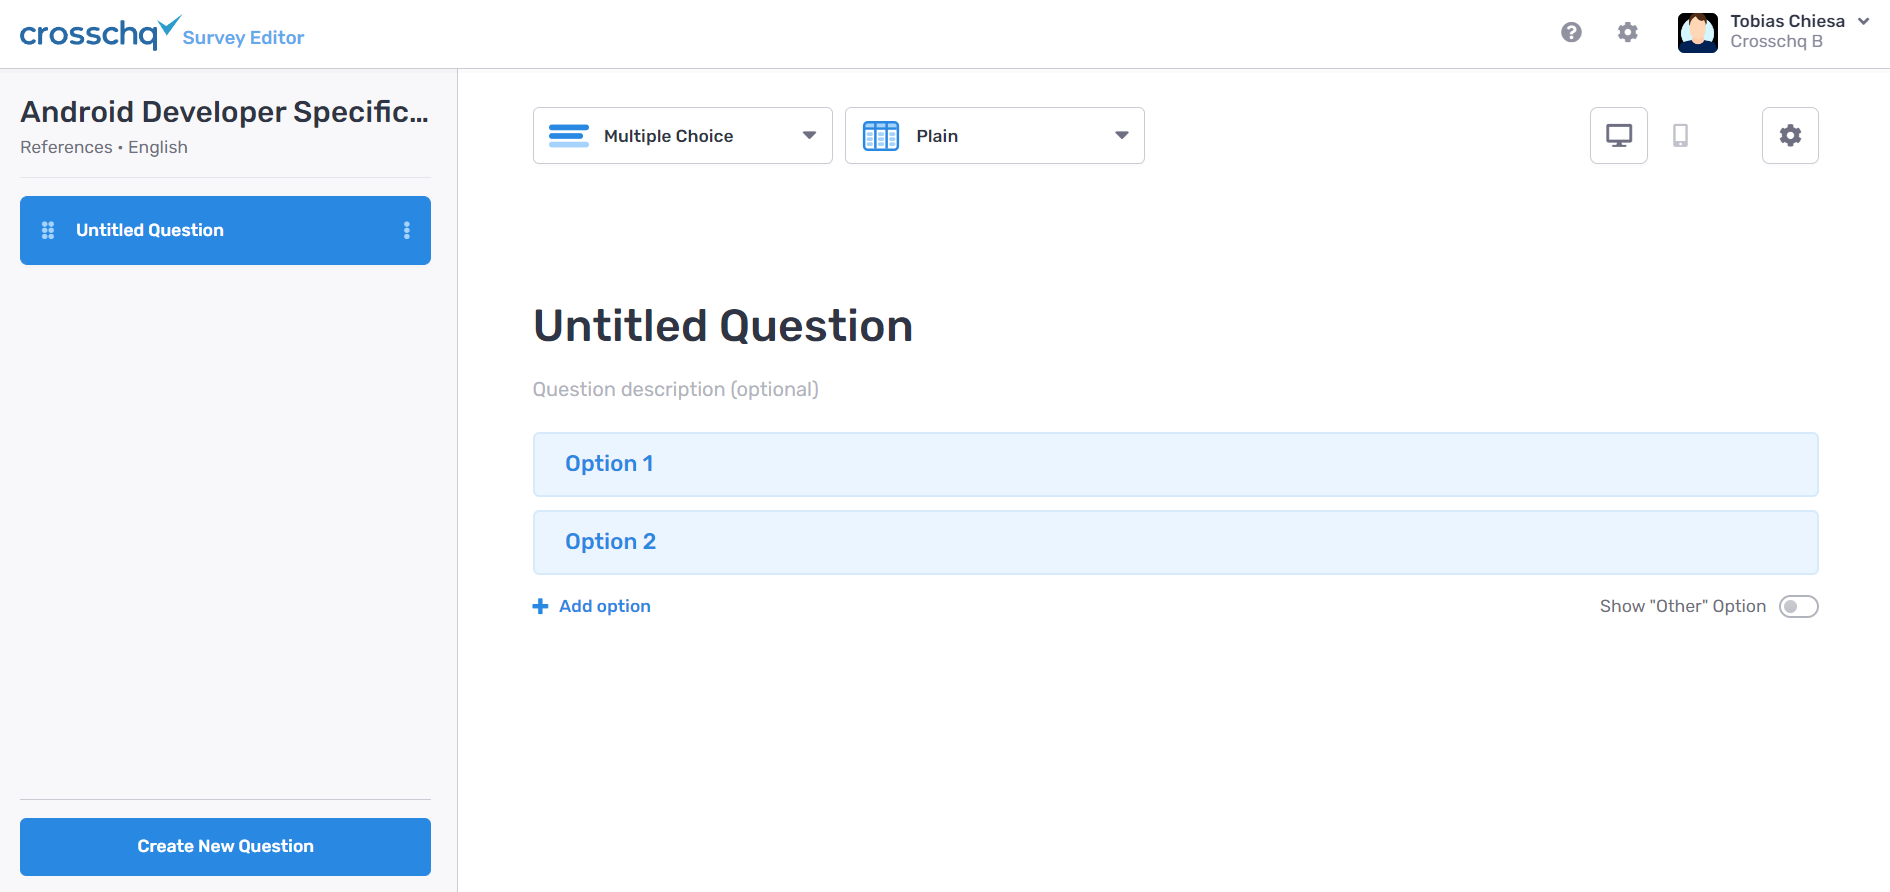
Click Manage to start creating your Custom Questions. You will be redirected to the survey editor.

Using Custom Fields
If you decide to use Custom Fields in order to refer to specific attributes you will need to do the following:
Type the { bracket so the custom fields appear. Use the drop-down to select the desired custom field.
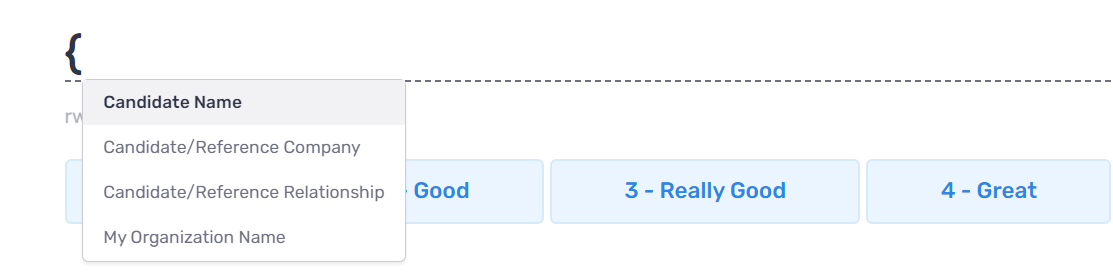
Crosschq supports the following Custom Fields:
- Candidate name: it's the name of the candidate;
- Candidate/Reference Company: it's the company in which the candidate and reference worked together;
*Note: Crosschq only asks for Managers, Direct reports, and coworkers/peers' company, so be careful while using this custom field on questions targeting other relationships such as mentors, and customers/suppliers. Read the Question Settings section to learn how to disable a question for a specific relationship type. - Candidate/Reference Relationship: it's the relationship between the candidate and the reference (Manager, Direct Report, Coworker/Peer, Customer/Supplier, Mentor);
- My Organization Name: it's the name of the organization that is requesting references.
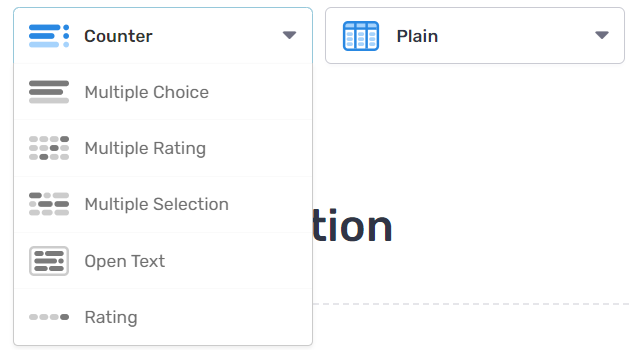
1. Question type and report visualization
Start by using the drop-down menus at the top to select the question type and the way you want this question to be displayed on the report.
You can select up to 6 different question types:
- Counter
- Multiple Choice
- Multiple Rating
- Multiple Selection
- Open Text
- Rating
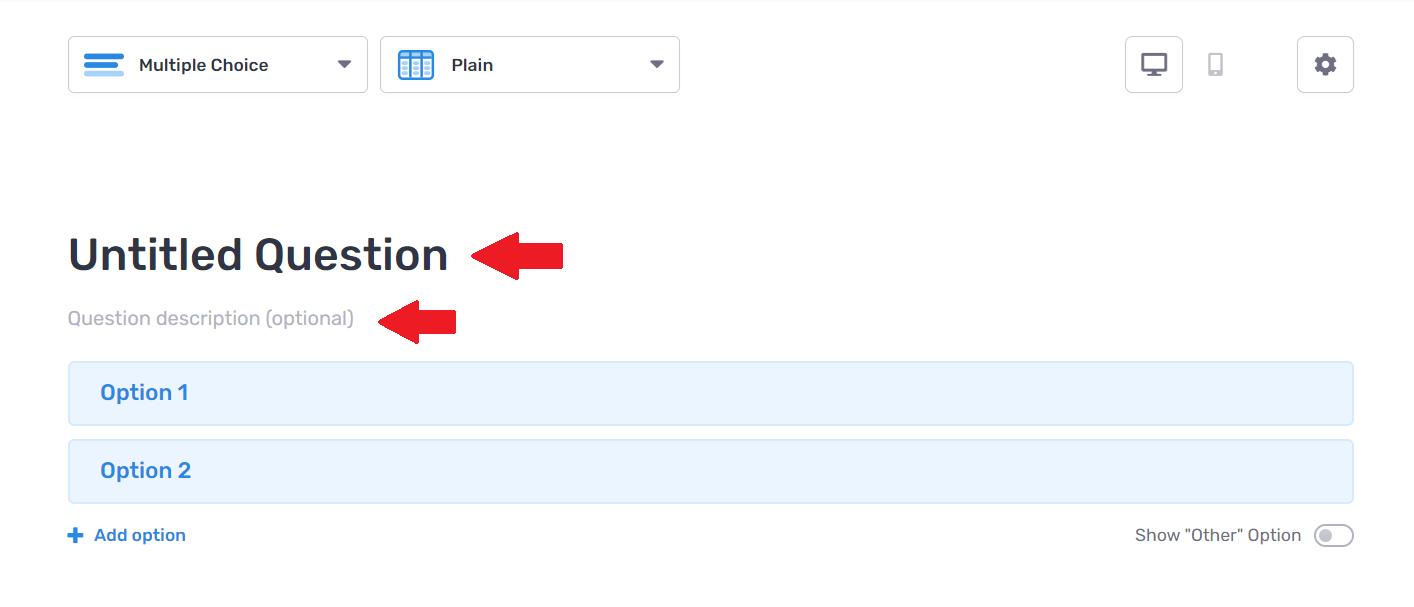
Type your question in the "Untitled Question" field and, if necessary, the description within the "Question Description (optional)" field.
Read the sections below to learn how to set up the questions and the report visualization for each question type.
Counter questions
Counter allows references/candidates to answer the question with a number.
Select add another row to add a new row to your question. You can delete an option by hovering over the option and clicking the trash can icon. Watch the video below.
Plain visualization
Multiple Choice Questions
Multiple Choice allows references/candidates to select only one option.
Select add option to add optional answers to your question. You can activate the "other" option by clicking the toggle switch.
You can delete an option by hovering over it and clicking on the trash can icon, and you can also change the order of the options by dragging them. Watch the video below.
Plain visualization
Half Pipe Graph visualization
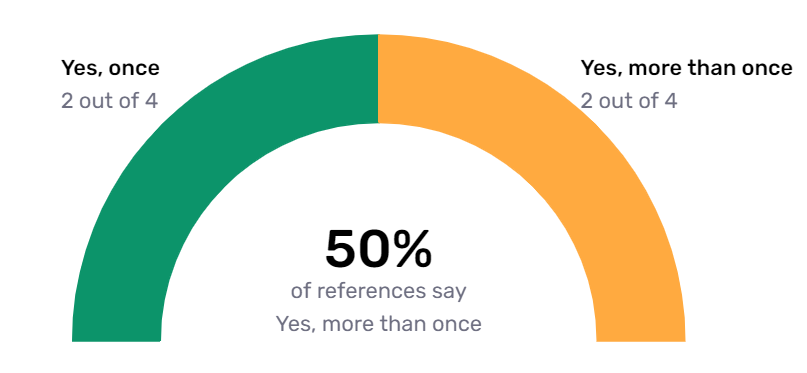
Table with bar chart visualization
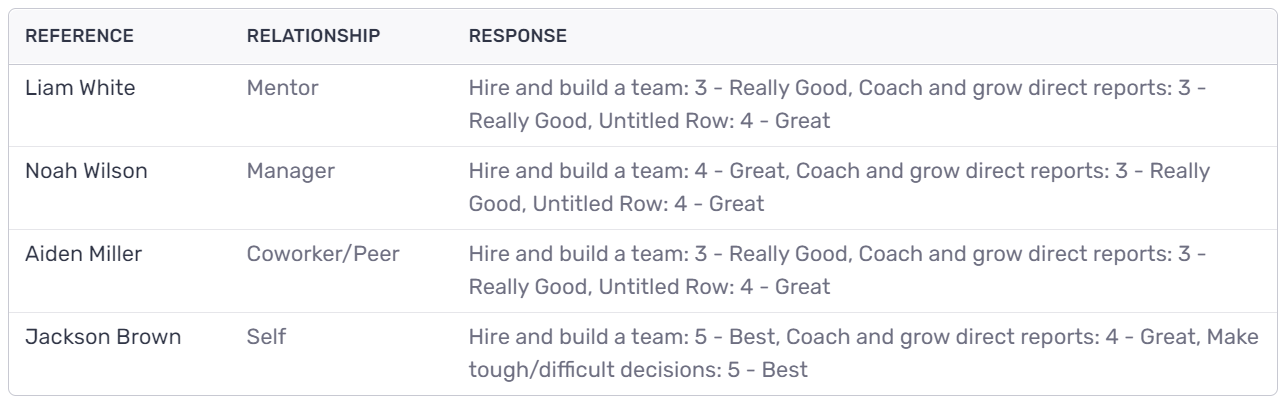
Multiple Rating Questions
Multiple Rating allows references/candidates to rank different options on a 1-5 scale.
Select the untitled row field to type your new option.
Select add option to add a new row with a new 1-5 scale. You can activate the "I don't know" option by clicking the toggle switch.
You can delete an option by hovering over the option and clicking the trash can icon. Watch the video below.
Plain visualization
Versus visualization

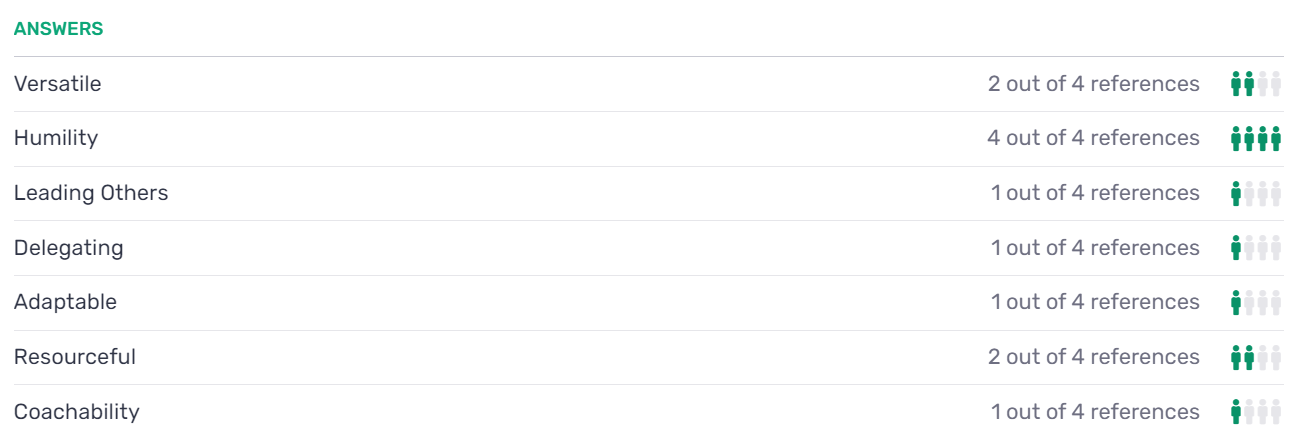
Multiple Selection Questions
Multiple Selection allows references/candidates to select up to three different options.
Select add option and a blue square will be added. Click the text inside that square and type your option. You can activate the "none" and "Other" options by clicking the toggle switch.
You can delete an option by hovering over it and clicking on the trash can icon, and you can also change the order of the options by dragging them. Watch the video below.
Plain visualization
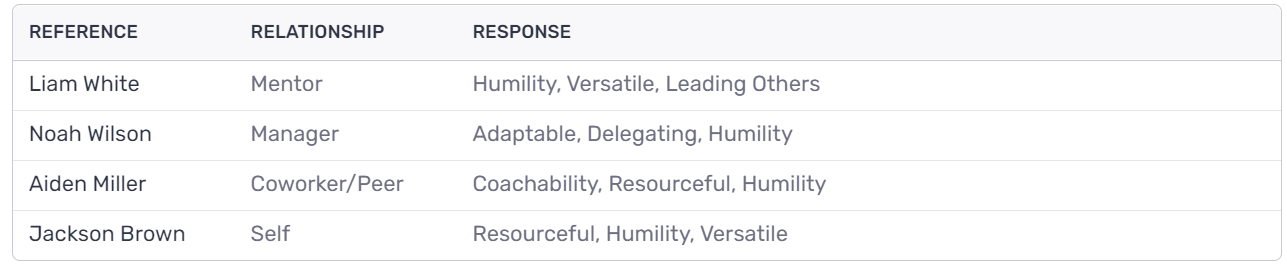
Body Counter visualization
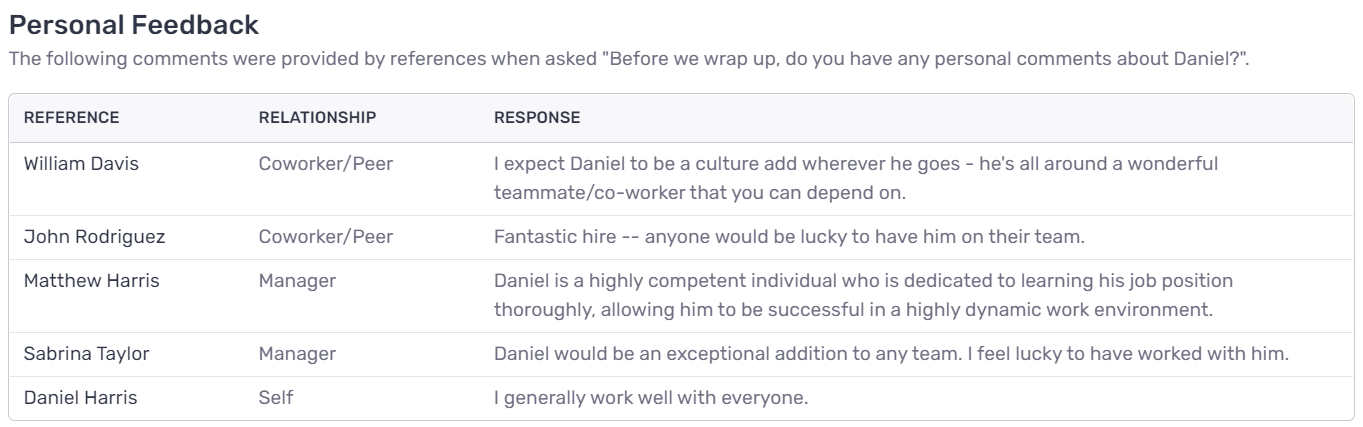
Open Text Questions
Open Text questions allow references/candidates to answer questions with no character limit.
Plain visualization
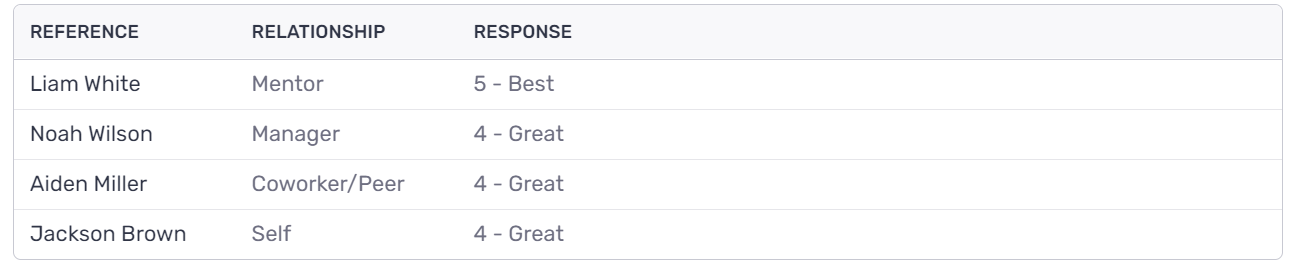
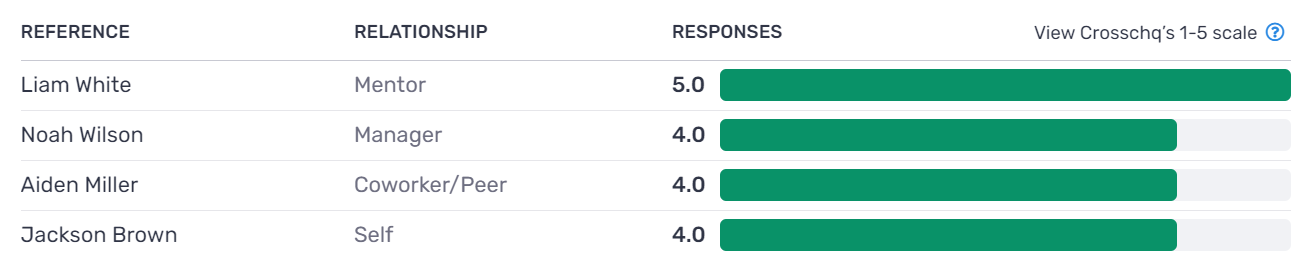
Rating Questions
Rating questions allow references/candidates to rank the question on a 1-5 scale. If you wish to add more than one row to the same question, please review the Multiple Rating questions above.
You can activate the "I don't know" option by clicking the toggle switch.
Plain visualization
Averages visualization
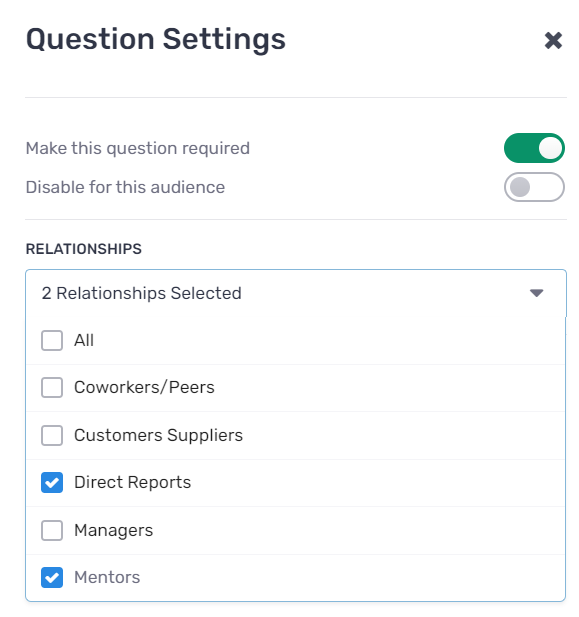
2. Question Settings
Select the settings wheel to access the question settings.
There, you will be able to:
- Make the question required by clicking the toggle switch. *Note that all questions are required by default
- Disable for this audience - this option will disable the question for the references or candidates depending on what survey are you editing. For instance, if there is a question that you want the references to respond to but not the candidate, you can access the candidate survey editor and activate the toggle switch. This way the question will show up for references only.
- Relationship - You can define when you want a question to show up based on the relationship type. For instance, if you request 2 direct report references, 1 mentor, and 1 peer, and there is a question that you want to show up for direct reports and mentors only, you can check the specific boxes for direct report and mentors so the peer will not respond to that question.
3. Desktop and mobile visualization
You can switch between Desktop and Mobile visualization to preview what the question will look like. Click the desktop or mobile icon to change visualizations.

4. Create a new question and edit the question order
You can create a new question by clicking the Create New Question button at the bottom of the screen.
If you want to delete a question, locate the question, click the three dots, and select delete.

You can also change the order of your questions by grabbing and moving them to the appropriate place.
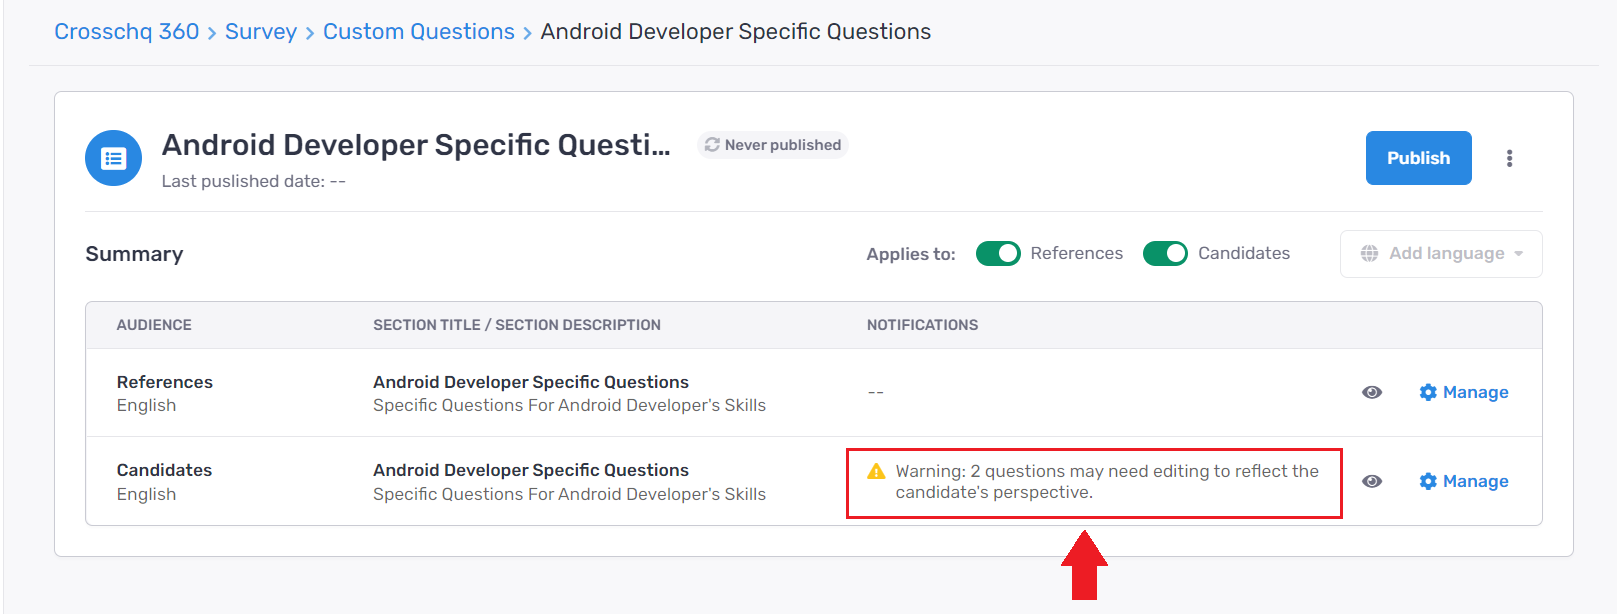
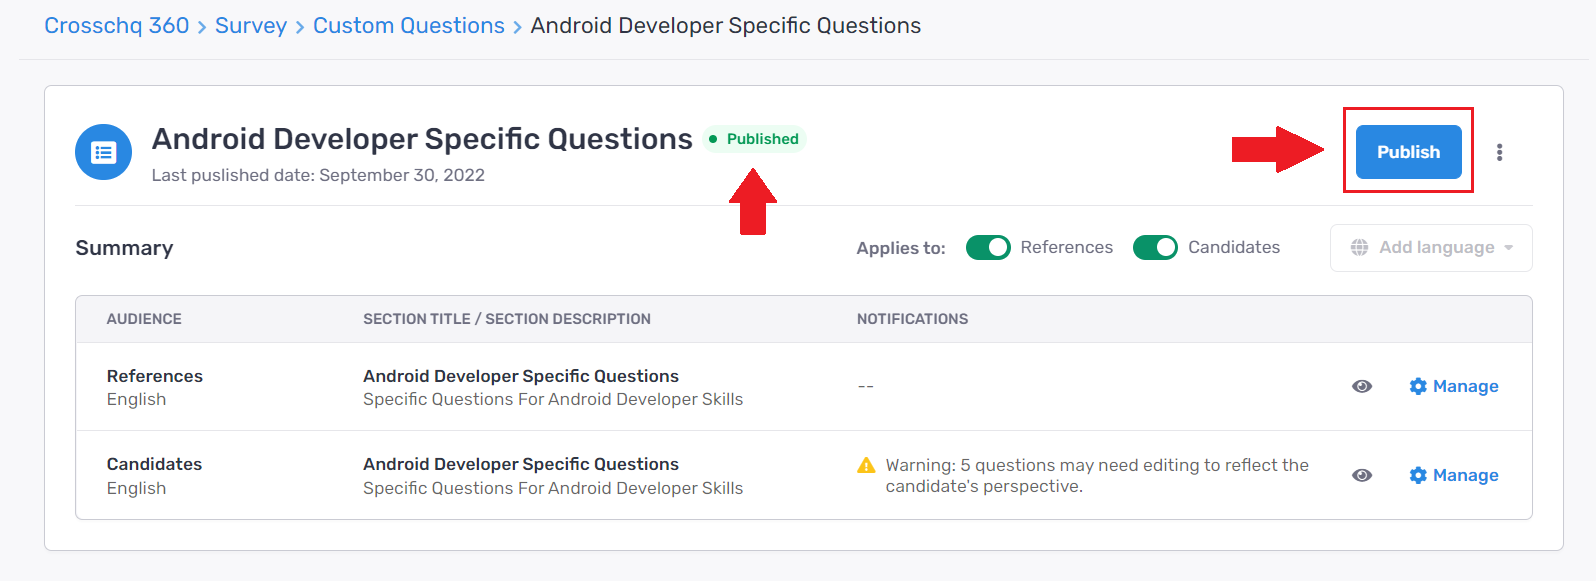
Publishing Custom Questions
Every question you add to the reference surveys will be replicated in the self-reference survey. In this case, you will see the following alert to ensure you edit appropriately so your questions are directed to the right audience.
"Warning: X questions may need editing to reflect the candidate's perspective."
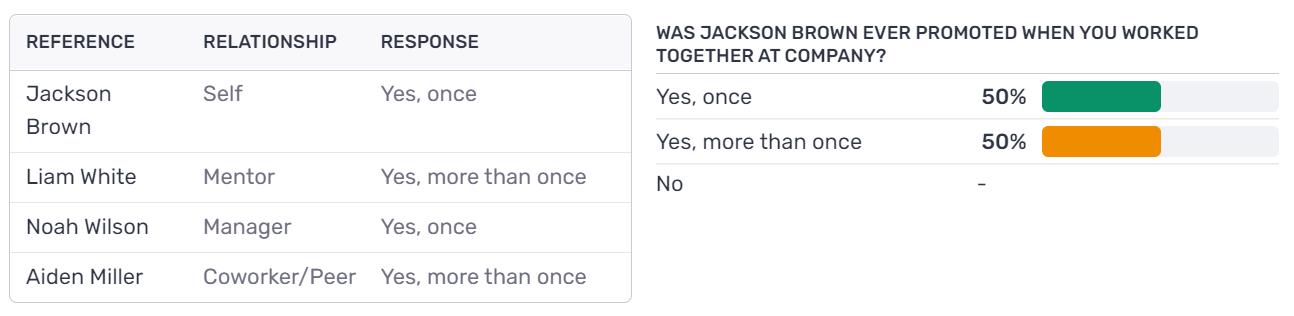
You may need to modify questions that were intended only for references, for example:
"Was {candidate} ever promoted when you worked together at {company}?" should be replaced with "Were you promoted when you worked at your last job?".
Access the survey editor to edit these questions. Repeated questions will be marked with a yellow warning triangle. Watch the video below:
Description Section
You can edit the section description for both the reference and self-surveys.
To do this, hover over the description so the Edit word appears and click on it. Remember that descriptions are external values; candidates and references will see the title and description of these sections.

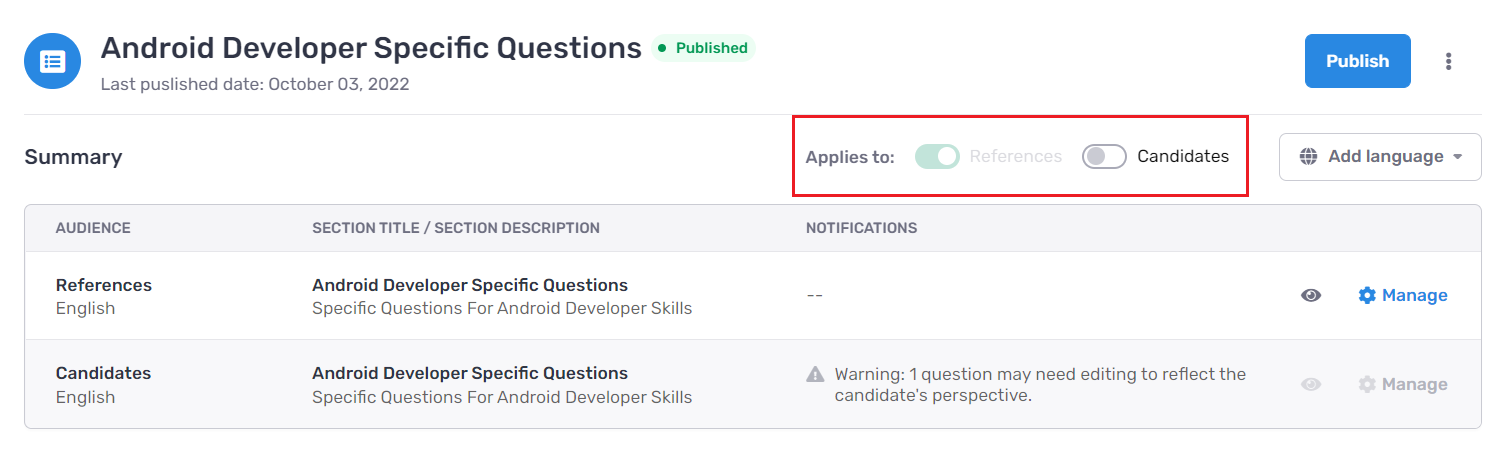
Apply custom questions for candidates or references only
If you want to create custom questions for references or candidates only, disable/enable the toggle switches. Disabled custom questions will be grayed out.
Publishing
Now that you finished setting up your questions for both candidates and references, you are ready to publish your custom questions. Once you close out of the custom module editor, and navigate back to the main custom modules screen you can publish your questions.
Click the Publish button to save and publish your Custom Questions. A green status will appear.
Change module's survey location
Crosschq allows you to modify the order in which Custom Questions are displayed for candidates and references.
To do this, select the three dots to the right of the Publish button and click change module's survey location. Then drag the module to the desired position. Watch the video below.
Change module's 360 report location
Crosschq allows you to modify the order in which Custom Questions are displayed within the 360 reports.
To do this, select the three dots to the right of the Publish button and click change module's 360 report location. Then drag the module to the desired position. Watch the video below.
Assigning module to a job competency survey
Once your Custom Questions are published you must add them to a job competency survey.
To do this, access the Custom Questions section and select the assign module icon (you will find this icon along with the edit pencil and the three settings dots). Next, select the survey to which you want to add the custom questions by activating the toggle switch. Watch the video below.
Now your custom questions will be available for references and candidates.
Translations
If you are planning to support surveys in multiple languages, you will also need to create localized versions of your questions.
Once your module is assigned to a job competency survey, the new language can be configured. To do this, access the editing section of your module and select Add language. Two new rows will be added to the table. Click manage within the questions you want to translate and rewrite your questions. Watch the video below:
Note: you must first make sure that the languages you want to add to your custom modules are enabled within the Languages Settings.